Demonstrate directory navigation, creation, deletion at the
command line.
Demonstrate file creation, editing, saving at the command line.
Demonstrate compilation and execution at the command line.
Explain the difference between command-line vs. GUI for computerese.
Explain the difference between command-line vs. GUI for programs.
0.0 Audio:
0.0 Our first program
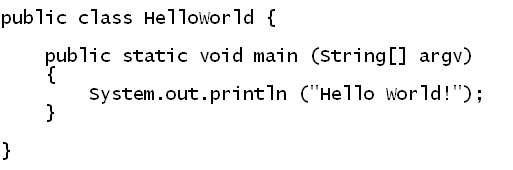
Let's take a look at our first program as it appears in a
textbook (like this one):
This is a program written in the Java programming language,
the language used for this unit and many others.
We will very soon (below) write this program ourselves.
There will be some differences when you write the program:
The entire program will appear inside of a text editor when
we write.
Then, we will do other things after writing (or editing,
as it's called): we'll compile and then execute.
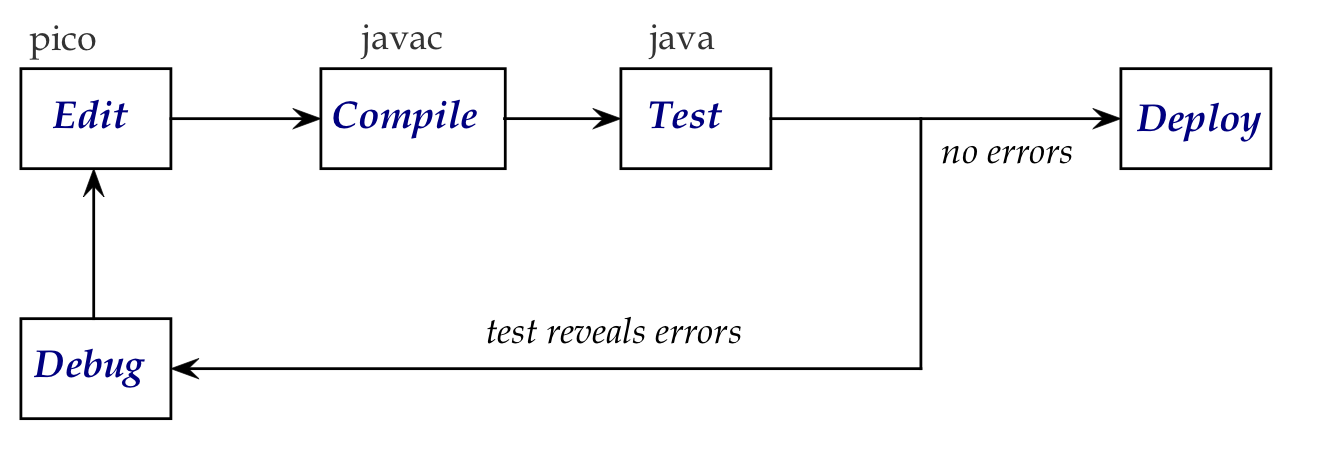
0.1 The Edit-Compile-Test process
The Edit-Compile-Test process (conceptually):
Editing is: typing in the text of a program, fixing syntax
errors (that we typed in ourselves).
Compiling is: using a compiler that (mysteriously) translates
our program into something the machine understands.
Testing is: commanding the machine to run (execute) our program.
Debugging is: detective work (finding and fixing errors).
We'll often say execute instead of the broader term
test, which implies execution for the sake of testing
something out in the program.
The ECT process as it will look on a typical Mac laptop (screenshots):
(Windows users: we recommend using Gitbash and following similar
steps)
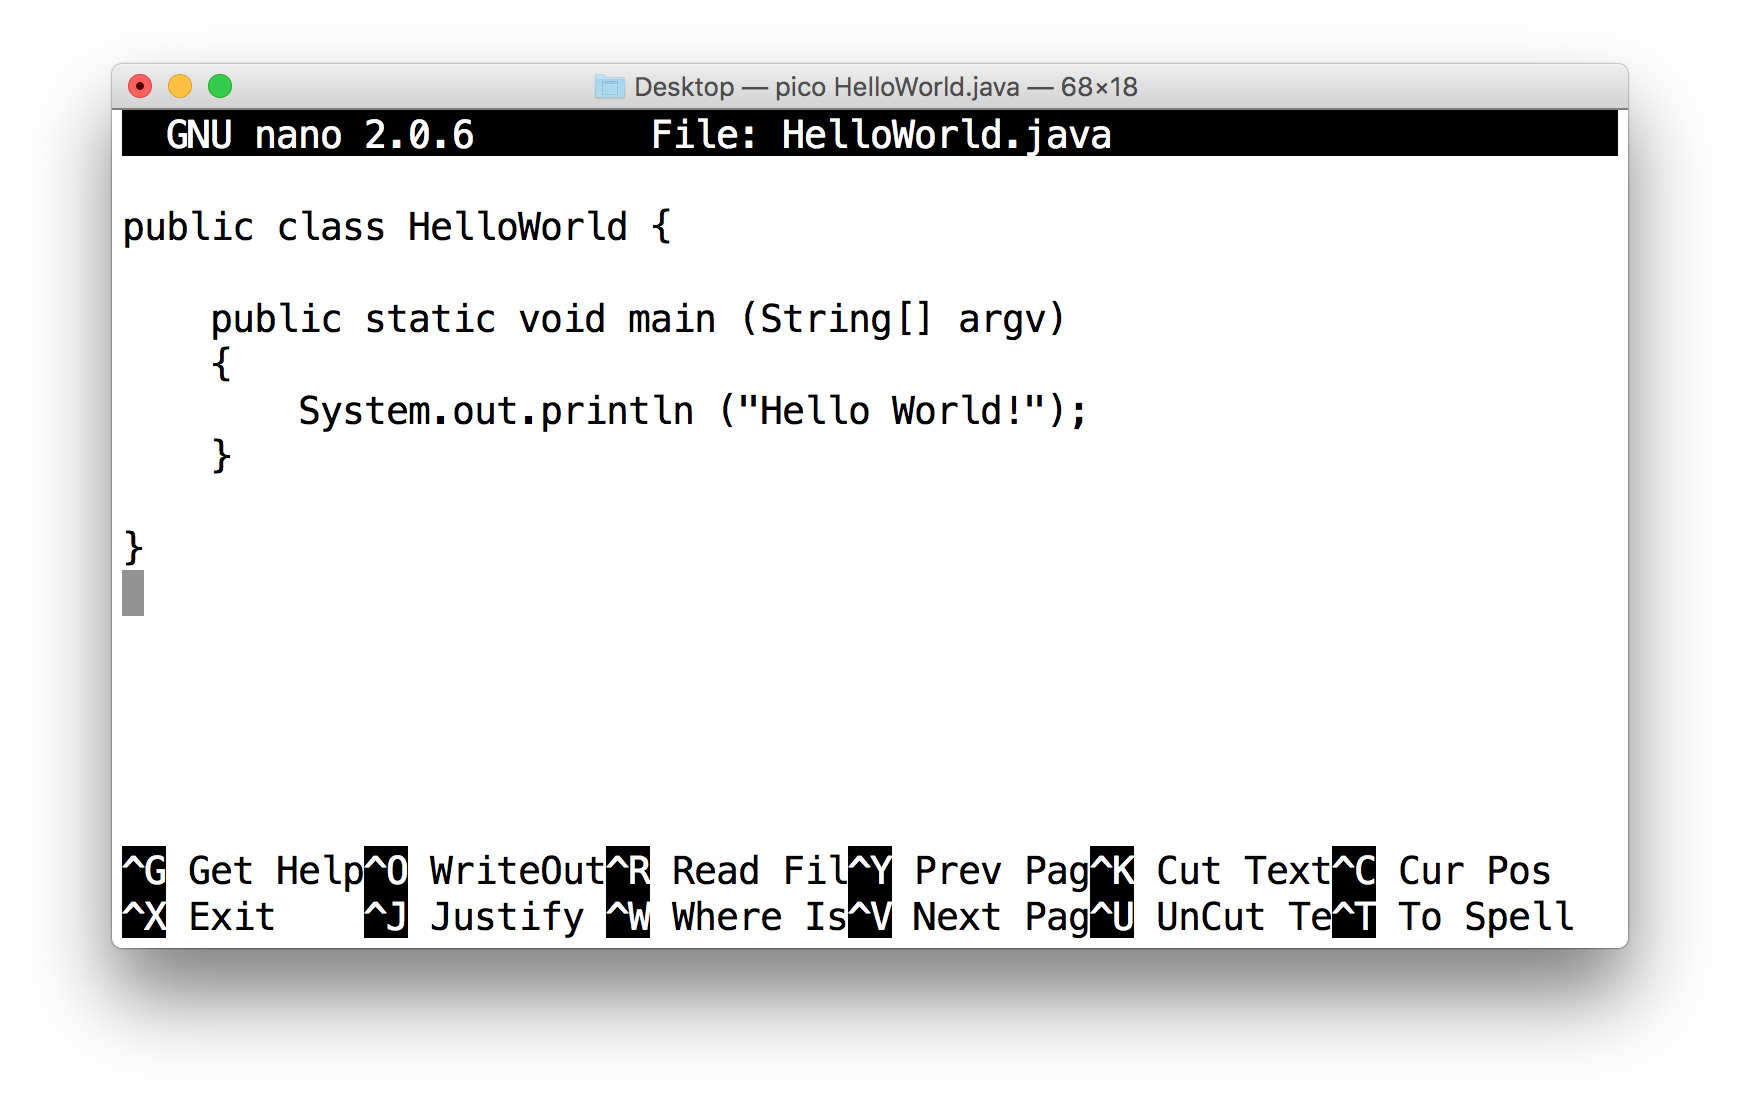
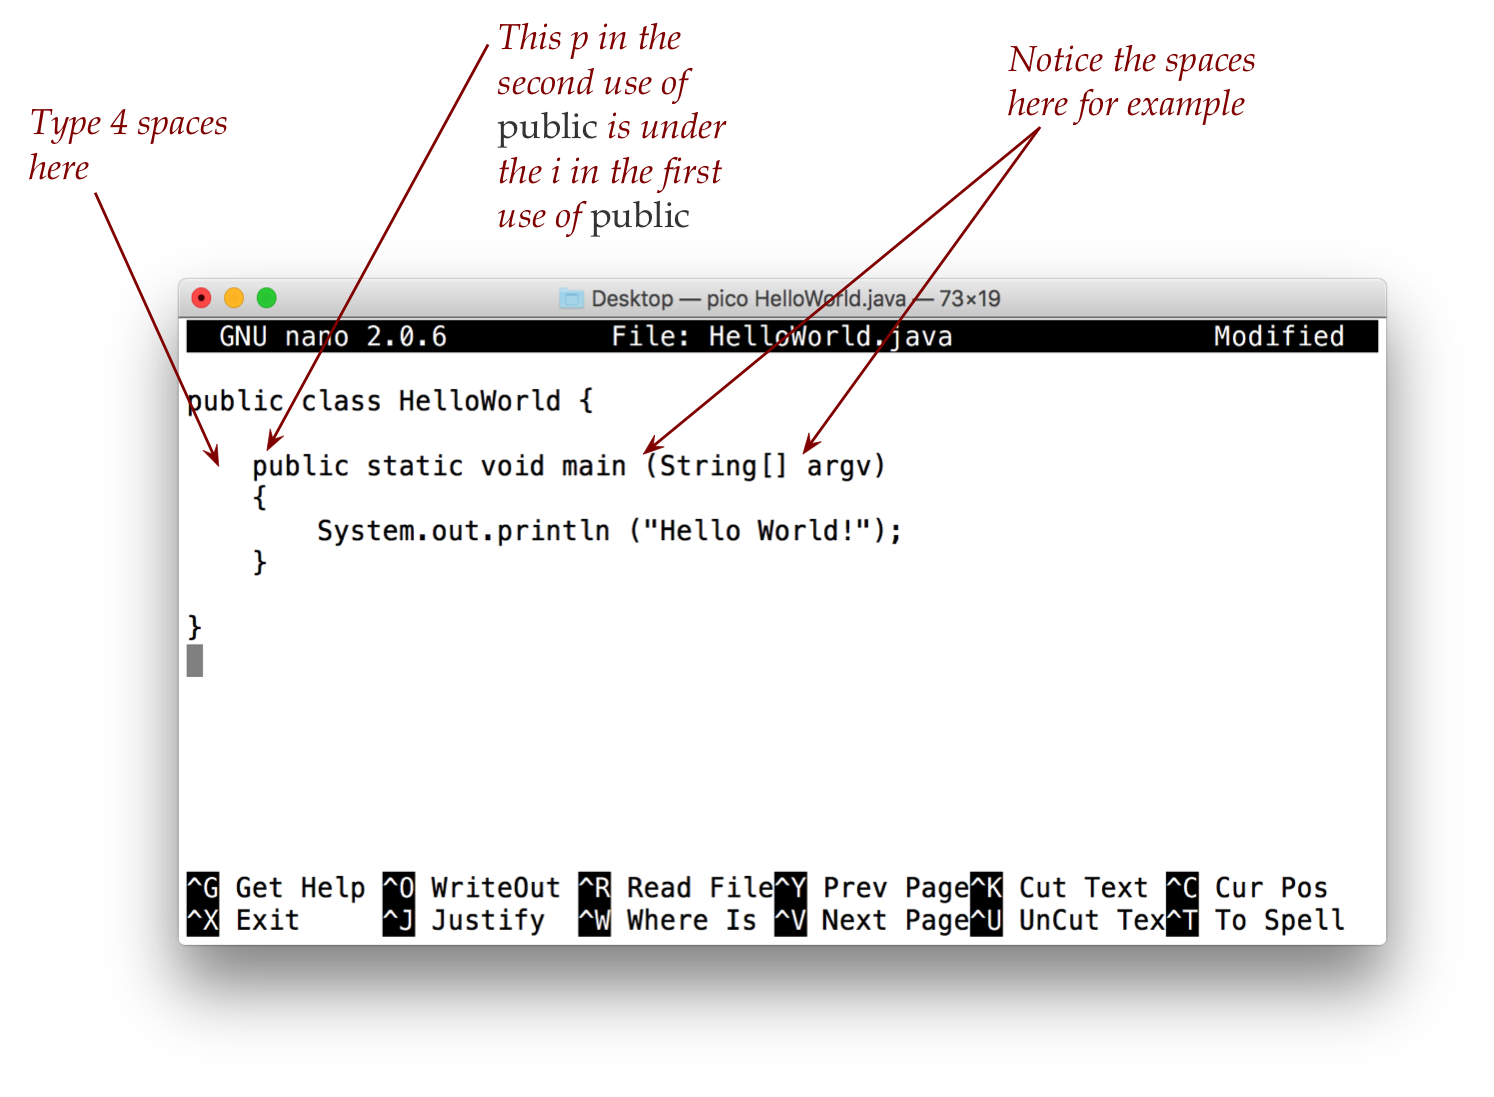
What editing looks like this in the pico editor:
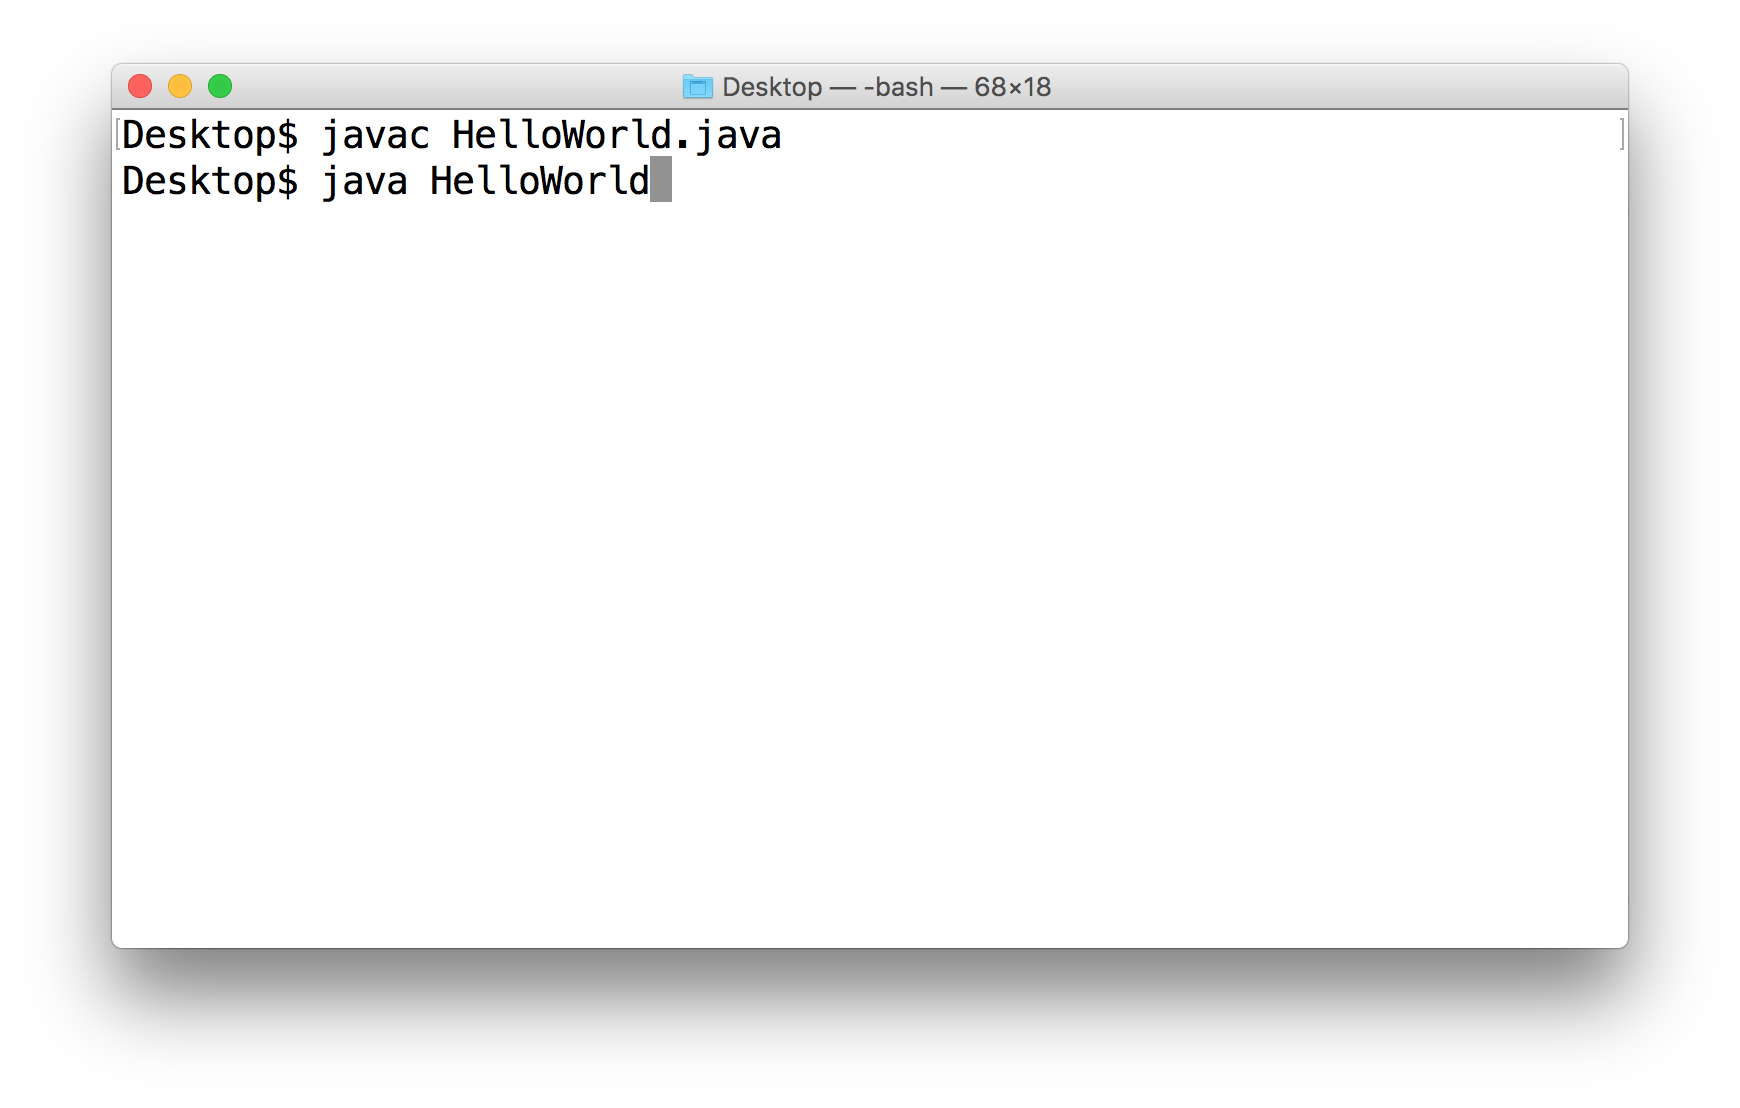
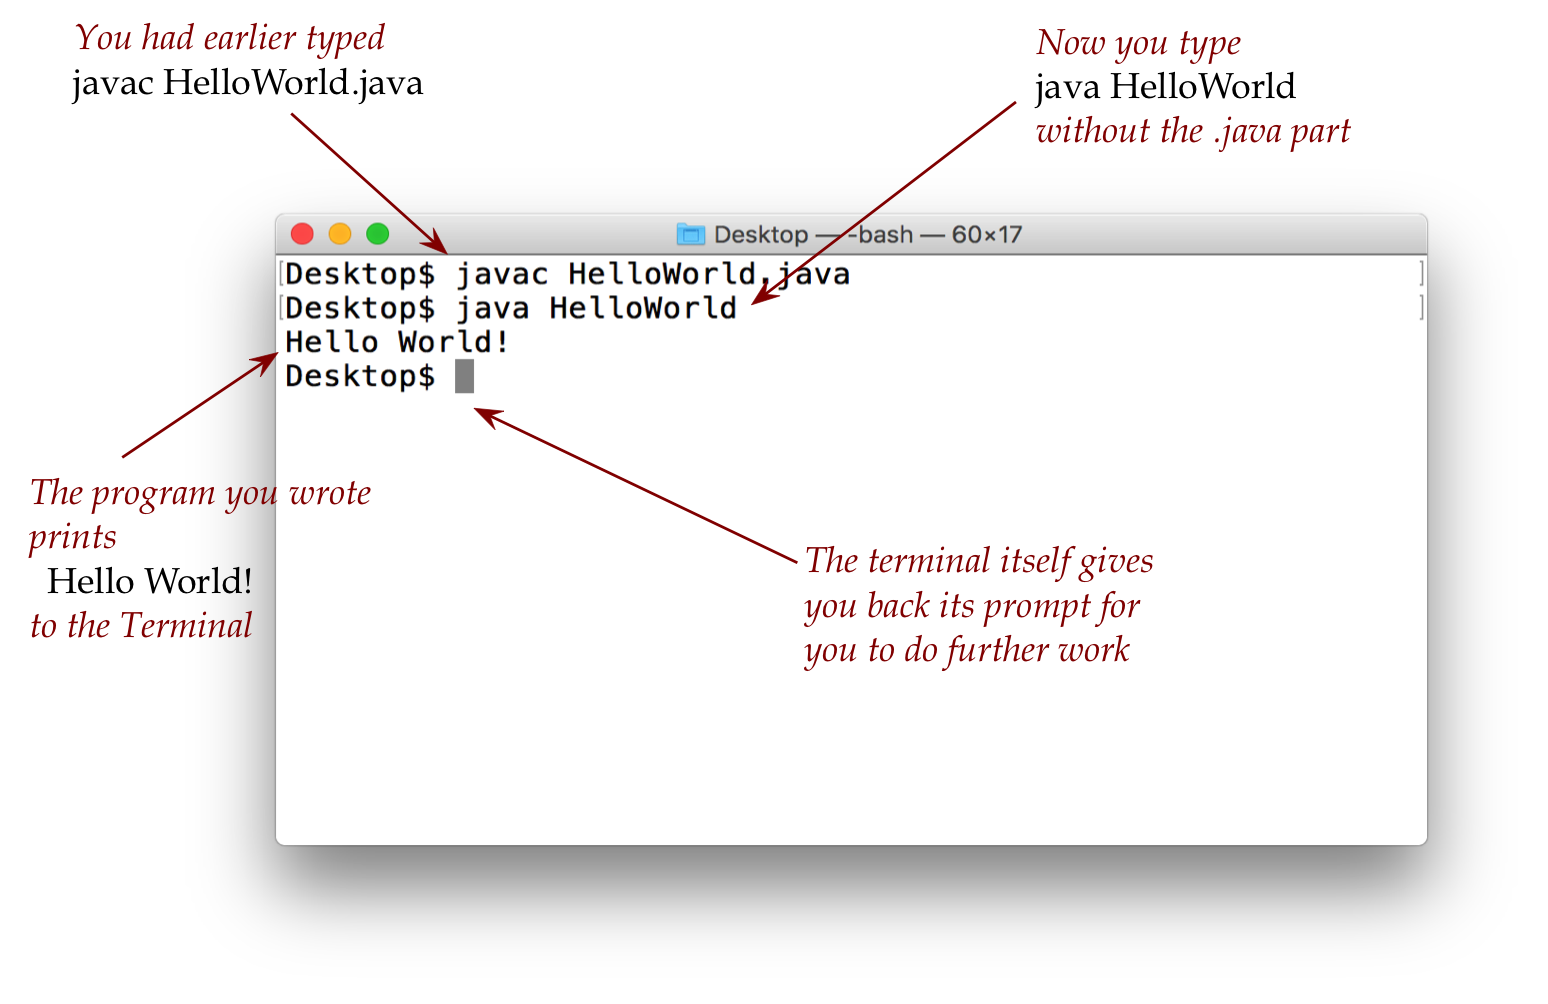
What compiling looks like on the Terminal:
(You type only the javac HelloWorld.java part. The Desktop$ part is written
by the Terminal and could look different on your laptop)
What execution looks like on the Terminal:
(Again, you type only the java HelloWorld part.)
Let's now follow these steps (Mac users):
(Windows users: a parallel set of instructions
can be found on the Gitbash page.)
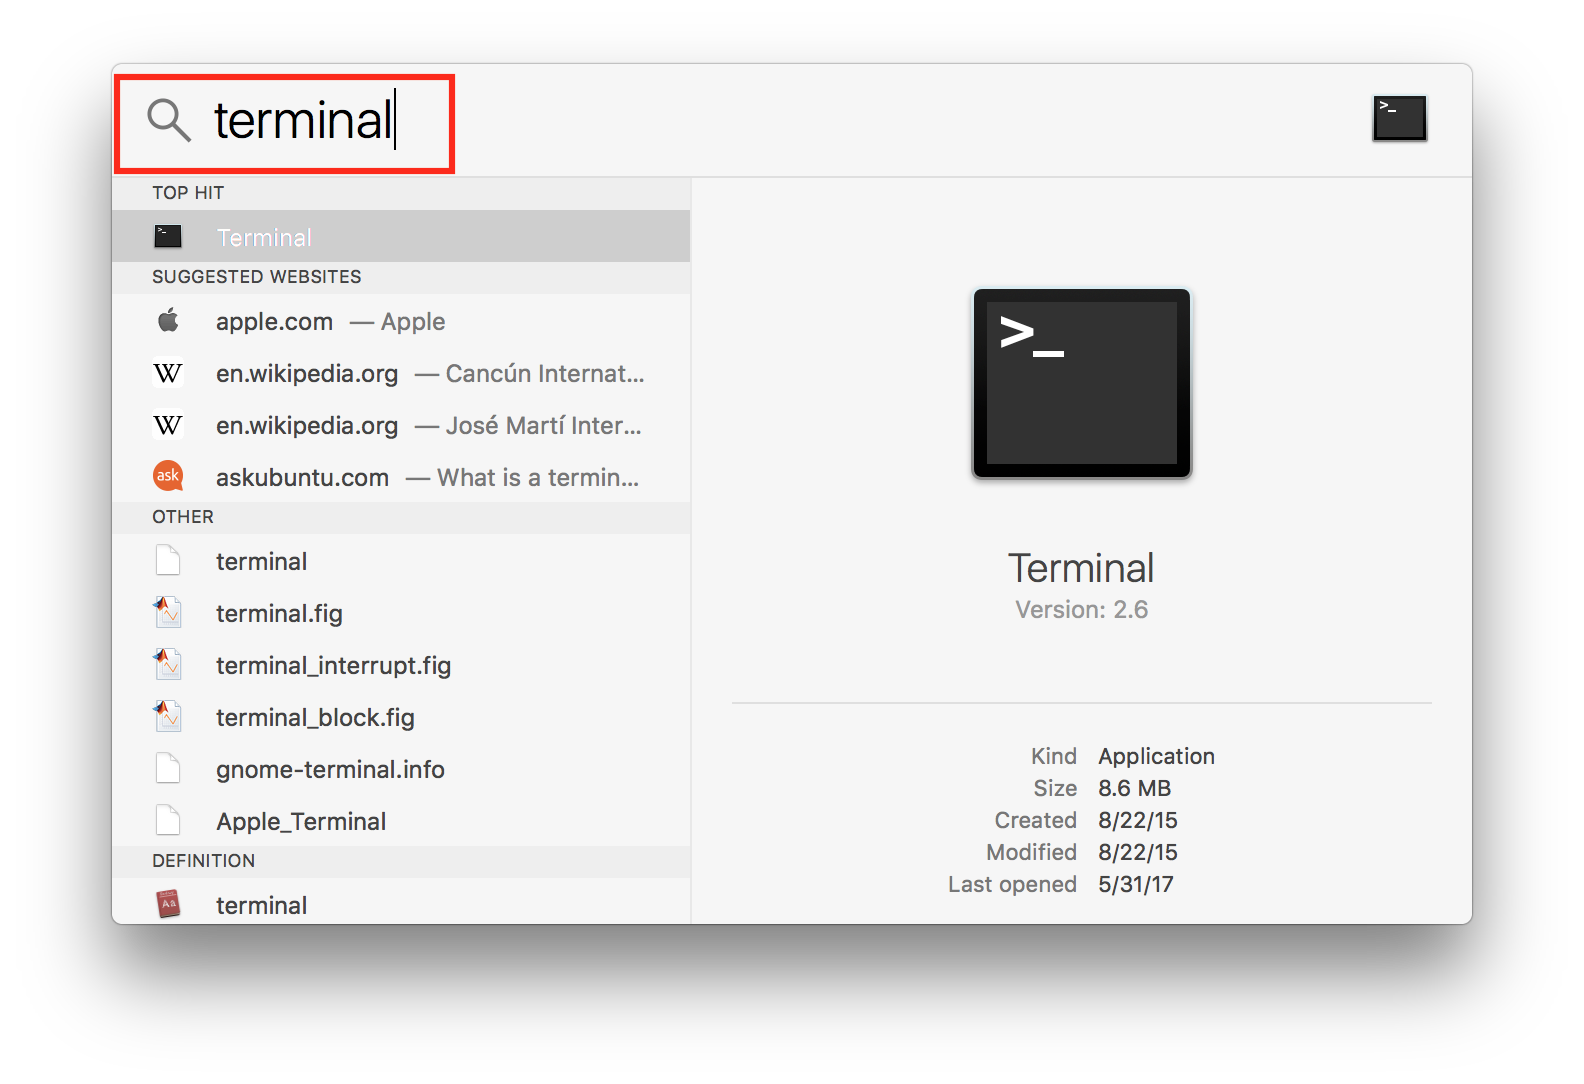
Step 1: launch a Terminal window by searching for
Terminal
after which you type "terminal"
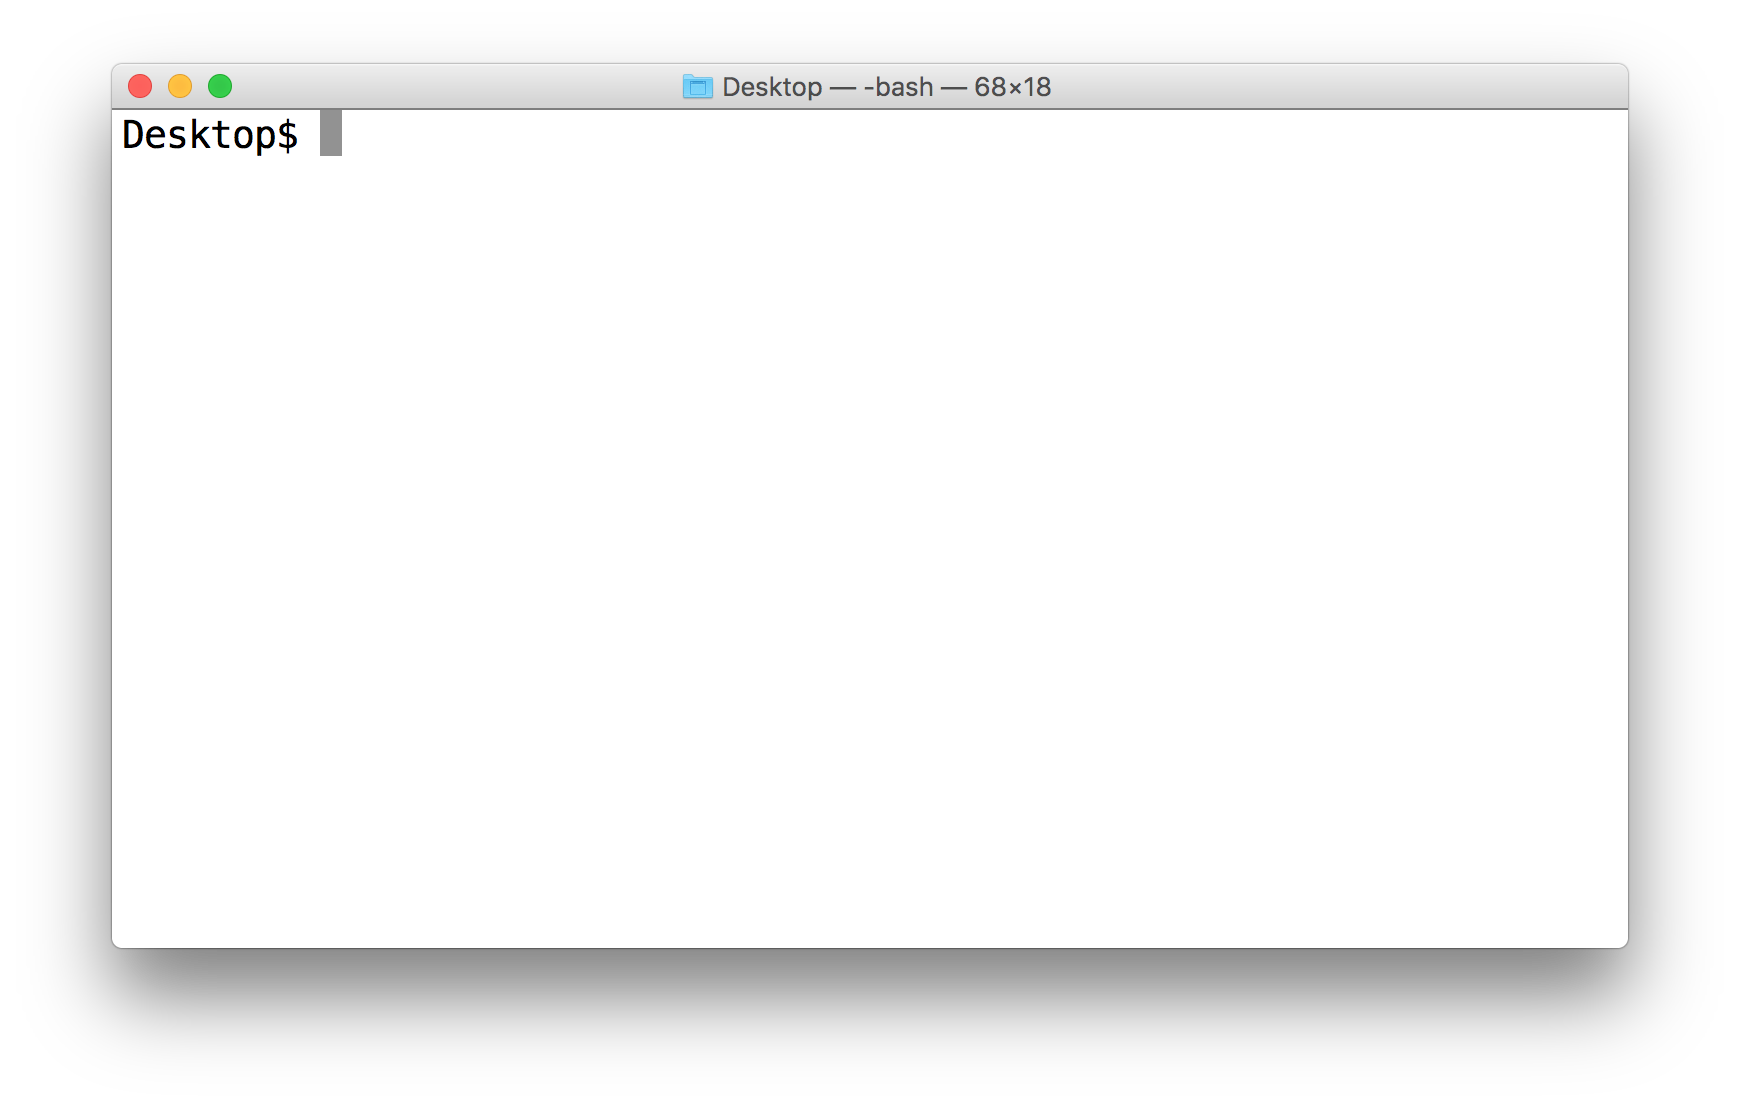
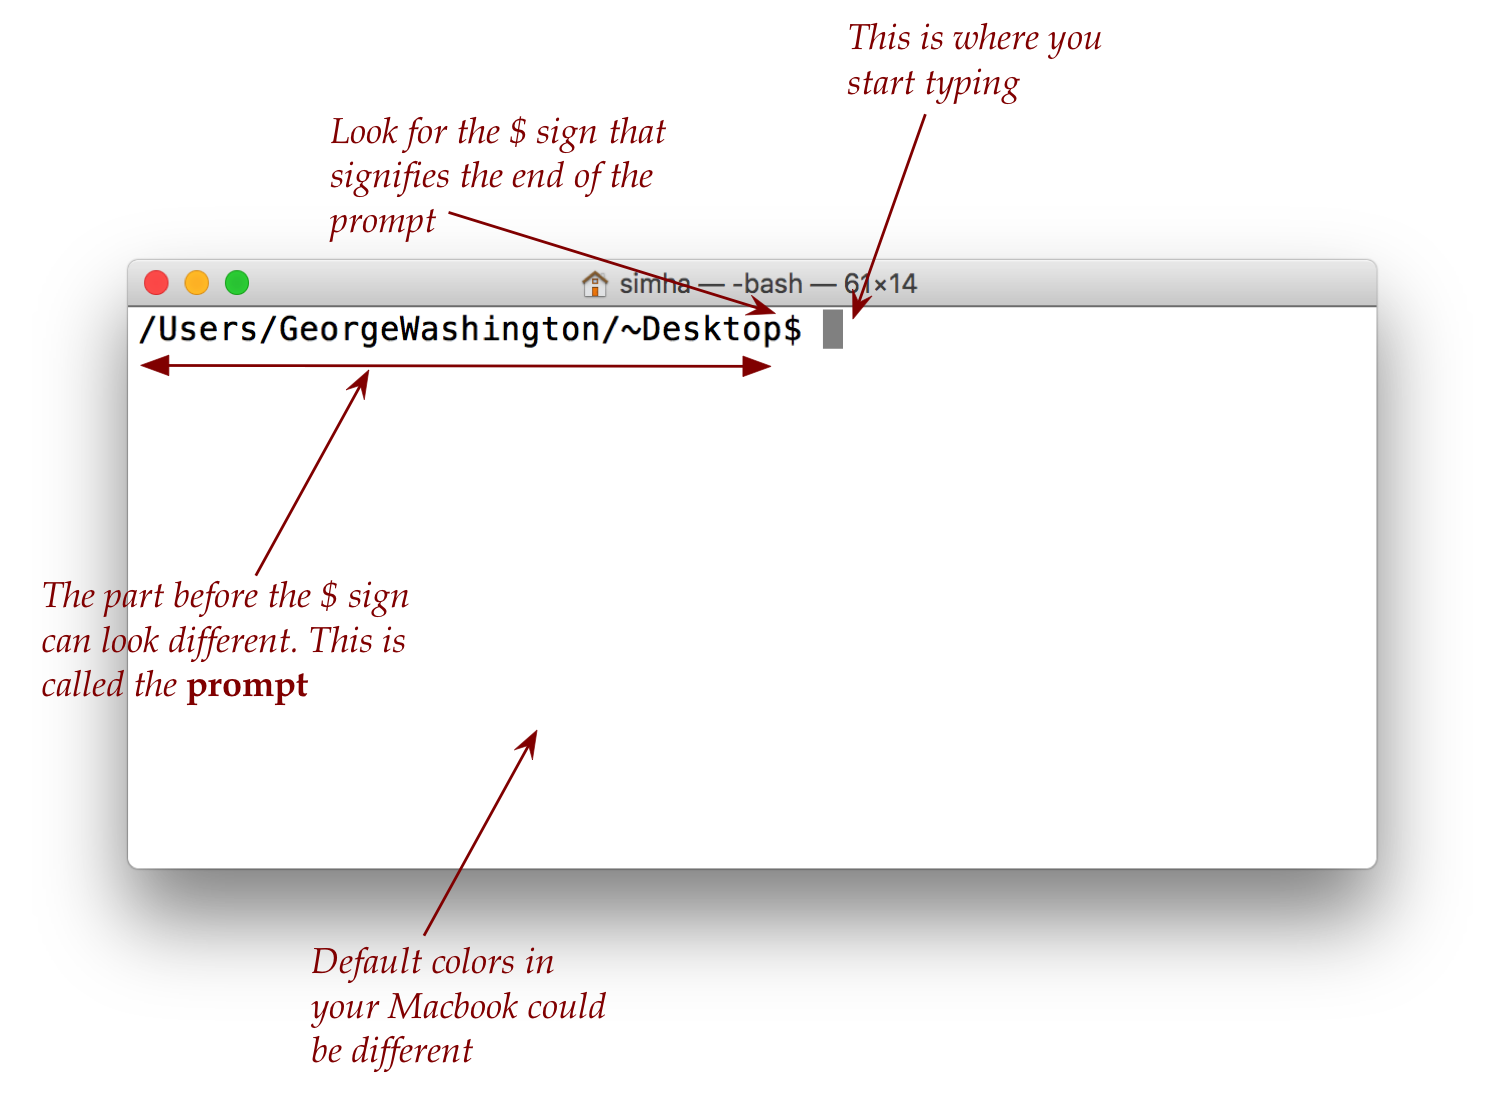
which should launch a Terminal window that looks something
like this (not exactly the same on every Mac):
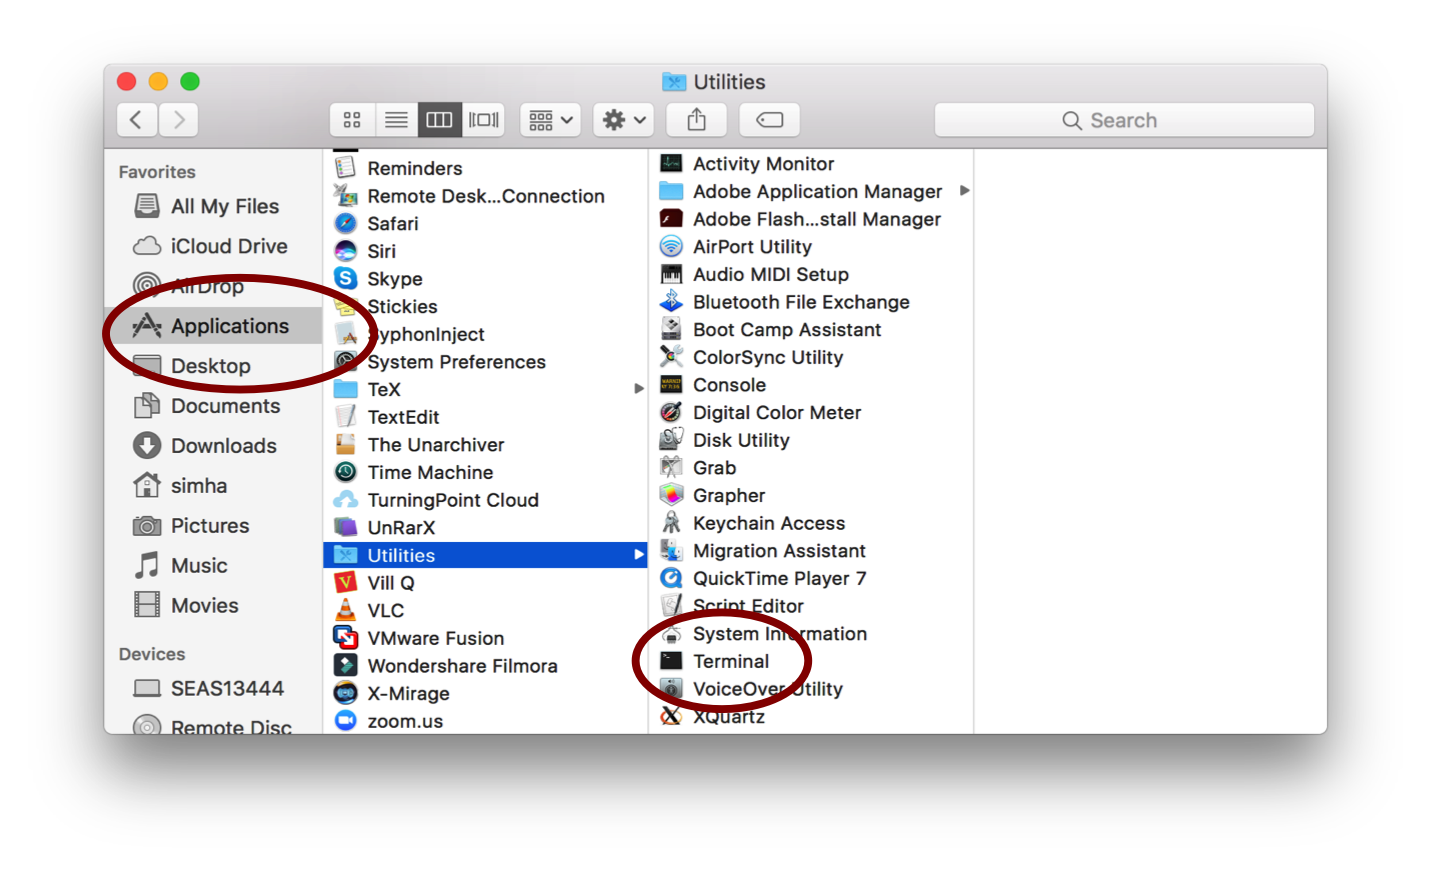
Note:
If the above approach
did not find the Terminal, you may need to open Finder,
then navigate to Applications, then to Utilities,
as shown here and double-click
on Terminal to launch it.
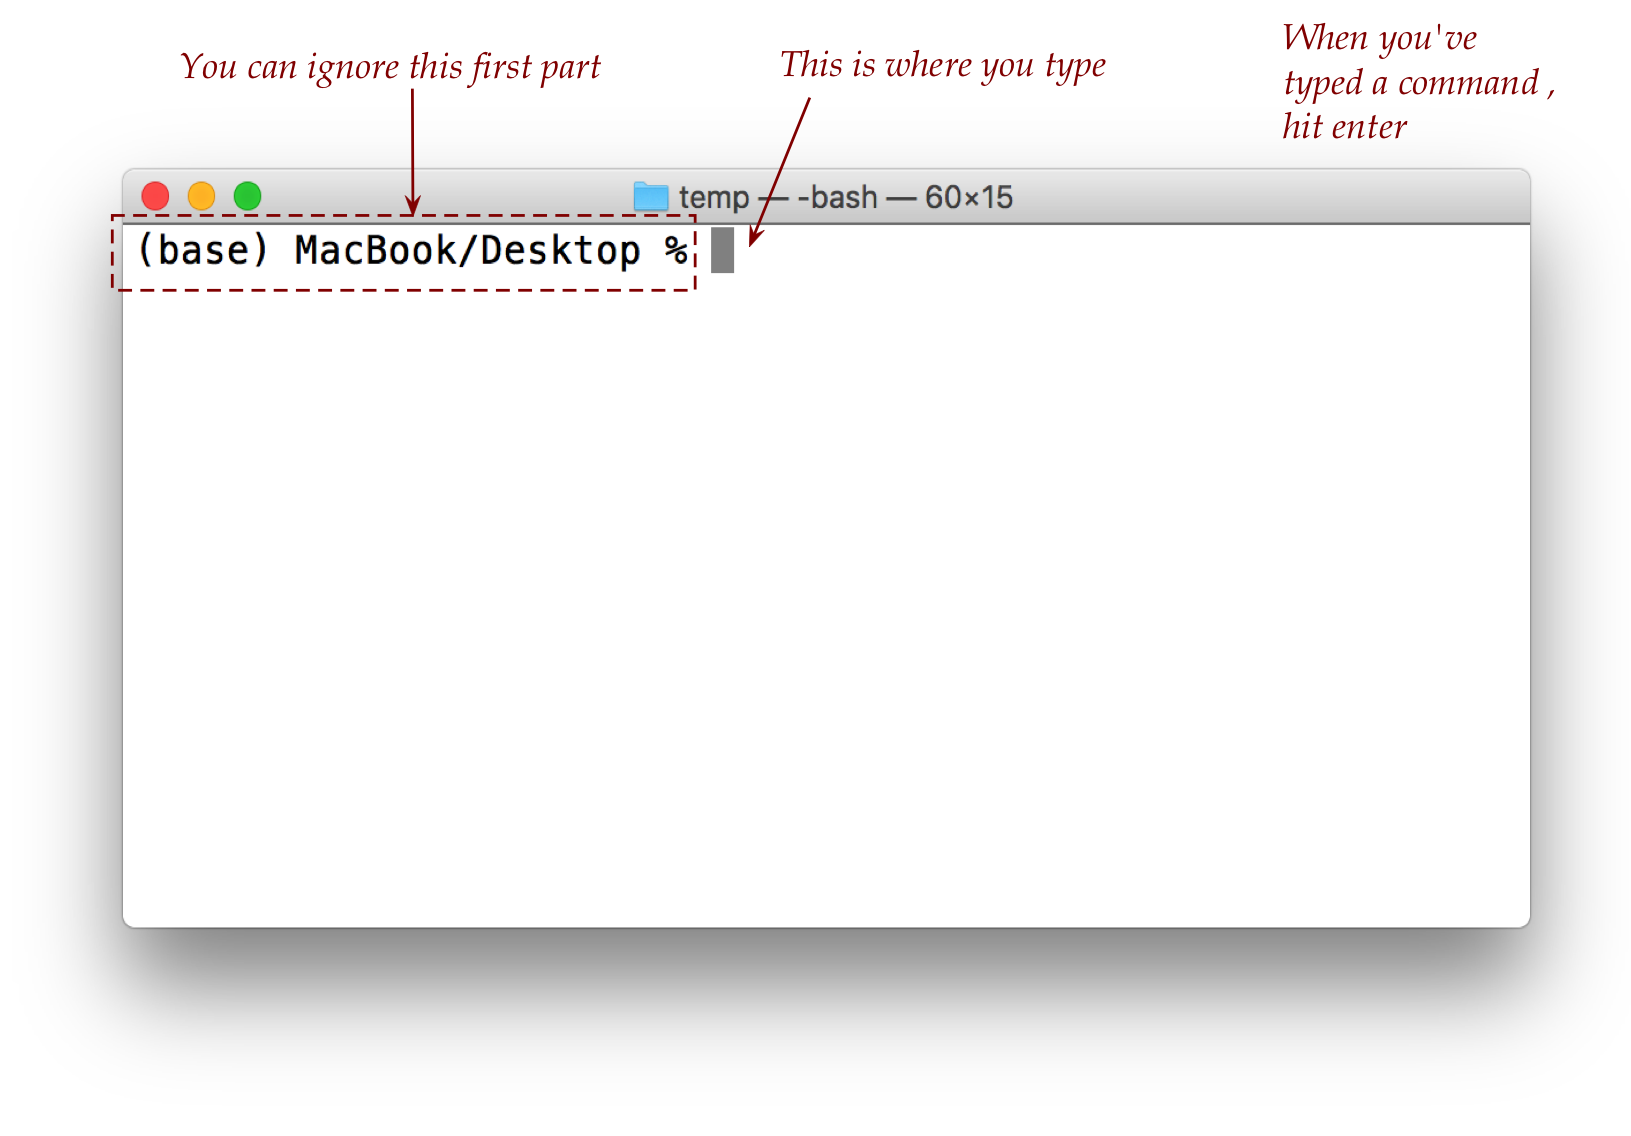
Your Terminal may look a little different, for example,
it may look like this
or like this,
or something else. That's OK.
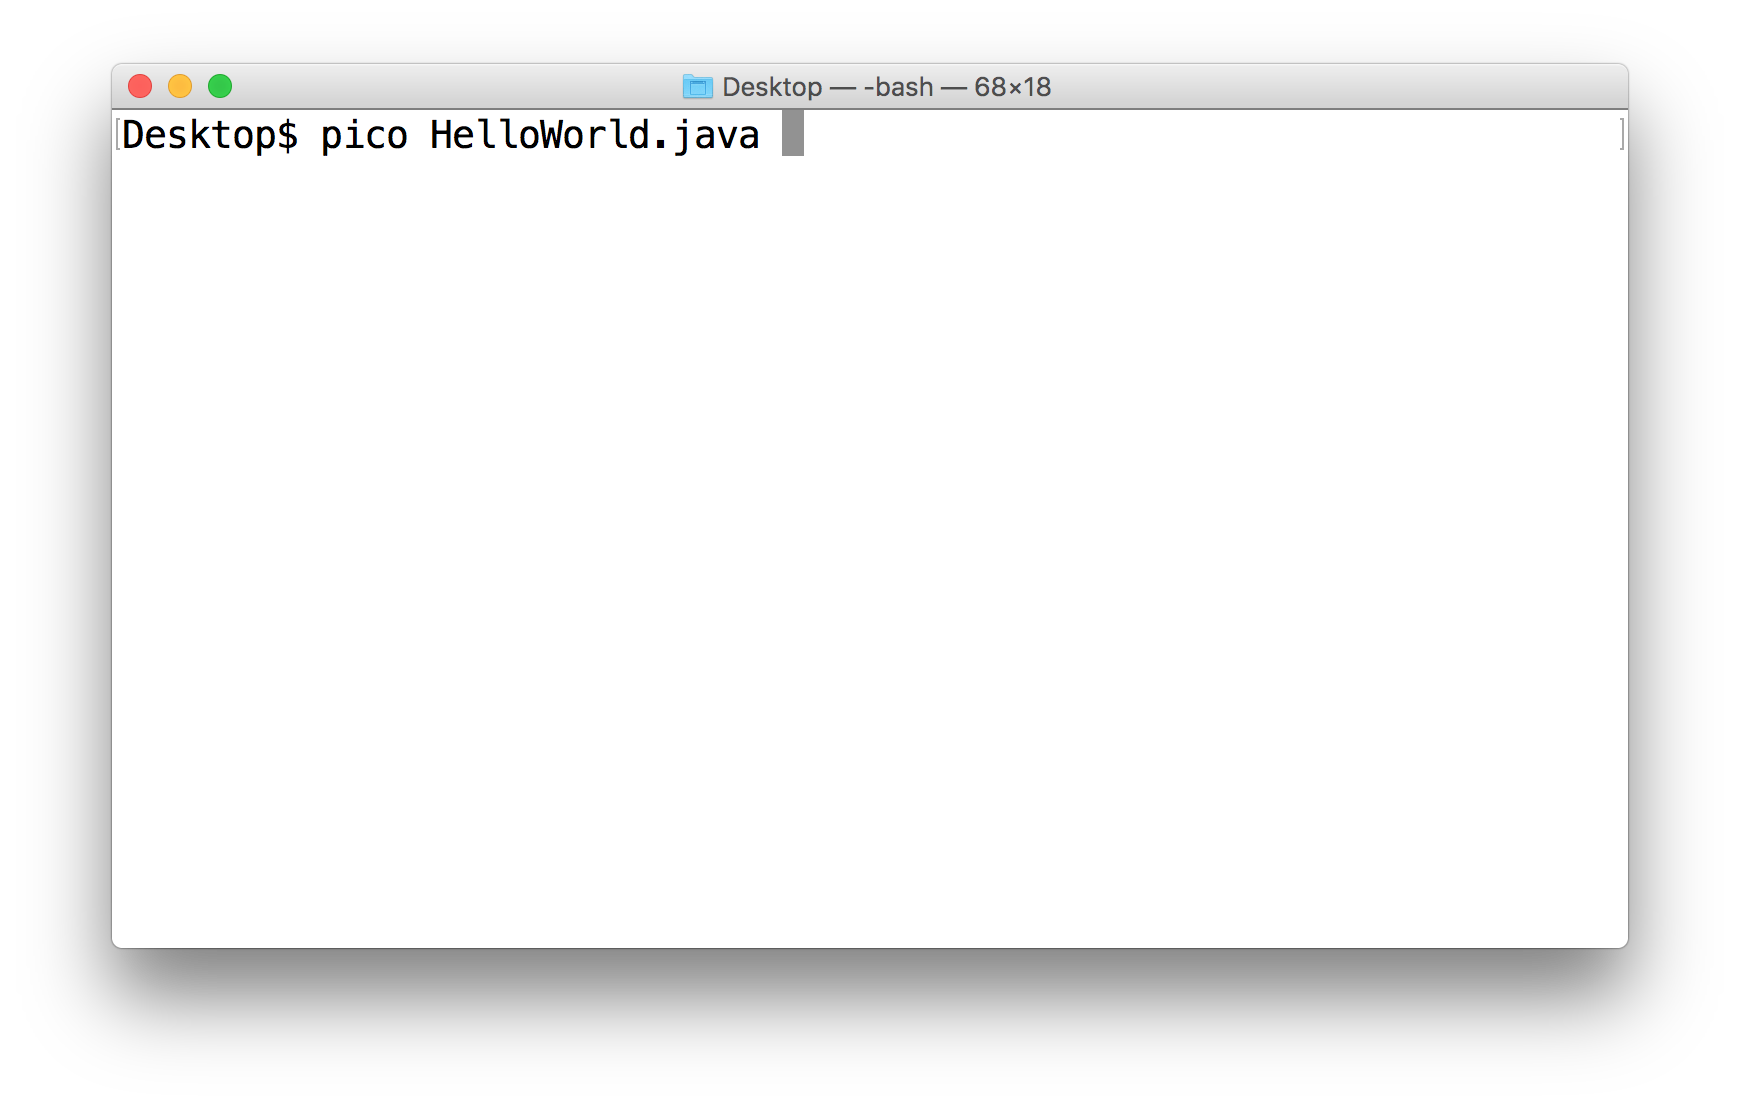
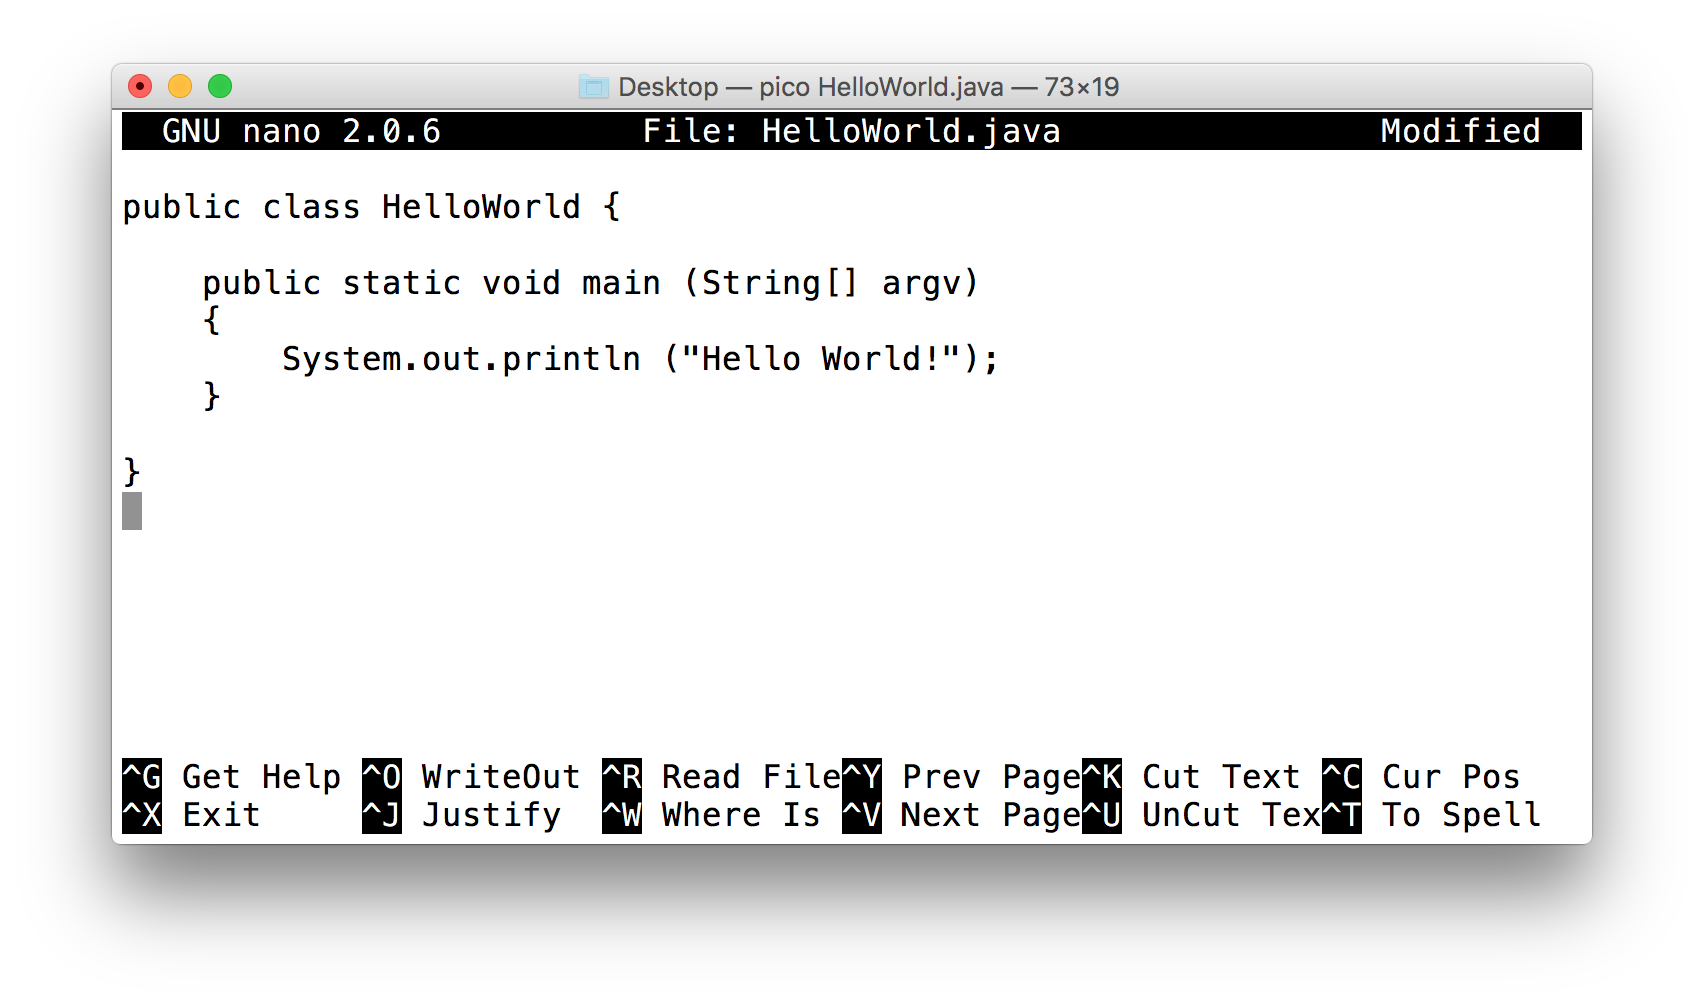
Step 2: enter the
pico (or nano, on some laptops) editor by typing
pico HelloWorld.java
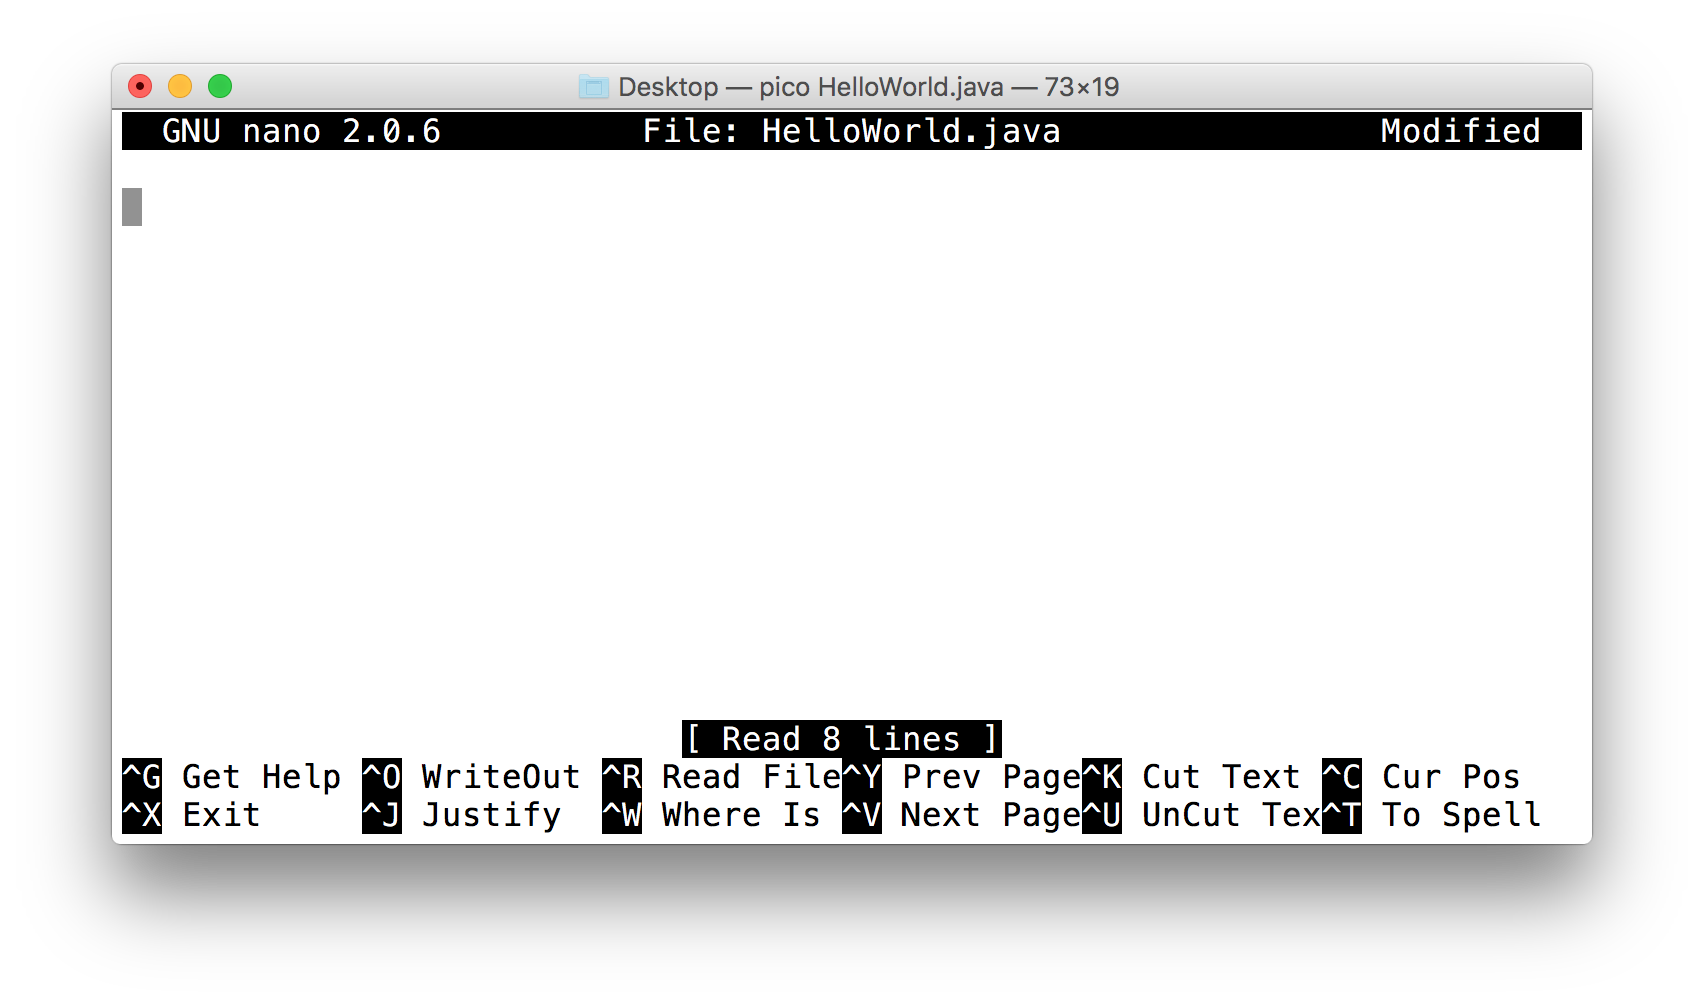
(followed by hitting the Return-key or Enter-key) in the Terminal window:
which brings up the editor and a blank workspace:
Note: if your computer does not have
pico
installed, you may have to use a variation called
nano.
In this case, you'll type
nano HelloWorld.java
(and use nano henceforth).
You'll notice that the mouse won't work in the editor.
Instead, use the up-down-left-right arrows to move around
in the text.
pico also uses
many "control" commands (where you press "control" and
a keyboard key simultaneously).
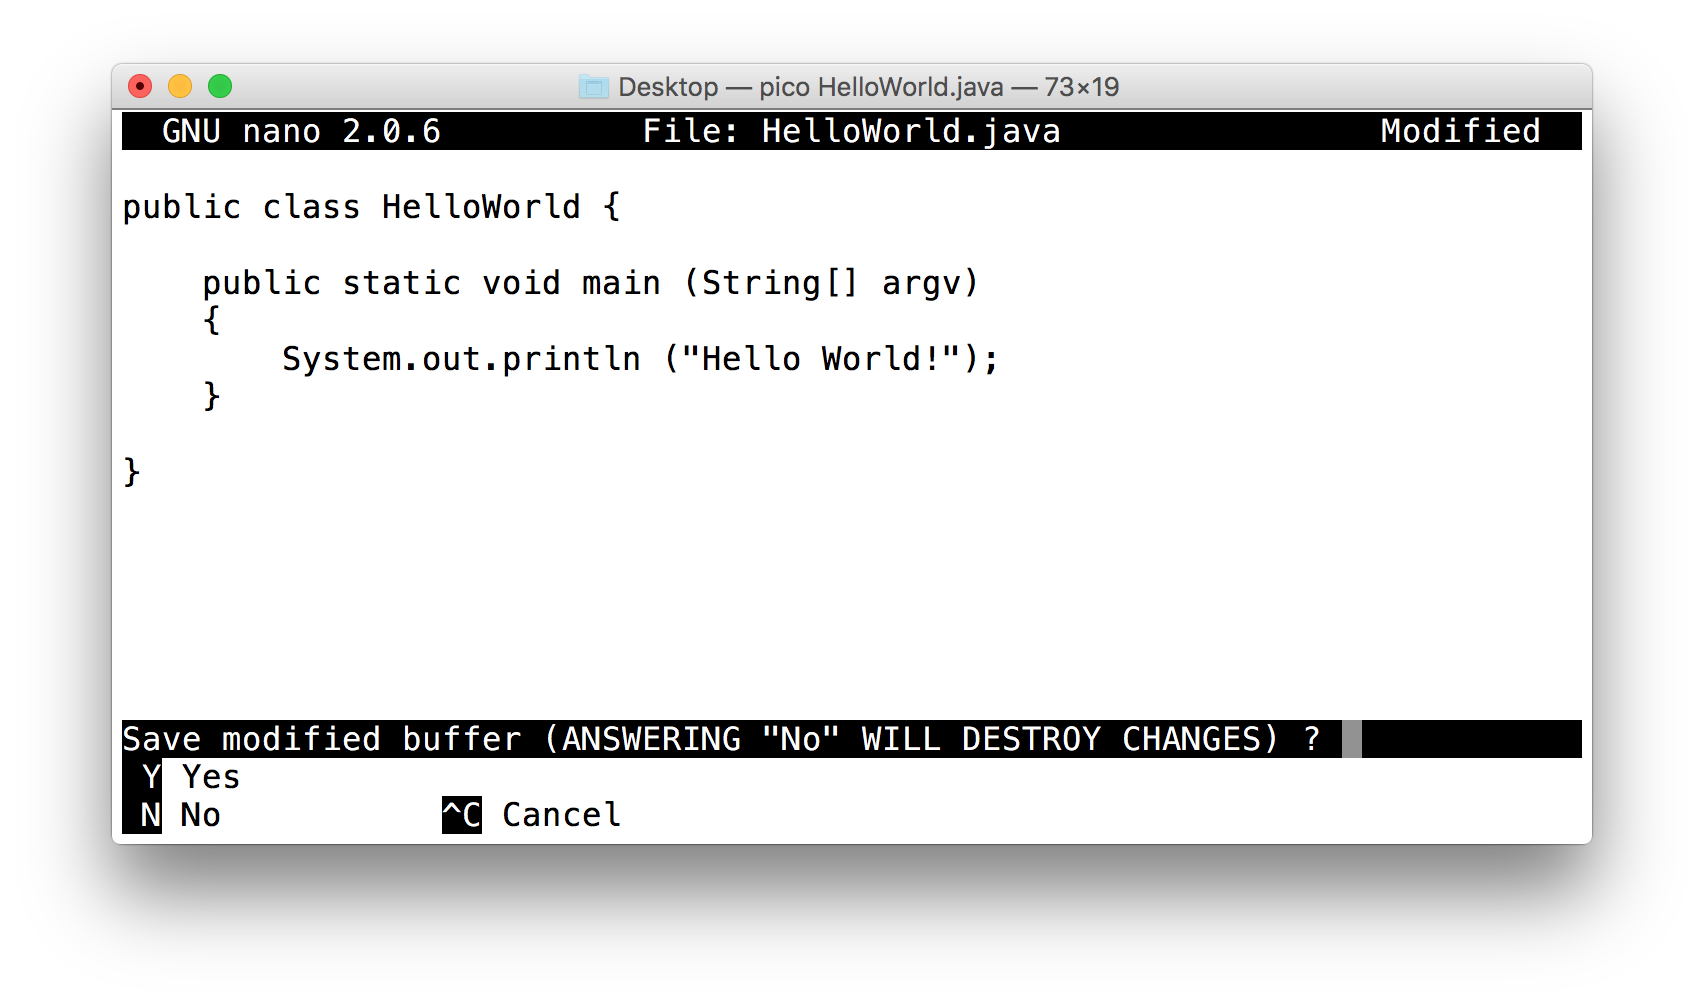
Step 4: save the program by typing ctrl-x inside pico.
⇒ ctrl-x means "press the control key and
x key together"
This will prompt you as follows (where you need to type y):
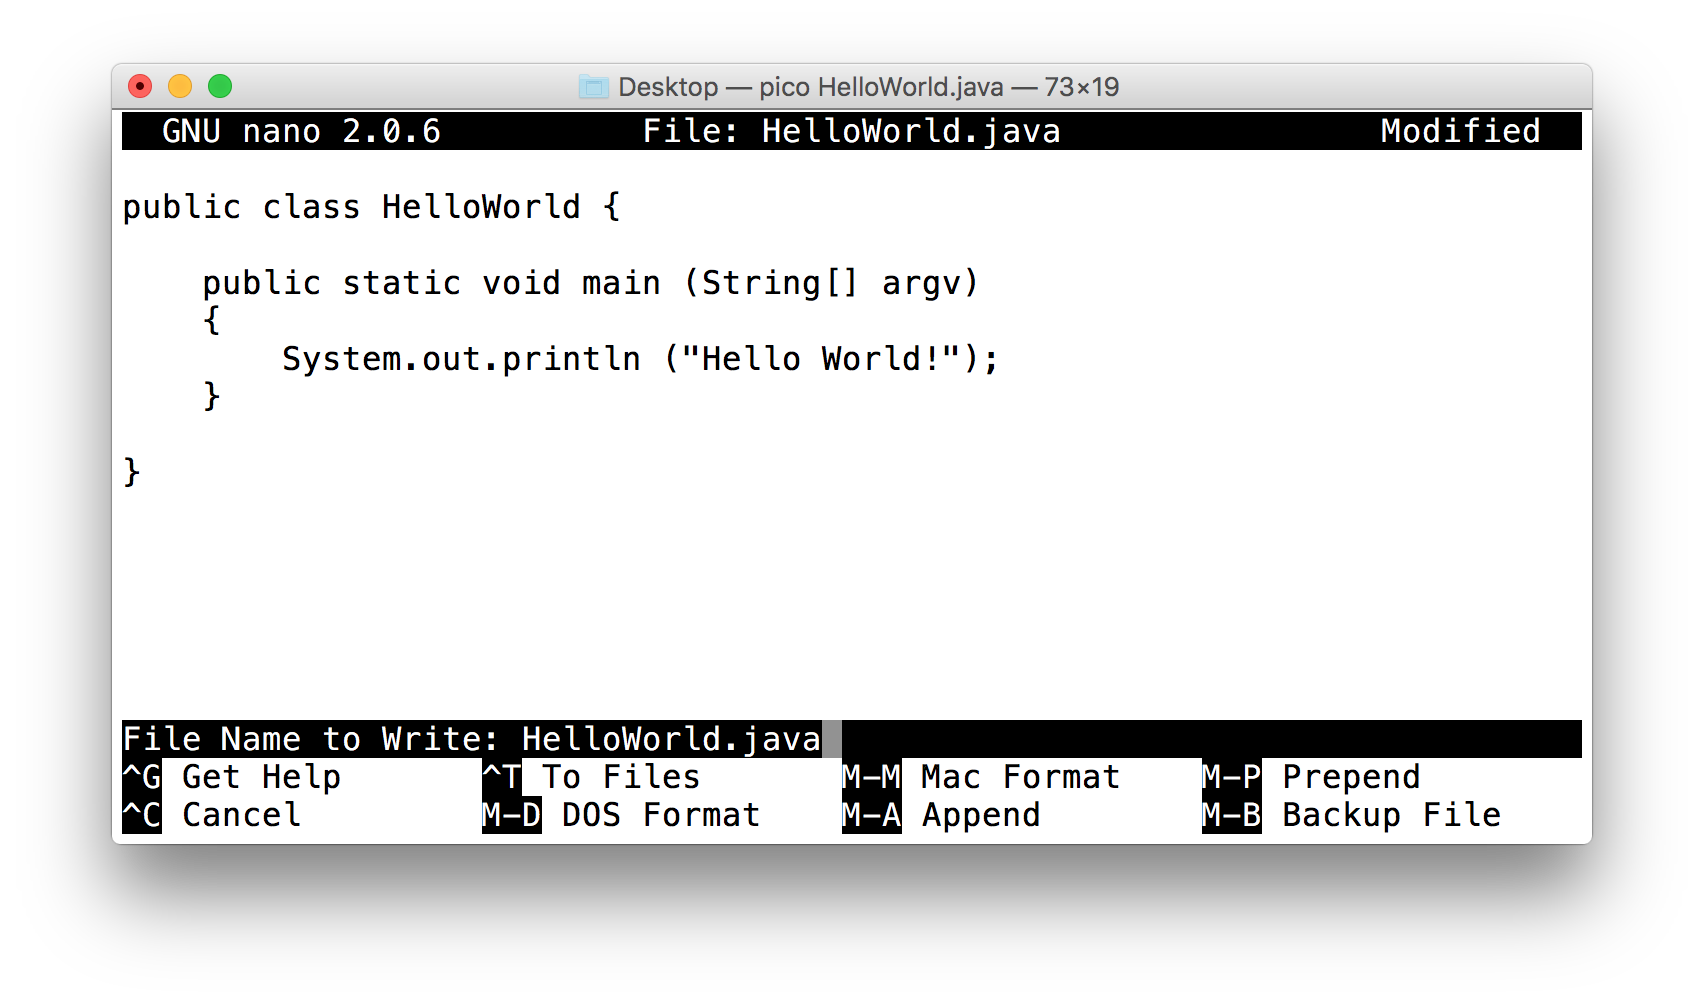
After which you will see
where you need to hit the Enter/Return key. This brings you to
Step 5: compile the program by typing javac HelloWorld.java
(followed by Enter/Return, which we will assume you will do for such
commands in the future).
What if the javac part
did not work? You might see something in the Terminal
that looks like: -bash: javac: command not found Then, use these instructions to install Java
Step 6: execute the program by typing java HelloWorld
in the Terminal.
Note for Windows users: a parallel set of instructions
can be found on the Gitbash page.
Thus, you have just solved this exercise:
0.1 Exercise:
Write a program to print "Hello World!" to the screen.
0.2 Video:
0.2 Programming vs. computerese
What we mean by computerese:
The computer-related tasks and knowledge that
are needed, but not the intellectual core of programming.
We use the term slightly pejoratively, like legalese.
⇒ A necessary evil.
Examples of computerese:
Navigating directories
Locating files, copying them, moving them.
Mastery of editor keys, shortcuts.
Handling the quirks of an operating system.
Uploading files to a website, downloading.
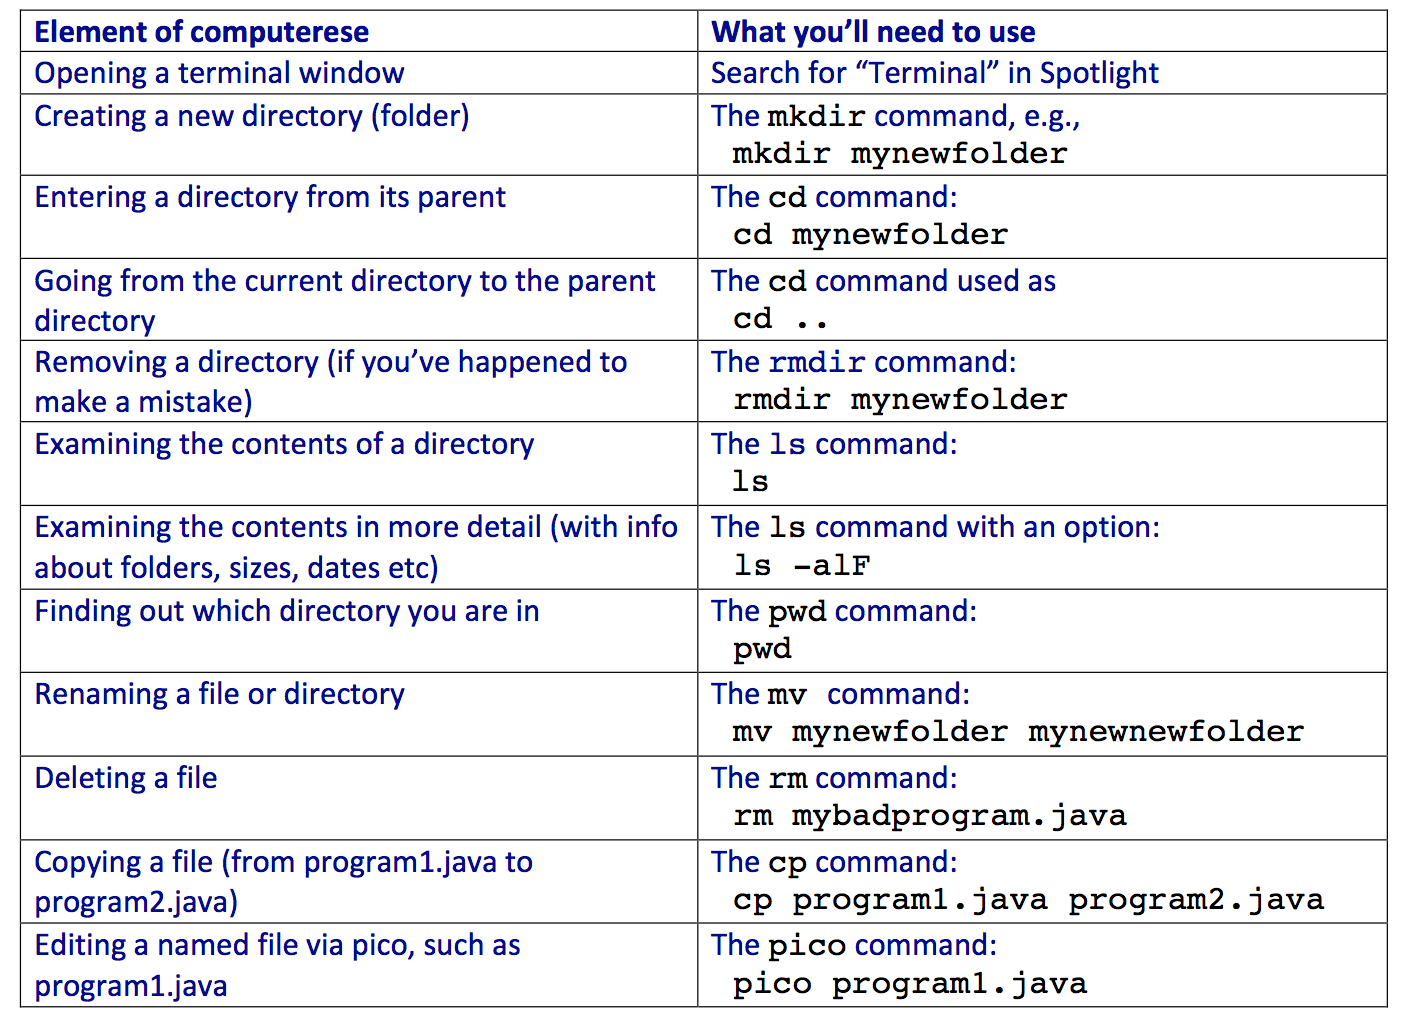
Below is some useful computerese you are very likely to use.
This is what you type after the
$
symbol, and at the end of which you hit the return key.
Note:
Some
Terminal's
will have a
%
instead of a
$
to indicate the prompt at which you type.
Also, you can (and probably) increase the font size on your
Terminal
window by pressing the CMD and + keys.
Keep in mind that at any given time, a Terminal is in some
folder (also called directory).
The commands you execute will apply to whatever's in the folder.
That is, the Terminal cannot "see" anything that's not in
its current folder.
You can get the Terminal to "move" into another folder using
the
cd
command.
The commands that you execute in a Terminal window
have the same effect as if you executed them in Finder (for Mac)
or Windows-Explorer.
For example, if you delete a file it really will be
irretrievably gone.
0.3 Exercise:
Go back to the HelloWorld example above
and identify the "Terminal" (but not within
pico) computerese involved in the
entire edit-compile-execute process. That is, what commands
did you type into the Terminal? Make a list of these in
a PDF document called
module0.pdf.
0.4 Exercise:
In this exercise, we'll set up the folder for all exercises in this
module, an approach you will use for future modules.
First, watch this video:
Follow the video to create your module0 folder.
Verify via Finder (Mac) or File Explorer.
0.5 Exercise:
Get rid of the Terminal window and bring up a new
Terminal window.
Now rewrite, compile and execute the HelloWorld.java
program that we did earlier but inside the
module0
directory. How much were you able to do without looking it up?
Also, recall the
module0.pdf
you created earlier. Copy or move that into the
module0
folder. Can you do this using Terminal commands exclusively?
0.6 Video:
0.3 A peek at a more complex program
We'll now merely glimpse something we will encounter much later.
The goal is to get a sense of what a more complex program
looks like.
Your goal is to look through it with bemused curiosity,
as if studying an incomprensible work of abstract art.
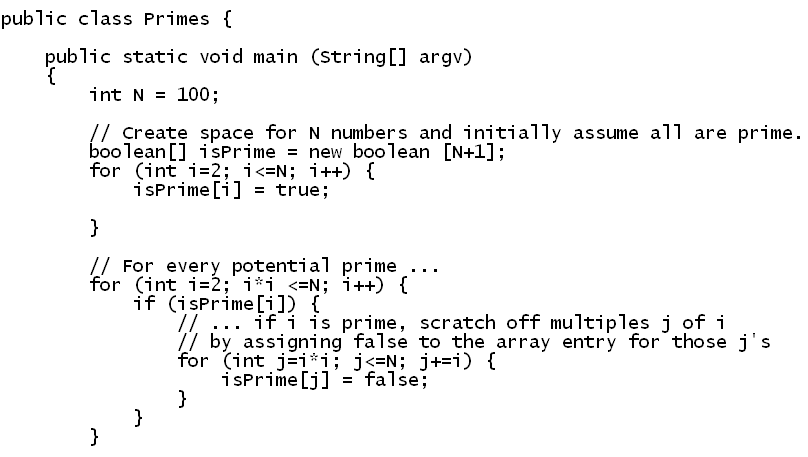
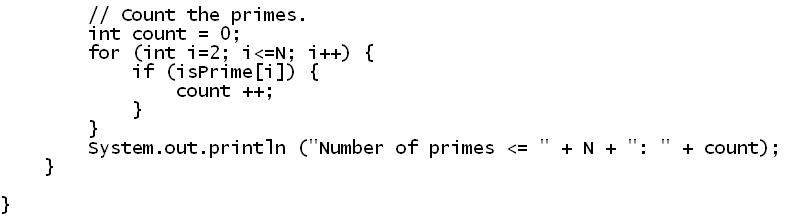
We will examine a program that counts the number of primes
in the range 2 to N, where N is some upper
limit like 100.
What is a prime number?
A number like 8 can be divided evenly by a smaller number like 4
⇒ 8 ÷ 4 = 2
But a number like 7 has no smaller number (we don't include 1)
that cleanly divides it.
⇒ it is a prime.
These are the primes up through 20: 2, 3, 5, 7, 11, 13, 17, 19.
The goal of this problem is, given some big number like 10000,
to list all the prime numbers up through the big number.
⇒ Clearly, we don't want to do this by hand, and
would rather write a program to do it.
We'll now peek at two programs that implement the idea,
just for the sake of seeing what such programs look like.
Program 1:
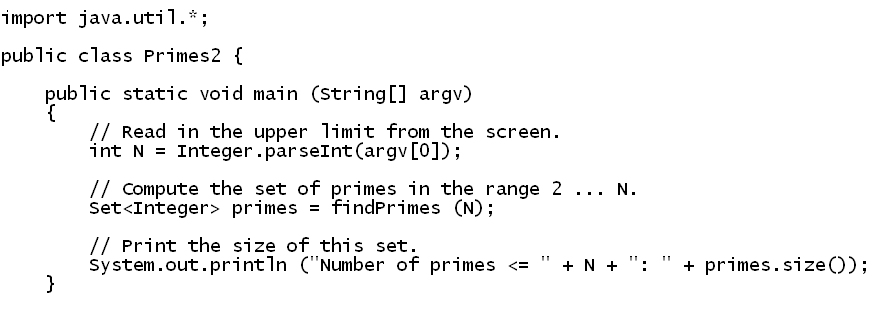
Program 2:
What to keep in mind at this time:
The above are programs that solve the exercise
"Write a program to compute the number of primes
between 2 and some number N".
At this time, we could probably edit (type
the program), compile and execute.
⇒ Without understanding the program itself.
The program has a lot of gobbledygook we don't yet understand.
Yet, we can perhaps see some structure and discern "pieces".
The goals of units 0-2:
To be able to understand the elements of the Java programming
language.
To be able to solve exercises like the above, from scratch,
in the Java programming language.
To read code, write code, and debug code (figure
out what's wrong when it doesn't work.
As an aside: the second program is not as efficient (fast)
as the first.
⇒ This is mostly a topic for later courses.
We'll make a rough analogy with learning a foreign language:
We're starting at the novice level
⇒ Absolutely no background needed.
0.7 Video:
0.4 GUI vs. command-line
GUI stands for: Graphical User Interface.
And is pronounced like "gooey".
We have seen the difference between GUI and command-line
interaction with the OS:
Command-line: e.g., navigating inside Terminal
using the cd command
GUI: e.g., using a powerful tool like Finder that
brings up its own window.
Now let's look at the same in Java programs:
The programs we've seen so far are command-line programs
⇒ They produce output to the command-line (Terminal) window.
A GUI program, on the other hand, itself brings up a window.
0.8 Exercise:
Download DrawTool.java
and TestDraw.java
and save in your module0 directory.
To download, right click on the link and use "save link as ...".
Compile and execute the file TestDraw.
(No need to edit, since it's already written.) The program doesn't
do much other than demonstrate some drawing. Also, you will need
to explicitly get rid of the window before you do anything else in the
Terminal window.
0.9 Video:
What we observe:
Java programs can bring up windows
⇒ These can draw something, or allow user interaction.
Programs can be written across multiple files.
⇒ There were two files involved above, but executed only one.
0.5 Computer science: beyond programming
Is computer science the same as programming?
Not at all:
Programming is certainly a significant part, just
as narrative non-fiction is a significant part of an English degree.
⇒ But there's much more to it.
What else does a computer science degree feature? Typically:
Programming devices (units 9-10).
An understanding of the hardware (units 11-12).
Algorithms: the science in computer science.
Theory: understanding fundamental theoretical limitations
of computation.
A deeper understanding of how computer systems work: networks,
databases, operating systems.
But also electives among (to name a few):
Artificial intelligence, machine learning, robotics, computer vision, natural language processing.
Design of interfaces.
Graphics, animation, visualization.
Digital humanities, computing for arts and social sciences.
Scientific computing.
Computational X, where X=biology, physics, economics ...
Educational tools, health data systems.
Medical devices, prosthetics, control of mechanical systems.
0.6 How to succeed as a student
The challenge in learning programming:
#1: it's an alien world.
⇒ Takes getting used to.
#2: it's a mental skill
⇒ Skills are acquired slowly, with much practice, and in fits and starts.
#3: there are confounding issues
⇒ some knowledge of (regrettably) computerese needed.
#4: it's easy to feel overwhelmed or intimidated
⇒ your neighbor may appear to be "getting it" while you feel you don't.
What you should expect:
You can't learn instantly
⇒ You may have to see a concept multiple times to "get it".
You may occasionally feel bewildered.
There are some things that can't be understood
at this stage.
⇒ Not enough background.
It's deceptively easy to understand an idea when reading or viewing
but devilishly harder to do it yourself.
How to succeed:
Make progress every day
⇒ Each module builds on previous modules
⇒ Can't afford to let anything slide.
Be willing to put the effort
⇒ Do all exercises, assignments etc.


