Using the Algorithm-Test Environment and Submitting Assignments
Mac vs Windows
Since you've had the pre-requisites, we will assume you know how to
compile and execute Java programs at the command-line.
If this is not the case, you will need to do that IMMEDIATELY
because nothing will work in the class without that. Generally, the
steps involved are:
- Mac or Linux:
- Open a terminal window.
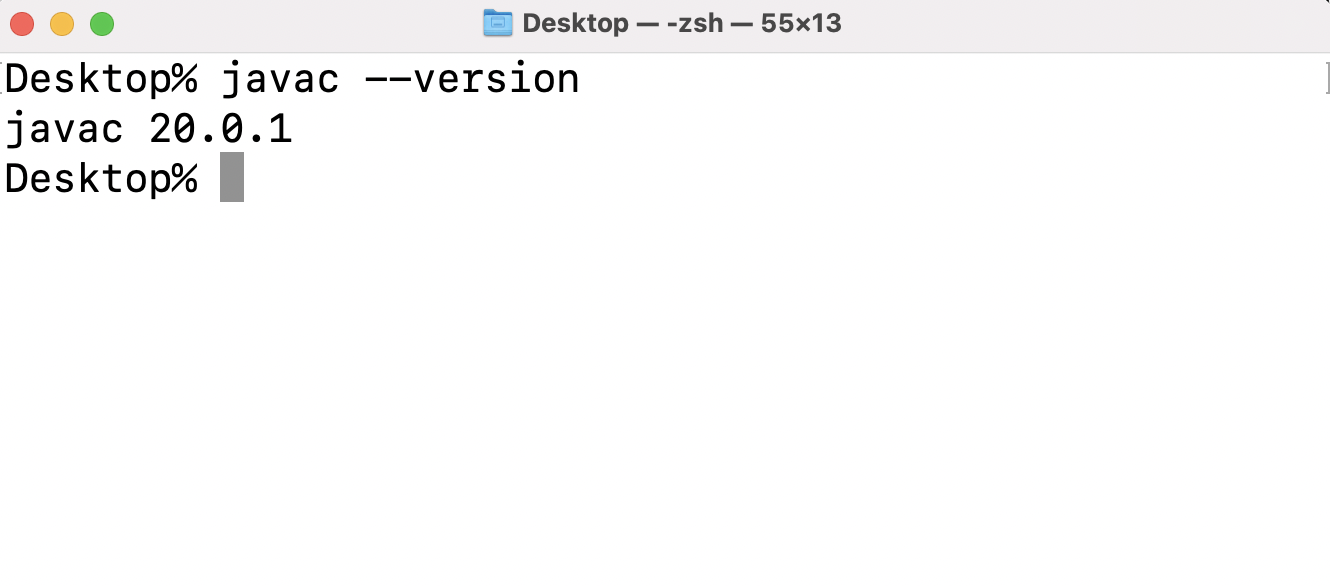
- In the terminal window, make sure you have Java installed by typing:
javac --version
and hit return. You should see something like:

In your case, the version number may be different.
Please update your JDK to the latest version.
And when you do, you most likely will need to update your PATH
variable - see the "Note about installing Java" below.
- Make a directory for this course and enter that directory:
  cd
  cd Desktop
  mkdir cs3212
  cd cs3212
This creates a subdirectory from the Desktop, as an example.
- From your browser (where you are reading this),
download HelloWorld.java and
save to the new
cs3212
directory.
- Compile and execute in the terminal:
   javac HelloWorld.java
   java HelloWorld
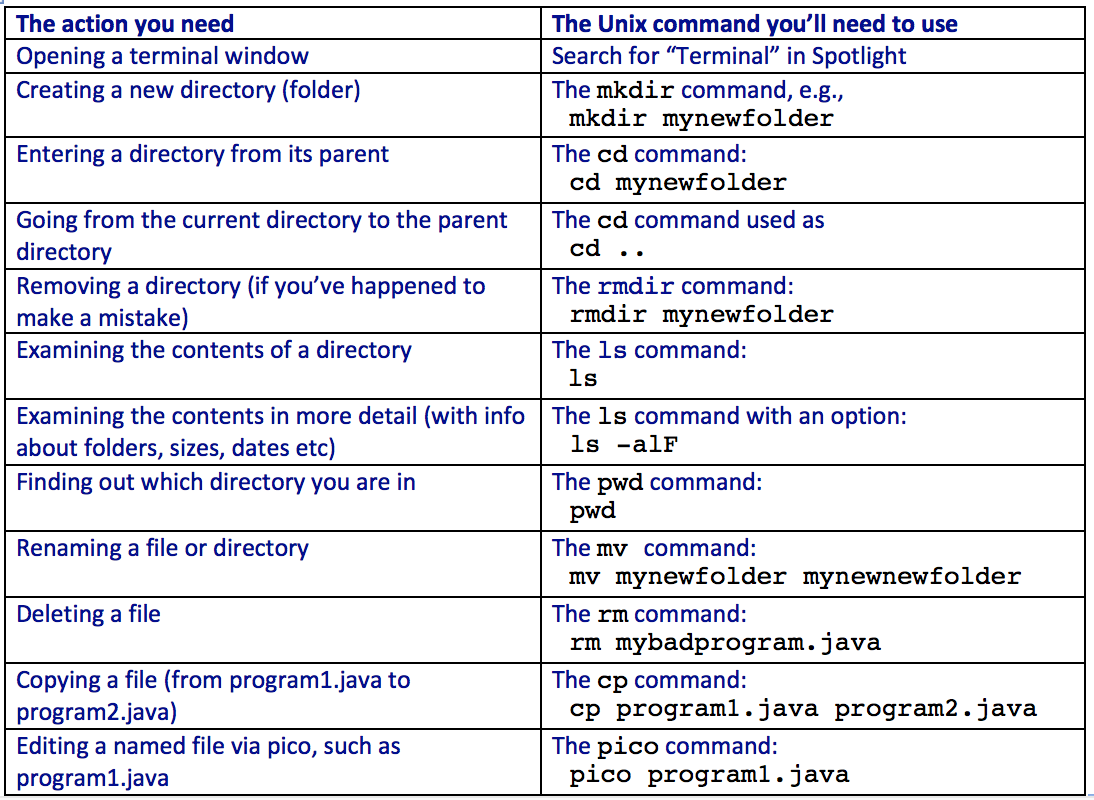
- Spend a little time learning basic commandline Unix on your
own. Find a tutorial and learn how to use the following commands

- Windows: with Windows, you have five options,
the first four of which
involve learning Linux (you need to learn the Terminal
commands in the
table above).
- (Linux option #1)
Install Linux within Windows using WSL (Windows Subsystem for Linux).
See for example this Microsoft page. Both this and the next three options
involve learning Linux. This is worth it
because it's useful for jobs/internships since a lot of
development occurs on the cloud using Linux.
- (Linux option #2)
Gitbash:
Get a Unix-like interface to work with Windows using Gitbash.
- (Linux option #3) Install a complete Linux OS in a virtual machine like
VirtualBox. Then, do all your work for this course inside that
virtual machine (using Linux). This is have the effect of a
"computer inside a computer" in some sense.
For this purpose, do a search on something like
"How to install Ubuntu inside VirtualBox on Windows".
- Run on Windows native (using powershell).
Note:
Since you've had several CS courses already, you should be
able to make one of the above options work for you.
Editing and compiling:
- Please DO NOT plan on using an IDE. We will have various
jar files that you'll need to use; these are challenging to
integrate into an IDE. In any case, it's a good idea to practice
using the command-line.
- For an editor, consider learning a simple text editor such as
emacs, vim, notepad++, sublime, atom, and the like.
- If you use VSCode, do NOT use VSCode's command-line. Instead,
use VSCode for editing but a separate command-line for compilation/execution.
Getting your directory structure set up:
- You already created the
cs3212
directory under your desktop above.
- Under this, create one directory per module. That is,
cs3212/module1,
cs3212/module2, etc.
- Similarly, under
cs3212
create one for each assignment as and when you need to.
For example, for Assignment 1, you will have
cs3212/assignment1,
- You will end up creating a zip of these sub-folders for submission.
The Test Environment:
In this course, you will use two tools developed for testing
and submitting programs.
The Algorithm Test Environment is a Java-based testing
environment for algorithms:
- The idea is, you will write algorithms and
let the environment do some testing for you.
- There are two kinds of
testing: correctness testing and performance
testing. (There is a third kind available, which we will not describe here).
- In correctness testing, a special test program will feed your
algorithm with different kinds of inputs to see if it "does the right
thing".
For example, a sorting algorithm will be expect to, of course,
sort the input data.
- In performance testing, large data sets will be provided to
examine the run-time performance: how long does your algorithm take
to run (in seconds) on the data sets. A graph is plotted and
displayed for various data sizes.
- You can test several algorithms at the same time, and compare
their run-time performance graphically.
- The environment parameters are controlled by a "properties"
file. If you know what you are doing, you can change the properties
to adjust the parameters of testing (correctness or performance).
The properties include the location (pathname) of your algorithm
(how else will the environment know where to find it?), test
parameters, performance parameters etc.
- How does environment know which method to call in your
algorithm class file? You'll implement an interface known to the
test environment for every algorithm tested.
- Important: It is useful to be able to run just
the correctness tests by themselves (after all, you first want
to get your program working). You can run only the correctness tests
by setting testPerformance=false in the properties file.
This is useful for two reasons: (1) initially you want to complete
correctness testing before performance tests;
(2) the default performance tests expect to display a GUI (which you
can't do on shell.
Note: you can set display=false in the properties file
to turn off the display.
Also: you can get a Java display to work on any Unix
workstation in Tompkins 411.
- Important: Do NOT call System.exit
in your code. System.exit causes
execution to halt instantly, without returning to the test environment.
Download the test environment and run the demo:
- Create a new directory called cs3212 under your home directory.
- Download algtest.jar
in the
cs3212 directory.
(Older verssion: algtest.jar)
- You will create subdirectories off of cs3212 for various
assignments and exercises.
- Set up your initialization, CLASSPATH etc based on
your laptop:
Mac/Linux users: how do you know which shell is being used?
Type echo $SHELL
in your Terminal.
- Note about installing Java:
If you install a new version of Java,
you will likely need to edit your PATH
environment variable, so that the
path to the Java executables (java, javac, jar etc) is in the PATH.
- Download min.jar
into the cs3212
directory to unpack it at the command line:
jar xvf min.jar
(Alternatively, download min.zip
and unpack that.)
- This will create a directory called min.
- Go to the cs3212/min directory and run the demo:
java -jar ../algtest.jar alg.props
You have just executed a test program, Min.java, in the
Algorithm-Test environment. Here's an explanation:
- The test-environment first does some correctness testing, the
results of which are that some tests are "passed". If an algorithm
fails a test, an appropriate message is displayed.
- Next, the second phase is performance testing, which plots a graph.
Now examine the source files:
- Open the file Min.java.
- Min.java is a really simple (demo) program: it scans
an array to find the least element.
- The import statements are necessary to be able to use the
edu.gwu.algtest package.
Important: you will need these import
statements (but not package statements)
for your code.
- Check that your classpath is correct by compiling
Min.java:
javac Min.java
If your PATH and CLASSPATH are properly set up, this should work.
If not, you will need to retrace the steps here.
- Now, note that the class Min implements the
MinAlgorithm interface
as well as the Algorithm interface
(which MinAlgorithm extends).
The methods getName() and setPropertyExtractor()
methods are from the Algorithm interface.
Java interfaces and props files
When you write code for assignments in this course, you will often
be asked to have your Java class implement an interface.
For example, in just about every exercise/assignent, your classes
will implement
the Algorithm interface.
The other thing to keep in mind are the props files, with names
like
min.props
and
ex1.props
(for Exercise 1, for example).
- These are "set up" files that direct the algtest test-environment.
- They tell the test environment the name of your files,
what to test, whether to run simple tests (to test correctness)
or whether to run a test with large data (for performance
comparisons between algorithms).
Submission
All submissions are to be done in Blackboard and in each case you
will upload a zip file in the appropriate place.
Here are some details, using the first homework as an example:
- Create (just once) a directory called
cs3212
for all your work in this course.
- Under this, create a directory called
hw1.
- In this directory, you will have all your code for
Homework 1, AND a single PDF with your written homework.
- For Homework 1, your PDF will be called
hw1.pdf,
for Assignment 1, it will be called
assignment1.pdf,
and so on.
- Make a zip of this directory and call it
hw1.zip.
- Upload
hw1.zip
into Blackboard under Homework-1.
Here are some details for submitting the narrative notes
for Module 1 (as an example):
- Scan your Module-1 narrative notes into a single PDF called
module1-notes.pdf
which will have answers to non-coding questions.
- When it's time to submit, submit this into the appropriate
section of BB.

