Assignment 4
Bonus point opportunity: In this assignment, you can either
- Create a simple "OK" algorithm that does reasonably in solving
the problem. This algorithm should produce better results than
the "naive" algorithm described below (NaiveBoxAlgorithm.java).
This is relatively easy to do, as you'll see when you read the problem.
- Spend a bit more time and compete to get more points that
can then be applied to recover points lost from a previous assignment.
Your algorithm will be compared to that of every other solution
proposed by students in the course.
There will be extra points for devising an algorithm that outperforms
the algorithms of most other students.
Also, you will be able to create and submit box-problem instances
to challenge other students in the class.
Note: your algorithm need to run in polynomial-time. Explain in your assignment PDF, along with pseudocode, why your algorithm runs in polynomial-time.
You will solve an "unsolved" problem, one that does
not have a name yet, even if it's similar to some other problems
we've seen. We'll call it the "Box Problem." You will be
given a box and a bunch of items with the goal of placing as many
items as possible into the box.
The problem is easily described with a picture:

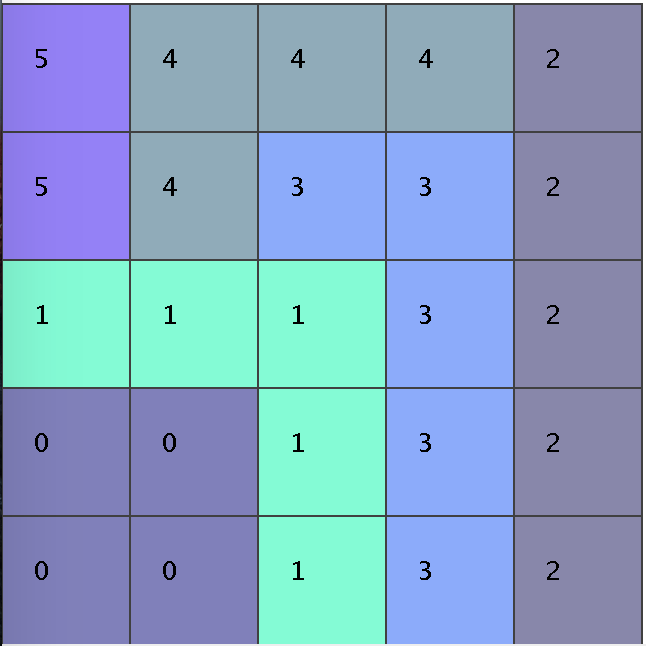
Here we have a two-dimensional box of width 5 and height 5. (In
general, width and height can be different.) This one
already has items (six of them numbered 0 to 5, and each with a color)
placed in the box,
showing a solution. The grid lines are drawn for convenience so that
one can view each item as consisting of a group of cells in a fixed
geometric pattern (such as the L-shaped item #1), and one can
see the whole box as a grid. Item placements need to respect
cell boundaries: we can't, for example, place item 0 so that its
left edge starts in the middle of a cell.
In a particular instance of the problem, you will be given the
box dimensions and the list of items in a plain text file.
For instance the above problem is in the text file
testproblem2.txt, which looks like
this:
5 5
#item 0
 0 0 0 1 1 0 1 1
#item 1
 0 0 0 1 2 2 1 2 0 2
#item 2
 0 0 1 0 2 0 3 0 4 0
#item 3
 1 0 0 3 0 2 0 1 0 0
#item 4
 0 0 0 1 1 1 2 1
#item 5
 1 0 0 0
Let's explain:
- The first line has the box width and height (5 by 5).
- Lines beginning with a # are comments.
- Each item is on a line by itself.
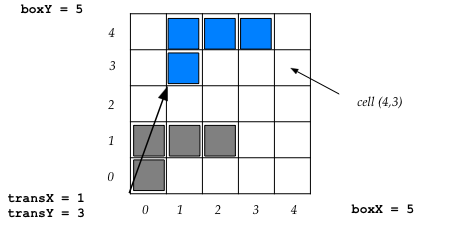
- Each item is a collection of contiguous cells that is described
as if the item were initially placed near the origin. For
example, the last item in the list has two cells: the cell (1,0) and the
cell (0,0) - see the picture below.
- Fortunately, you don't have to parse the text file. All you
need to do is create a problem instance:
BoxProblem problem = new BoxProblem ("testproblem2.txt");
The class BoxProblem reads and parses the file (assuming
the file is in the same directory).
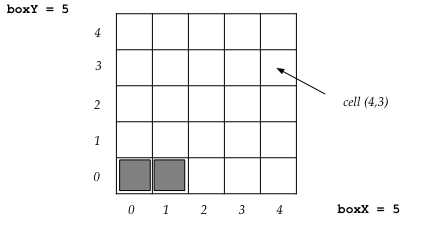
To understand cell coordinates, let's draw the 5x5 grid:

Your main goal is to write code to solve the problem of deciding
which items go into the box, the orientation for each item,
and where they are placed (the translation for each item) so that
as many items as possible are packed and the as much of the box
as possible is used. You will
do that by creating a class that implements the
BoxProblemAlgorithm interface,
which has two methods:
- Your method getName() should return your name.
- Your method findSolution() should return your solution.
To see an example, take a look at
NaiveBoxAlgorithm.java,
which implements the interface and features a simple but somewhat ineffective
algorithm. To see how it runs, examine the code in
TestBoxAlgorithm.java, then compile and run
TestBoxAlgorithm.
Start by downloading and unpacking
boxproblem.jar.
The relevant javadocs:
Now let's consider some of the details:
- First, when writing code for the algorithm, we'll need to
understand how to extract the elements of the problem, when
given a BoxProblem instance:
- The public variables boxX, boxY have the dimensions.
- Call getItems() to get all the items in an array-list.
Or call getItem() to get a
particular item, as in these examples:
     BoxProblem problem = new BoxProblem ("testproblem2.txt");
     // Get all the items:
     ArrayList<Item> items = problem.getItems ();
     // Just the first item:
     Item firstItem = problem.getItem (0);
     // Alternatively:
     firstItem = items.get (0);
     // Examine the item:
     System.out.println (firstItem);
- Now let's consider a particular item:
- Each item is an instance of the class Item.
- Each item is identified by a unique ID, which you can read from
the public variable ID.
- Since an item is a collection of cells, you can get the whole
list of cells by calling getCells().
- Each Cell has x and y values available as public
variables: these are the integer
coordinates of the cell's lower left corner.
- The Item class also has useful methods to
rotate an item anti-clockwise by 90 degrees, or to rotate
an item to a given orientation. Similarly, you can translate
an item by a given (x,y) amount.
- Both Item and Cell have toString() methods
for debugging.
- The orientation of an item is the amount the item needs
to be rotated before placement in the box. There are only four
possible orientations:
- The default is orientation=0.
- When orientation=1, the item is rotated anti-clockwise by 90 degrees.
- When orientation=2, the item is rotated anti-clockwise by 180 degrees.
- When orientation=3, the item is rotated anti-clockwise by 270 degrees.
When you place items, it's up to you to decide the orientation so
that you can take advantage of rotations to more cleverly fit as
many items as possible.
- When placing an item, you will also need to provide its
translation. The default is no translation, which means the
item will touch the x and y axes. Clearly, it's very likely
that two un-translated items will overlap, which is not allowed. Thus,
except possibly for one item, all items will need some translation.
- To place an item in the box, once you've decided its orientation
and translation, call the put() method of the solution
instance. For example, consider:
        BoxSolution solution = new BoxSolution ();
        solution.put (0, 0, 0, 0);
        solution.put (1, 0, 0, 1);
        solution.put (2, 1, 0, 2);
This places items 0, 1, 2 in sequence (first parameter). The
second parameter is the orientation and the third
and fourth are the translation amounts to determine where to
place the item in the box. Thus, above, the 3rd item (item with ID=2)
is translated along the y-direction by 2 units, with an orientation
that rotates it by 90 degrees anti-clockwise. See the
examples in BoxProblemExamples.java, that's included
in the jar.
- Testing your code:
- Edit the file TestBoxAlgorithm to replace
NaiveBoxAlgorithm with your class.
- Notice that you can test with a single problem instance
and view your solution, or you can test across multiple problems
and obtain an "average-across-the-problems" performance report.
- The jar file contains three test problems, in the files
testproblem1.txt, testproblem2.txt, testproblem2.txt,
of increasing difficulty.
This should be enough to get started. However, there are some
additional tools that you may find useful:
- Since the text file that describes a problem is hard
to visualize, you can view a problem by browsing through the
items in a problem, for example:
java ItemBrowser testproblem2.txt
- Similarly, it helps to see your solution. You can do this
programmatically by seeing the example in TestBoxAlgorithm,
which calls SolutionViewer.
- Finally, you are encouraged to submit a 10x10 or 20x20
problem that's "hard" as a challenge problem for others but
one that your algorithm solves. That is, your algorithms fits
all the items but others will find it hard to fit all items into
the box.
To create such a problem, use
java BoxProblemDesigner 10 10
which sets you up with a 10x10 grid and a simple interface in
which to draw items by clicking on cells. Your goal is
to create a problem instance for which your algorithm is able
to pack all items in the box, but which others would find hard.
But to have your problem qualify, your algorithm will need to
solve other problems well too. That is, you can't code up an
algorithm that's explicitly tied to your particular problem.
- Important: Your algorithm cannot be an exhaustive
search algorithm, or some variant of exhaustive search.
It has to apply some idea for optimization that runs in polynomial time.
If your code takes too long to run on large sizes, that will
be considered "non polynomial".
The competition:
- We will run each student's algorithm on the problems currently
included, and on a few additional problems we will create,
and on select problem instances that you submit.
- We will examine both the number of items packed and
the average area (number of cells) packed.
- Some points will be awarded for placing well in the competition.
Submission:
- Name your file with your username as part of the
file name. For examplem if your username is xyz, call
your file XyzBoxAlgorithm.
- Name your problem submission similarly, for example
Xyzproblem.txt.
- IMPORTANT: write all your code in that one file. You can
of course use multiple methods, and create your own classes, but
please put all the code in one file. The reason is, we will have
all student code in one directory: it will be convenient with fewer files.
- Submit a PDF document that explains the ideas (high and low-level
pseudocode) in your algorithm, and explains why it runs in polynomial-time.
- You'll need to follow
the usual submission instructions
carefully.
-
The name of subdirectory should be: your username
followed by _a4.
Example: if your username is xyz
your subdirectory will be called xyz_a4.
Thus, the jar file will be called
xyz_a4.jar.


