Module 9B: Swing, Part I
Introduction
Java provides two quite different packages for developing
GUI applications: Swing and JavaFX
- Swing is a bit dated but sturdy and well-understood.
- JavaFX is newer (2016) and an improvement over Swing
but it's not clear whether it will establish itself in
the marketplace.
- There are also third-party Java GUI libraries (such as
Apache's Pivot) in use.
- We will focus on Swing.
- The key ideas in most Java GUI development can be learned
through Swing.
- Swing itself evolved from Java's first GUI package called AWT.
- AWT is still in use on some small devices.
- Some classes (objects) that Swing uses are still in AWT.
- This is why many import statements import from AWT.
Typical classes you can expect to use include:
- JFrame: to create a
top-level window.
- JPanel: a sort-of "sub-window" in which you can
place groups of buttons and other widgets.
- JTextField and TextArea: to display and read-in
text.
- JDialog and FileChooser: to obtain specific
event-driven information in a separate top-level window.
- Various standard widgets: JCheckbox, JList
JButton, JLabel, JScrollbar and JScrollpane.
- Various layout managers: FlowLayout, BorderLayout,
CardLayout, GridLayout, BoxLayout
and GridBagLayout.
- Menu-related widgets: JMenuBar, JMenuItem and
JPopupMenu.
Components and Containers:
- Swing classes or "widgets" are derived (via inheritance) from
JComponent
which is a sort-of "uber" component with basic functionality.
- Another such class is
JContainer
which allows one to place widgets inside other widgets.
- For example, we need to place buttons inside frames.
- What this means for us:
- Some API documentation for particular methods may not easily
be found in the particular widget you're looking at.
- You may need to look at the documentation in a "parent" class.
Bringing up a window
Let us create a simple blank window that does nothing:
- At first, it might appear that the following code is
sufficient:
import java.awt.*;
import javax.swing.*;

public class TestSwing1 {
    public static void main (String[] argv)
    {
       JFrame f = new JFrame ();
    }
}
The code compiles, but on execution nothing shows up and the
terminal hangs.
- Two things need to be done:
- We need to set a size (the default size is (width=0, height=0)).
- We need to ask a top-level window to "show" itself,
by calling the setVisible() method.
- Next, let us try:
(source file)
import java.awt.*;
import javax.swing.*;

public class TestSwing1 {
    public static void main (String[] argv)
    {
        JFrame f = new JFrame ();
        f.setSize (200, 100);
        f.setVisible (true);
    }
}
This does produce a window (OS-X):
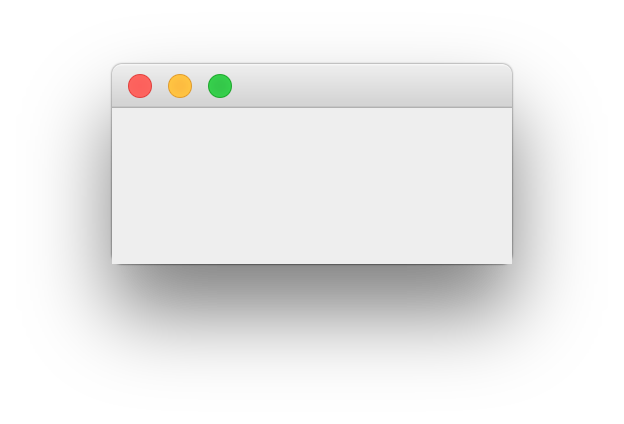
- Note:
- The frame has a title-bar.
- The window is re-sizable:
- Some window controls native to the operating system are available:
- The screen from which the interpreter was called hangs.
- To quit, type ctrl-c at the command-line (not in
the Java window) to kill the interpreter process.
Next, let's create a slightly improved window:
(source file)
import java.awt.*;
import javax.swing.*;

public class TestSwing2 {

    public static void main (String[] argv)
    {
        // Create a Frame instance.
        JFrame f = new JFrame ();

        // Set the size.
        f.setSize (200, 100);

        // Install a title for the titlebar.
        f.setTitle ("A Test Window");

        // A background color:
        //   First, extract the contentPane
        Container cPane = f.getContentPane();
        //   Then, set its color.
        cPane.setBackground (Color.cyan);

        // Display.
        f.setVisible (true);
    }

}
The result:
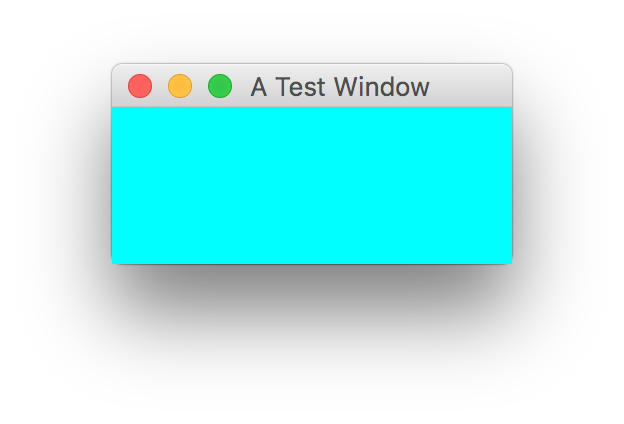
Note:
- Some books will use show() instead of setVisible().
- On some operating systems, the window may not be automatically
re-sizable. In this case, simply add the line:
f.setResizable ();
- The size of the window is described in pixels:
- Thus, f.setSize (200,100) requests a window
200 pixels wide and 100 pixels in height.
- Since the actual screen resolution will vary from terminal
to terminal, the actual window size will vary across systems.
- You can get the screen resolution with the following code:
    // Get a Toolkit instance.
    Toolkit tk = Toolkit.getDefaultToolkit ();

    // Get resolution in pixels per inch.
    int pixelPerInch = tk.getScreenResolution ();

    // Screen dimensions can also be obtained in a Dimension instance.
    Dimension screenSize = tk.getScreenSize ();

    // Print out results.
    System.out.println ("Resolution: " + pixelsPerInch);
    System.out.println ("Size (pixels): Height=" + screenSize.height +
			", Width=" + screenSize.width);
Exercise 9.1:
Use the above code in the following
template
to print out the screen size in inches. Next,
bring up a window that is 3 inches wide and 2 inches in height
and place the window approximately in the center of the screen.
(Use the setLocation method
of Component).
Simple drawing and writing
We will now look some basic graphics (drawing and
lettering):
Consider the appropriate widget for drawing:
- In Swing, we usually draw on a
JPanel
that is itself placed inside the
JFrame.
- To actual perform drawing, we need to override
the
paintComponent()
method, which really means we need to
extend
JPanel.
Important: Even though it looks like overriding
the
paint()
method will also work, it should be avoided.
- Also, even though you can draw on most Swing components, but are
not advised to draw on top-level components like
JFrame.
All drawing occurs on a graphics context:
- A graphics context is an instance of class Graphics.
- However, you cannot instantiate this class yourself.
- A component (like JPanel) does that for you.
- Thus, to draw on a JPanel, you need to get a
Graphics instance from the panel.
- The way this works is, you get the Graphics
instance as a parameter of paintComponent (Graphics
g).
The all-important technique of overriding paintComponent()
(and, sometimes, repaint()):
- Swing does not maintain "bit-mapped memory".
- That is, if a window is covered and later uncovered, Swing does not
re-draw the contents.
- Thus, when re-drawing is needed, you have to do it.
- Swing tells you when drawing is needed by calling the
paintComponent() method.
- Thus, you need to override the paintComponent() method
to "do your thing".
- Important: Therefore, you need to extend
the appropriate class (usually JPanel to override
the paintComponent() method.
- This method is given a Graphics instance as
parameter.
Let's look at a simple example:
(source file)
import java.awt.*;
import javax.swing.*;

// Extend JPanel to override its paintComponent() method:

class NewPanel extends JPanel {

    // Set background in constructor.

    public NewPanel ()
    {
        this.setBackground (Color.cyan);
    }


    // Override paintComponent():

    public void paintComponent (Graphics g)
    {
        // Always call super.paintComponent (g):
        super.paintComponent(g);

        // drawString() is a Graphics method.
        // Draw the string "Hello World" at location 100,100
        g.drawString ("Hello World!", 100, 100);

        // Let's find out when paintComponent() is called.
        System.out.println ("Inside paintComponent");
    }

}

public class TestSwing4 {

    public static void main (String[] argv)
    {
        // Create a frame
        JFrame f = new JFrame ();

        // Set the title and other parameters.
        f.setTitle ("Hello World Test");
        f.setResizable (true);
        f.setSize (500, 300);

        // Add the panel using the default BorderLayout
        NewPanel panel = new NewPanel ();
        Container cPane = f.getContentPane ();
        cPane.add (panel);

        // Show the frame.
        f.setVisible (true);
    }

}
Here is the result:
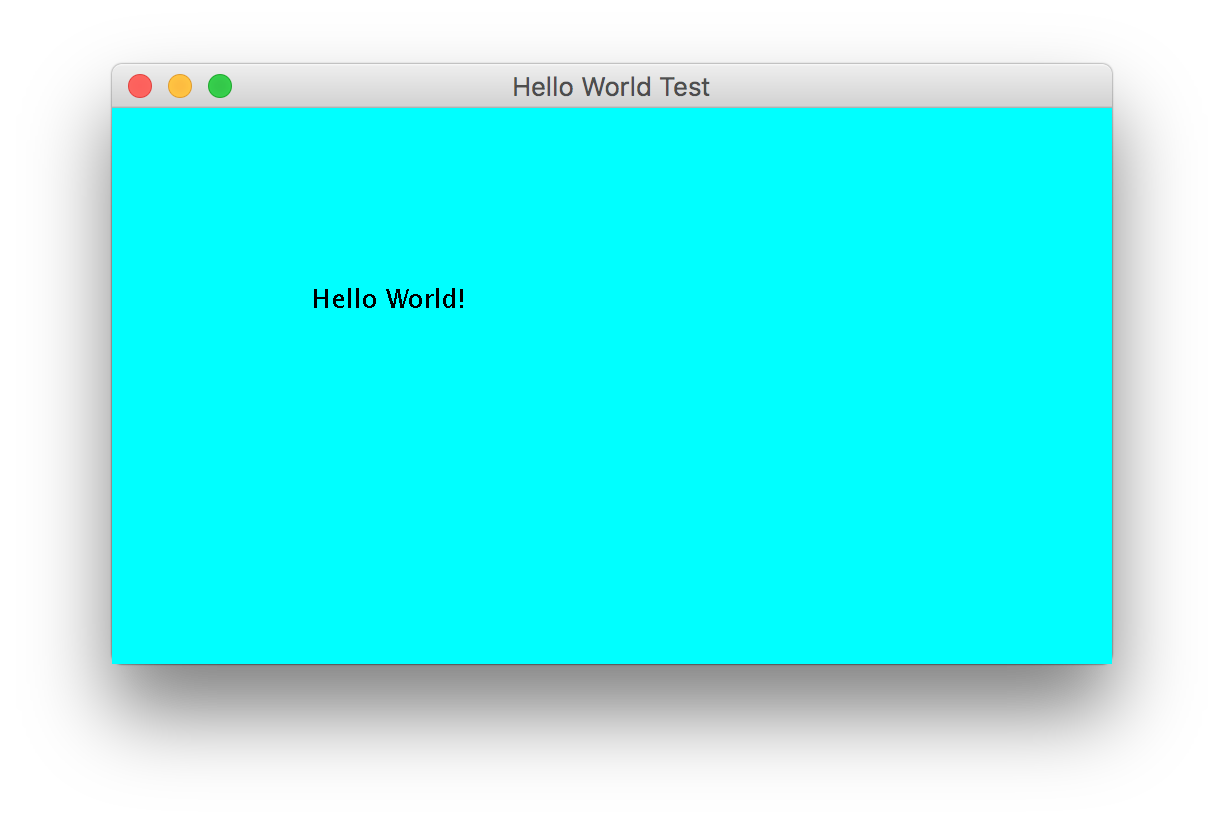
An explanation:
- To write or draw in a frame, we need to override the
paintComponent() method in JPanel.
- To override means we have to inherit from JPanel.
- Above, the class NewPanel extends JPanel:
class NewPanel extends JPanel {

  // ...

}
- Since the NewPanel component will fill up the
contentPane, it's background will be visible.
Therefore, we set the Panel's background color to what we want.
- Note that paintComponent() is passed a Graphics
context.
- Only a graphics context has the means for drawing and writing.
- Here are some methods in Graphics, for example:
- For writing: drawString(), setFont().
- For drawing empty shapes: drawRect(), drawOval, drawPolygon(),
drawPolyline(), drawArc().
- For drawing filled shapes: fillRect(), fillOval(), fillPolygon(),
fillArc().
- For drawing a line: drawLine()
- For clipping and translating: setClip(), translate().
- All measurements are in pixels:
- The frame size is 500 x 300.
- The drawString method draws the specified string
at a location specified from the top-left corner.
(The origin is at the topleft corner).
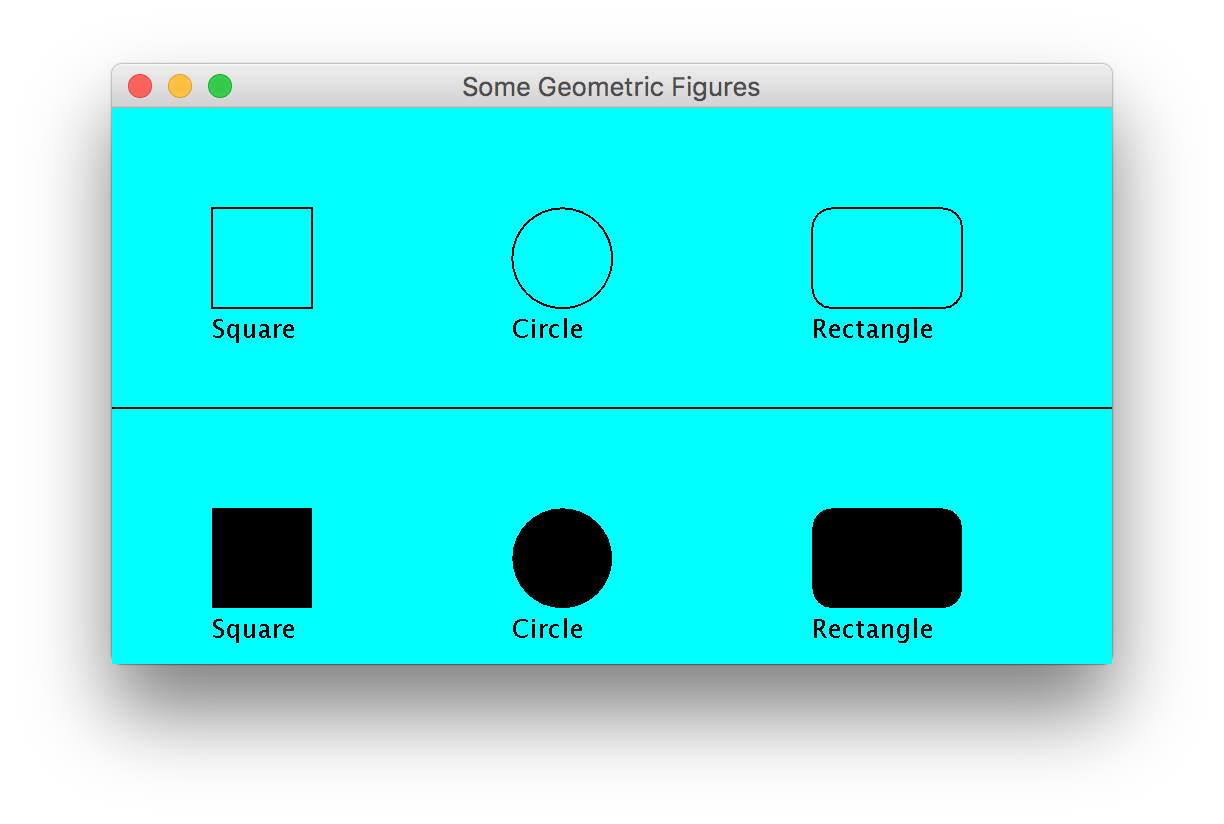
Next, let us draw some geometric figures:
- We will draw un-filled and filled versions of a
square, a circle and a rectangle.
- All the drawing methods are in Graphics.
- We will use methods drawRect(), drawOval()
and drawRoundRect().
- drawRect (int topleftx, int toplefty, int width, int height):
- The first two integers specify the topleft corner.
- The next two are the desired width and height of the rectangle.
- drawOval (int topleftx, int toplefty, int width, int height):
- The first two integers specify the topleft corner.
- The next two are the desired width and height of the
enclosing rectangle.
- drawRect (int topleftx, int toplefty, int width, int height,
int arc_width, int arc_height):
- The first four numbers specify the rectangle.
- The last two specify "roundedness".
- The larger the values, the more rounded the result.
- How the corners are constructed:
- An imaginary oval is constructed in a rectangle of dimensions
arc_width and arc_height.
- The oval is broken into four quadrants.
- Each arc is used as a corner of the target rectangle.
- The drawLine() method is used to draw lines:
- Unfortunately, the line thickness is fixed at one pixel.
- To draw thicker lines, you have to "pack" one-pixel lines
together yourself or use advanced graphics (see below).
For example, consider the following code:
(source file)
import java.awt.*;
import javax.swing.*;

// Extend JPanel to override paintComponent ()
class NewPanel extends JPanel {

    public NewPanel ()
    {
        this.setBackground (Color.cyan);
    }

    public void paintComponent (Graphics g)
    {
        super.paintComponent (g);

        // Draw a Square:
        g.drawRect (50,50,50,50);
        g.drawString ("Square", 50, 115);

        // Circle:
        g.drawOval (200,50,50,50);
        g.drawString ("Circle", 200, 115);

        // Rounded rectangle:
        g.drawRoundRect (350,50,75,50,20,20);
        g.drawString ("Rectangle", 350, 115);

        // Draw a line across the middle:
        g.drawLine (0,150,500,150);

        // Now draw some filled shapes:

        // Square:
        g.fillRect (50,200,50,50);
        g.drawString ("Square", 50, 265);

        // Circle:
        g.fillOval (200,200,50,50);
        g.drawString ("Circle", 200, 265);

        // Rounded rectangle:
        g.fillRoundRect (350,200,75,50,20,20);
        g.drawString ("Rectangle", 350, 265);
    }

}

public class TestSwing5 {

    public static void main (String[] argv)
    {
        // Create an instance of NewFrame
        JFrame f = new JFrame ();

        // Set the title and other parameters.
        f.setTitle ("Some Geometric Figures");
        f.setResizable (true);
        f.setSize (500, 300);

        // Create and add the panel.
        NewPanel panel = new NewPanel ();
        // Note alternative syntax:
        f.getContentPane().add (panel);

        // Show the frame.
        f.setVisible (true);
    }

}
The result produced is:
We can improve the code slightly by placing all the
frame-related code inside NewFrame itself:
(source file)
import java.awt.*;
import javax.swing.*;

// Extend JPanel to override paintComponent ()
class NewPanel extends JPanel {

    public NewPanel ()
    {
        this.setBackground (Color.cyan);
    }

    public void paintComponent (Graphics g)
    {
        super.paintComponent (g);

        // Draw a Square:
        g.drawRect (50,50,50,50);
        g.drawString ("Square", 50, 115);

        // Circle:
        g.drawOval (200,50,50,50);
        g.drawString ("Circle", 200, 115);

        // Rounded rectangle:
        g.drawRoundRect (350,50,75,50,20,20);
        g.drawString ("Rectangle", 350, 115);

        // Draw a line across the middle:
        g.drawLine (0,150,500,150);

        // Now draw some filled shapes:

        // Square:
        g.fillRect (50,200,50,50);
        g.drawString ("Square", 50, 265);

        // Circle:
        g.fillOval (200,200,50,50);
        g.drawString ("Circle", 200, 265);

        // Rounded rectangle:
        g.fillRoundRect (350,200,75,50,20,20);
        g.drawString ("Rectangle", 350, 265);
    }

}


// Create a new Frame class.

class NewFrame extends JFrame {

    public NewFrame ()
    {
        // Set the title and other parameters.
        this.setTitle ("Some Geometric Figures");
        this.setResizable (true);
        this.setSize (500, 300);

        // Create and add the panel.
        NewPanel panel = new NewPanel ();
        this.getContentPane().add (panel);

        // Show the frame.
        this.setVisible (true);
   }

}

public class TestSwing6 {

    public static void main (String[] argv)
    {
        // Simply fire up the whole application.
        NewFrame f = new NewFrame ();
    }

}
Note:
- We used a constructor to set JFrame attributes.
- Since methods in JFrame need to be called for
the particular instance, we use this for clarity.
- We could use a no-parameter constructor to create a default size.
- Note the unusual syntax in replacing
    Container cPane = f.getContentPane ();
    cPane.add (panel);
with the variable-free
f.getContentPane().add (panel);
If you are uncomfortable with this form, use the former syntax.
Exercise 9.2:
Use the following template
to draw a standard 8x8 chessboard.
Place the topleft corner of the chessboard at the topleft corner
of the panel.
Frame insets
In the above chessboard exercise you may have noticed that
a filled rectangle is slightly smaller than an empty one of
the same size (one pixel smaller on two sides).
To fix the problem, you can draw a line around the periphery
of the chessboard.
Note:
- The graphics instance will let you draw well outside the
actual visible area.
However, only the visible area will be shown.
- For example, the following code for a 500x300 frame draws
well outside the visible region:
(source file)
  public void paintComponent (Graphics g)
  {
      super.paintComponent (g);

      // Draw a wide rectangle:
      g.fillRect (-100, 100, 800, 50);
  }
Exercise 9.3:
Modify your Ex 9.3 code or use this
template to dynamically
compute the size of the Panel in paintComponent().
You can do this by getting the width and height by calling
the getWidth() and getHeight() methods of the
Panel itself. This way, if the window
is re-sized, the chessboard will fit the new window.
Writing with fonts
Swing's support for text is somewhat modest:
- There is in-built support for some font families.
- You can load your own font families, but it's complicated.
- Some text layout help is provided.
The following code tells you what fonts are supported:
    // Print out available font names.
    GraphicsEnvironment gEnv = GraphicsEnvironment.getLocalGraphicsEnvironment();
    String[] fNames = gEnv.getAvailableFontFamilyNames();
    System.out.println ("Available font families: ");
    for (int i=0; i < fNames.length; i++)
        System.out.println ("  " + fNames[i]);
Note:
- GraphicsEnvironment is a general-purpose AWT class that bundles together
many system-related properties.
- To get an instance of GraphicsEnvironment, you need to call its
static getLocalGraphicsEnvironment() method.
- The instance method getAvailableFontFamilyNames() provides a list of
fonts, returned as a String-array.
About fonts:
- Swing's font functionality is found in the
classes Font and FontMetrics.
- A font is specified by a type
(or name),
a
size
and a style.
- Font name: the name of the Font family, e.g.,
Zapf Dingbats
- Font styles:
- A font style
is the particular thickness and slant
used for emphasis.
- The constants Font.PLAIN, Font.ITALIC
and Font.BOLD are used to specify styles.
- Swing supports 4 styles:
- Plain:
- This is the regular appearance of the font.
- To specify, use Font.PLAIN.
- Italic:
- This is a slanted version for emphasis.
- To specify, use Font.ITALIC.
- Bold-plain:
- This is a boldface version of the plain style.
- To specify, use Font.PLAIN | Font.BOLD.
(Logical OR).
- Bold-italic:
- This is a boldface version of the italic style.
- To specify, use Font.ITALIC | Font.BOLD.
- Font sizes:
- A font's size is specified using the standard "printer's point"
measure: one "point" is about 1/72 inches.
- Swing does not guarantee that your size specification will be
implemented exactly - only a "best attempt" is made.
- The FontMetrics class provides more information
about a font's sizes.
- Note: a font size is not specified in pixels.
- To use a font, you need to:
- Create an instance of Font, passing the
name, style and size to the constructor.
- To specify a style, use the constants in class Font.
- Pass the Font instance to the Graphics
context using the setFont() method.
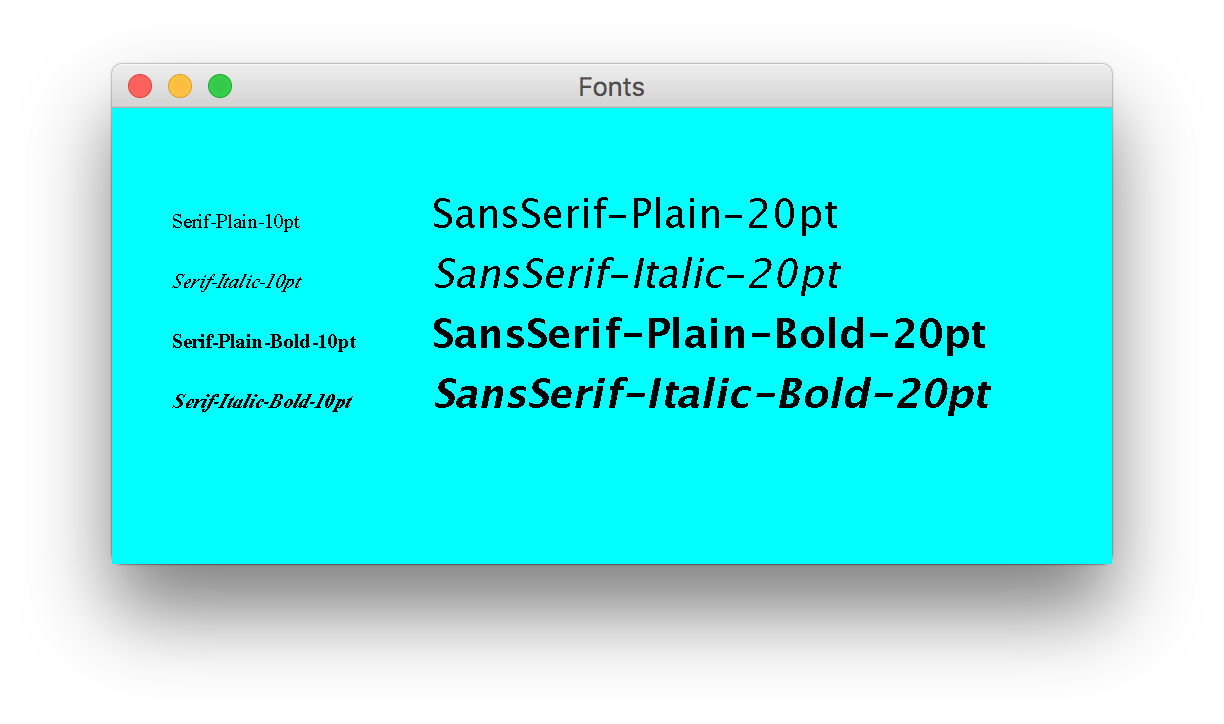
Consider this example, which prints out Serif
and SansSerif strings in two sizes and all the available
styles:
(source file)
import java.awt.*;
import javax.swing.*;

// Extend JPanel to override paintComponent ()
class NewPanel extends JPanel {

    public NewPanel ()
    {
        this.setBackground (Color.cyan);
    }

    public void paintComponent (Graphics g)
    {
        super.paintComponent (g);

        // Create 10-point Serif fonts in all styles:
        Font f = new Font ("Serif", Font.PLAIN, 10);
        g.setFont (f);
        g.drawString ("Serif-Plain-10pt", 30, 60);

        f = new Font ("Serif", Font.ITALIC, 10);
        g.setFont (f);
        g.drawString ("Serif-Italic-10pt", 30, 90);

        f = new Font ("Serif", Font.PLAIN | Font.BOLD, 10);
        g.setFont (f);
        g.drawString ("Serif-Plain-Bold-10pt", 30, 120);

        f = new Font ("Serif", Font.ITALIC | Font.BOLD, 10);
        g.setFont (f);
        g.drawString ("Serif-Italic-Bold-10pt", 30, 150);

        // Create 20-point SansSerif fonts in all styles:
        f = new Font ("SansSerif", Font.PLAIN, 20);
        g.setFont (f);
        g.drawString ("SansSerif-Plain-20pt", 160, 60);

        f = new Font ("SansSerif", Font.ITALIC, 20);
        g.setFont (f);
        g.drawString ("SansSerif-Italic-20pt", 160, 90);

        f = new Font ("SansSerif", Font.PLAIN | Font.BOLD, 20);
        g.setFont (f);
        g.drawString ("SansSerif-Plain-Bold-20pt", 160, 120 );

        f = new Font ("SansSerif", Font.ITALIC | Font.BOLD, 20);
        g.setFont (f);
        g.drawString ("SansSerif-Italic-Bold-20pt", 160, 150);
    }

} // End of NewPanel


// Create a new Frame class.

class NewFrame extends JFrame {

    public NewFrame ()
    {
        // Set the title and other parameters.
        this.setTitle ("Some Geometric Figures");
        this.setResizable (true);
        this.setSize (500, 250);

        // Create and add the panel.
        NewPanel panel = new NewPanel ();
        this.getContentPane().add (panel);

        // Show the frame.
        this.setVisible (true);

        // Print out available font names.
        GraphicsEnvironment gEnv = GraphicsEnvironment.getLocalGraphicsEnvironment();
        String[] fNames = gEnv.getAvailableFontFamilyNames();
        System.out.println ("Available font families: ");
        for (int i=0; i < fNames.length; i++)
            System.out.println ("  " + fNames[i]);
    }

}

public class TestSwing11 {

    public static void main (String[] argv)
    {
        NewFrame nf = new NewFrame ();
    }

}
The result produced is:
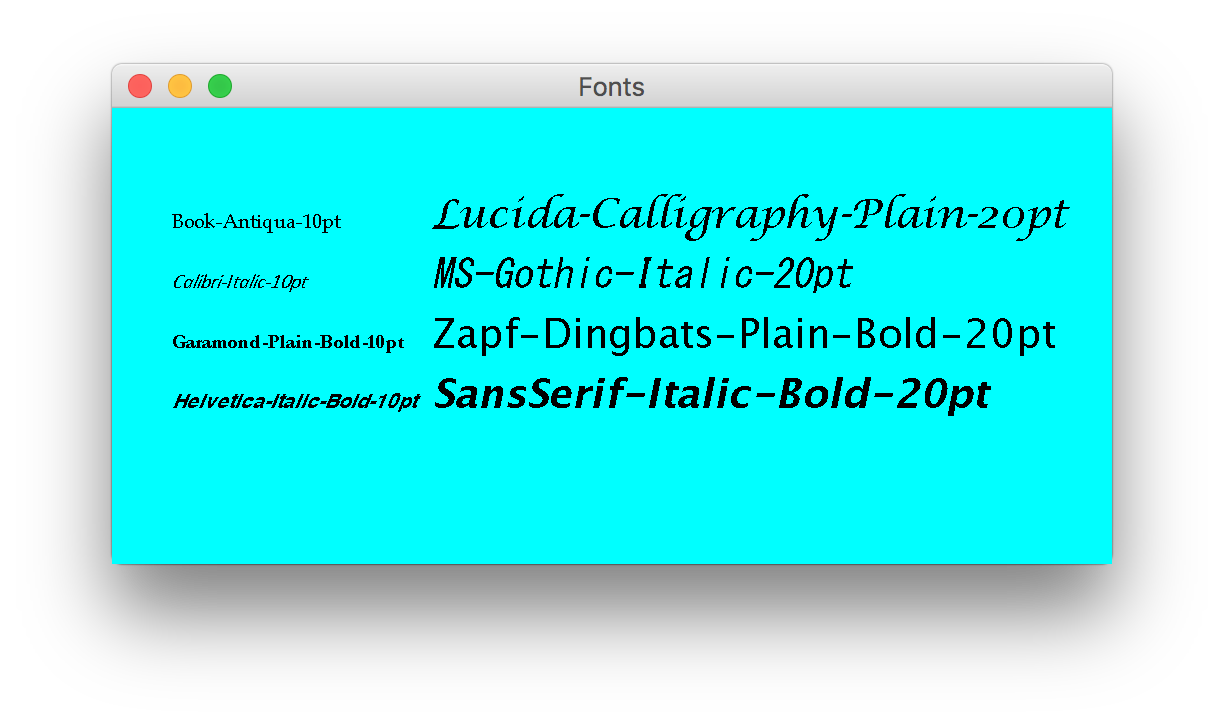
We could use some of the more interesting fonts:
Note:
- The font name is passed as a string:
Font f1 = new Font ("Serif", Font.PLAIN, 10);
- The font style is an OR'ed combination of constants, e.g.,
f1 = new Font ("SansSerif", Font.ITALIC | Font.BOLD, 20);
- To use a font, you first "set" the font using the setFont()
method in the graphics context.
- The drawString method of Graphics will then
draw the specified fonts at a given location.
g.drawString ("Hello World!", 30, 60);
- The lowest point of a non-descending letter like "h" is
used for the y-value.
- You, the programmer, are responsible for laying out the
strings (typesetting):
- you need to compute line lengths, inter-word spacing, etc.
Typesetting:
- A font has several measurements (characteristics)
useful in typesetting:
- Baseline: An imaginary line on which the characters
in a line are placed.
- usually, the lowest point of a non-descending character like "h".
- Ascent: the height of a non-descending character
above the baseline.
- Descent: the distance a
descender like "y"
dips below the baseline.
- Leading (pronounced "ledding"): the distance between the
descent of one line and the ascent of the next line.
(Space between lines, essentially).
- Height: The sum of the
ascent,
descent
and leading.
- Note: the font characteristics depend on the letters in the text.
- An accent is not counted in the ascent.
- A FontMetrics instance provides the characteristics
for a particular font, style and size.
- A FontMetrics instance is usually obtained as
follows:
    // Create a font.
    Font f = new Font ("Serif", Font.PLAIN | Font.BOLD, fontsize);

    // Set the font in the graphics instance.
    g.setFont (f);

    // Get a FontMetrics instance from the graphics instance.
    FontMetrics fm = g.getFontMetrics();
- The class FontMetrics in java.awt has
several methods:
  public abstract FontMetrics implements Serializable {

      //...

      // Some methods that return a font characteristic.
      public int getAscent ();
      public int getDescent ();
      public int getLeading ();
      public int getHeight ();
      public int maxAscent ();
      public int maxDescent ();

      // Get the resulting width of a string.
      public int stringWidth (String s);

      //...

    }
- If accents are being used, it may be advisable to use
the sum of maxAscent, maxDescent and leading.
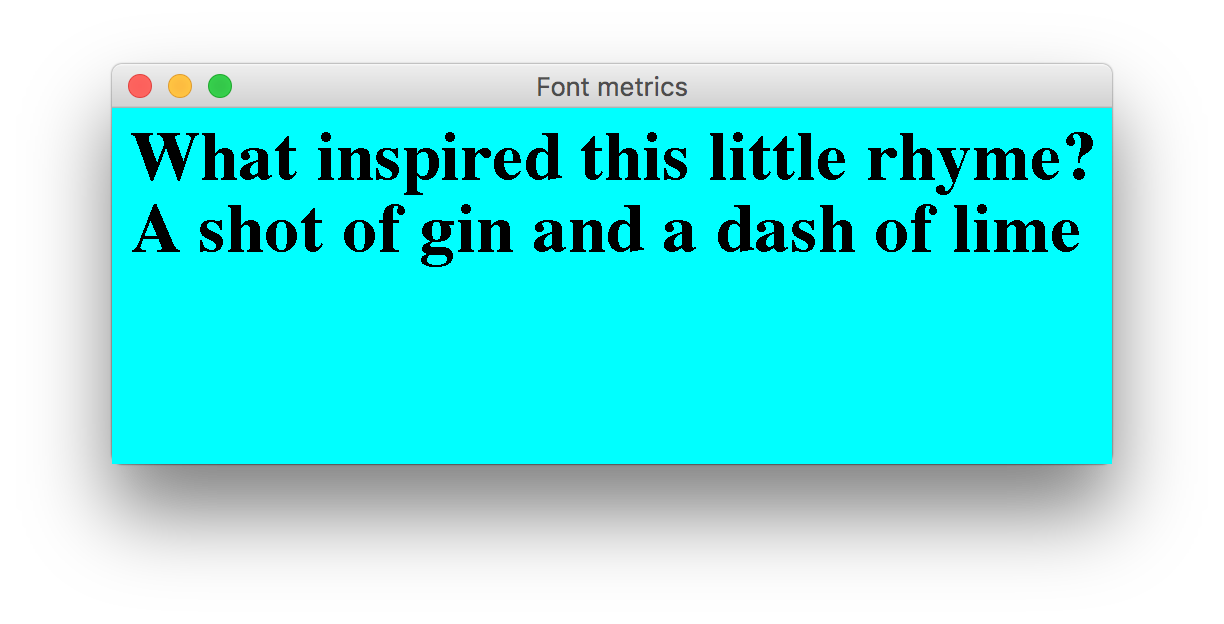
We will consider an example in which:
- We are given a piece of text as an array of String's,
and we want to write out the words so that words are not broken up.
- We will allow the font size to be specified.
- We will use the stringWidth() method in FontMetrics
to get the size of a string in pixels.
Here is code:
(source file)
import java.awt.*;
import javax.swing.*;

// Extend JPanel to override paintComponent ()
class NewPanel extends JPanel {

  String[] words; // List of words to display.
  int fontsize;   // Size of font.

  public NewPanel (String[] words, int fontsize)
  {
    // Retain data and font size.
    this.words = words;
    this.fontsize = fontsize;

    this.setBackground (Color.cyan);
  }

  public void paintComponent (Graphics g)
  {
    super.paintComponent (g);
    // Create a Serif font in the given font size.
    Font f = new Font ("Serif", Font.PLAIN | Font.BOLD, fontsize);
    g.setFont (f);

    // Get a FontMetrics instance from the graphics context.
    FontMetrics fm = g.getFontMetrics();

    // Get the height (height of font plus separator).
    int fontheight = fm.getHeight ();

    // Size of frame plus insets.
    Dimension D = this.getSize ();

    // Visible drawing area
    int max_width = D.width;
    int max_height = D.height;

    // Start at topleft.
    int startx = 0;

    // Must add font height since bottom left corner
    // of font is used as starting point.
    int y = 0 + fontheight;

    int x = startx;
    for (int i=0; i < words.length; i++) {

      // Obtain pixel-length of string (with blank)
      int len = fm.stringWidth (" " + words[i]);

      if (x + len < max_width) {
        // If it fits within the current line, draw it
	g.drawString (" " + words[i], x, y);
	x += len;
      }
      else {
	// Go to next line.
	x = startx;
	y += fontheight;
	g.drawString (" " + words[i], x, y);
	x += len;
      }
    }

  }

} // End of NewPanel

class NewFrame extends JFrame {

  // Constructor.
  public NewFrame (int width, int height, String[] words, int fontsize)
  {
    // Set the title and other frame parameters.
    this.setTitle ("Font metrics");
    this.setResizable (true);
    this.setSize (width, height);

    // Create and add the panel.
    NewPanel panel = new NewPanel (words, fontsize);
    this.getContentPane().add (panel);

    // Show the frame.
    this.setVisible (true);
  }

} // End of class "NewFrame"

public class TestSwing12 {

  public static void main (String[] argv)
  {
    String[] testwords = {
        "What", "inspired", "this", "little", "rhyme?",
        "A", "shot", "of", "gin", "and", "a", "dash", "of", "lime"
    };
    NewFrame nf = new NewFrame (500, 200, testwords, 35);
  }

}
This prints out the following:
Note:
- We have used the method getSize() in Component
(and therefore in NewFrame) to get the window size:
(The window size may be changed.)
Dimension D = this.getSize ();
- The x-value is the leftmost drawable location:
int startx = 0;
- However, the first baseline
is well-below the
the top of the drawable area.
- Here, we add the font's height (adding the ascent is actually enough):
int y = 0 + fontheight;
- The list of words and desired font size
is passed to the constructor:
NewFrame nf = new NewFrame (750, 200, testwords, 35);
Exercise 9.4:
Use the following
template to create a frame in which you write the largest
possible "Hello World!" that will fit into the drawable area.
Start with a font size of 10 and increase the size in increments
of 10 until you find the largest possible font that will fit into
the drawable area.
Allow for the situation where the window may be resized.
Images
Java provides some support for loading, manipulating and
displaying images in a window:
- Simple features include:
- Loading a JPEG, GIF or animated GIF image from a file or URL.
- Displaying the image in a Frame using the
drawImage method in Graphics.
- Tracking the "wait" during image upload.
- Advanced features include:
- Creating a buffer for images.
- Manipulating images: shrinking, rotating.
- Defining and using image filters.
- The classes for most simple features are in java.awt
whereas the more complicated stuff is in java.awt.image.
In this module, we will only consider simple image features.
About image formats
- Images consist of pixel values: each pixel is determined
by its "RGBA" values, typically 8-bits for each value.
- The "A" is transparency.
- Images are typically stored in compressed format.
- GIF (Graphical Interchange Format) is one such format:
- GIF (created by CompuServe) uses the lossless Lempel-Ziv-Welch
(LZW) algorithm.
- GIF is probably the most popular format.
- However, there is a patent controversy surrounding GIF.
(Unisys holds the LZW patent).
- JPEG (Joint Photographic Experts Group) is another format:
- JPEG uses lossy compression based on a number of
image-processing techniques such as transforms (DCT)
and quantization.
- JPEG is free.
- JPEG is really an algorithm spec rather than a file spec.
- PNG (Portable Network Graphics) format:
- Lossless format, like GIF.
- Slightly better compression than GIF.
- Free of patent issues.
- Support for transparency and progressive display.
- Java handles GIF, JPEG and PNG formats and decides based on the
extensions .gif, .jpeg or .jpg,
and .png.
The following classes are useful:
- java.awt.Image:
- An Image instance is used to store and maintain
pixels from an image.
- The full set of pixels is not necessary -- any subset will do.
- Image does not provide access to the raw pixels.
- To actually get at the pixels, you need to use PixelGrabber.
- java.awt.Toolkit:
- Toolkit is a motley collection of useful methods
bundled together into a single class, in package java.awt.
- You cannot create an instance, but must instead use the
method Toolkit.getDefaultToolkit().
- The getImage() method is the most important method
of the Toolkit instance.
- getImage() comes in two flavors:
   public Image getImage (String filename);
   public Image getImage (URL u);
- Both methods return an Image instance.
- MediaTracker:
- The getImage() method above is written to return
immediately.
- Thus, as the image loads, it starts filling up the window,
typically, top-down.
- If you want to wait until the entire image has loaded,
use a MediaTracker instance.
- Graphics:
- As with any rendering, the Graphics instance
passed to the paintComponent() method is used.
- The method drawImage() (and its variants) is
is used to display an image.
- ImageObserver:
- ImageObserver is really an interface in java.awt.
- It has just one method.
- The method is used by a image-rendering process to
report on progress, on errors etc.
- An instance must be passed to drawImage().
- The class Component (and therefore JPanel)
implements this interface.
- Thus, the JPanel instance itself is usually passed
via this.
Let's look at a simple example:
(source file)
import java.awt.*;
import javax.swing.*;

// Extend JPanel to override paintComponent ()
class NewPanel extends JPanel {

    public NewPanel ()
    {
        this.setBackground (Color.cyan);
    }

    public void paintComponent (Graphics g)
    {
        super.paintComponent (g);

        // Get a Toolkit instance.
        Toolkit tk = Toolkit.getDefaultToolkit ();

        // Provide a filename to the getImage() method.
        Image img = tk.getImage ("bugs.gif");

        // Use the drawImage method.
        g.drawImage (img, 0, 0, this);
        // Note: we pass "this" as a parameter.
    }

} // End of NewPanel

class NewFrame extends JFrame {

    // Constructor.
    public NewFrame (int width, int height)
    {
        // Set the title and other frame parameters.
        this.setTitle ("Bugs");
        this.setResizable (true);
        this.setSize (width, height);

        // Create and add the panel.
        NewPanel panel = new NewPanel ();
        this.getContentPane().add (panel);

        // Show the frame.
        this.setVisible (true);
    }

} // End of class "NewFrame"

public class TestSwing13 {

    public static void main (String[] argv)
    {
        NewFrame nf = new NewFrame (300, 200);
    }

}
The result produced is:
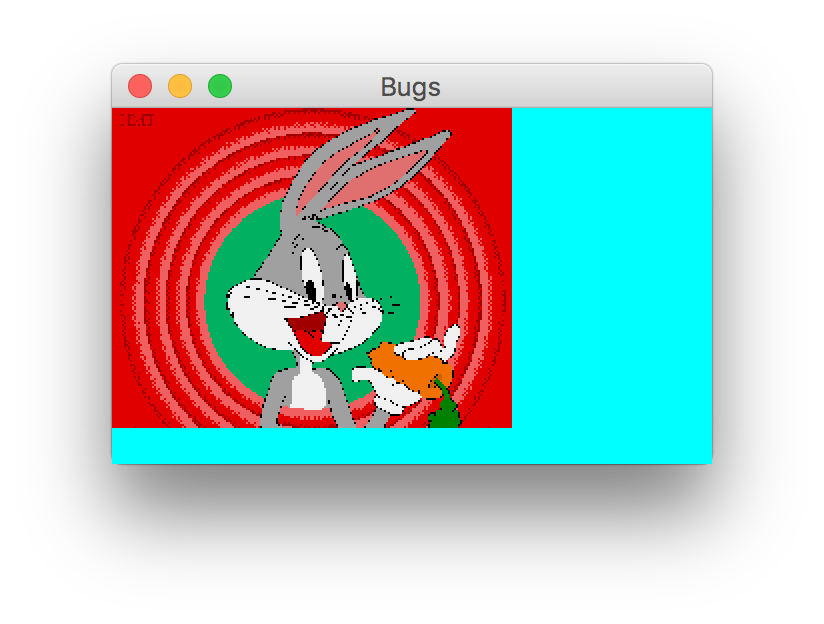
Note:
- The format is GIF.
- The file is assumed to be in the same directory.
- Since the insets were not used, part of the image
gets clipped.
- The definition of drawImage() used is:
public void boolean drawImage (Image img, int x, int y, ImageObserver I);
Here:
- You pass an Image instance (img).
- You pass the point where the topleft corner of the image
is to be located.
- You pass an ImageObserver instance.
- Note that Component implements the
ImageObserver interface:
  public abstract class Component
    implements ImageObserver, MenuContainer, Serializable {

    // ...

  }
- Thus, Frame, which is a subclass of Component,
also implements ImageObserver.
- Therefore, we can pass the current Frame instance
(via this) as the fourth parameter:
g.drawImage (img, 0, 0, this);
- You don't really need to understand the purpose of
ImageObserver at this time.
Finally, we can clean up the code in NewPanel a little:
class NewPanel extends JPanel {

    Image img;

    public NewPanel ()
    {
        this.setBackground (Color.cyan);
        // Get a Toolkit instance.
        Toolkit tk = Toolkit.getDefaultToolkit ();

        // Provide a filename to the getImage() method.
        img = tk.getImage ("bugs.gif");
    }

    public void paintComponent (Graphics g)
    {
        super.paintComponent (g);

        g.drawImage (img, 0, 0, this);
    }

} // End of NewPanel
In the next example, we will fetch an image from a URL:
(source file)
import java.awt.*;
import javax.swing.*;
import java.net.*;  // For class URL.

// Extend JPanel to override paintComponent ()
class NewPanel extends JPanel {

    public NewPanel ()
    {
        this.setBackground (Color.cyan);
    }

    public void paintComponent (Graphics g)
    {
        super.paintComponent (g);

        Toolkit tk = Toolkit.getDefaultToolkit ();

        // try-catch needed since URL constructor throws an exception.
        try {
            // URL is in java.net.
            URL u = new URL ("http://www.seas.gwu.edu/~simha/canyon.jpg");

            // Load the image using the second form of getImage().
            Image img = tk.getImage (u);

            // Display image.
            g.drawImage (img, 0, 0, this);
        }
        catch (MalformedURLException e) {
            System.out.println (e);
        }
    }

} // End of NewPanel


class NewFrame extends JFrame {

    // Constructor.
    public NewFrame (int width, int height)
    {
        // Set the title and other frame parameters.
        this.setTitle ("Gif image");
        this.setResizable (true);
        this.setSize (width, height);

        // Create and add the panel.
        NewPanel panel = new NewPanel ();
        this.getContentPane().add (panel);

        // Show the frame.
        this.setVisible (true);
    }

} // End of class "NewFrame"

public class TestSwing14 {

    public static void main (String[] argv)
    {
        NewFrame nf = new NewFrame (600, 300);
    }

}
The result is:
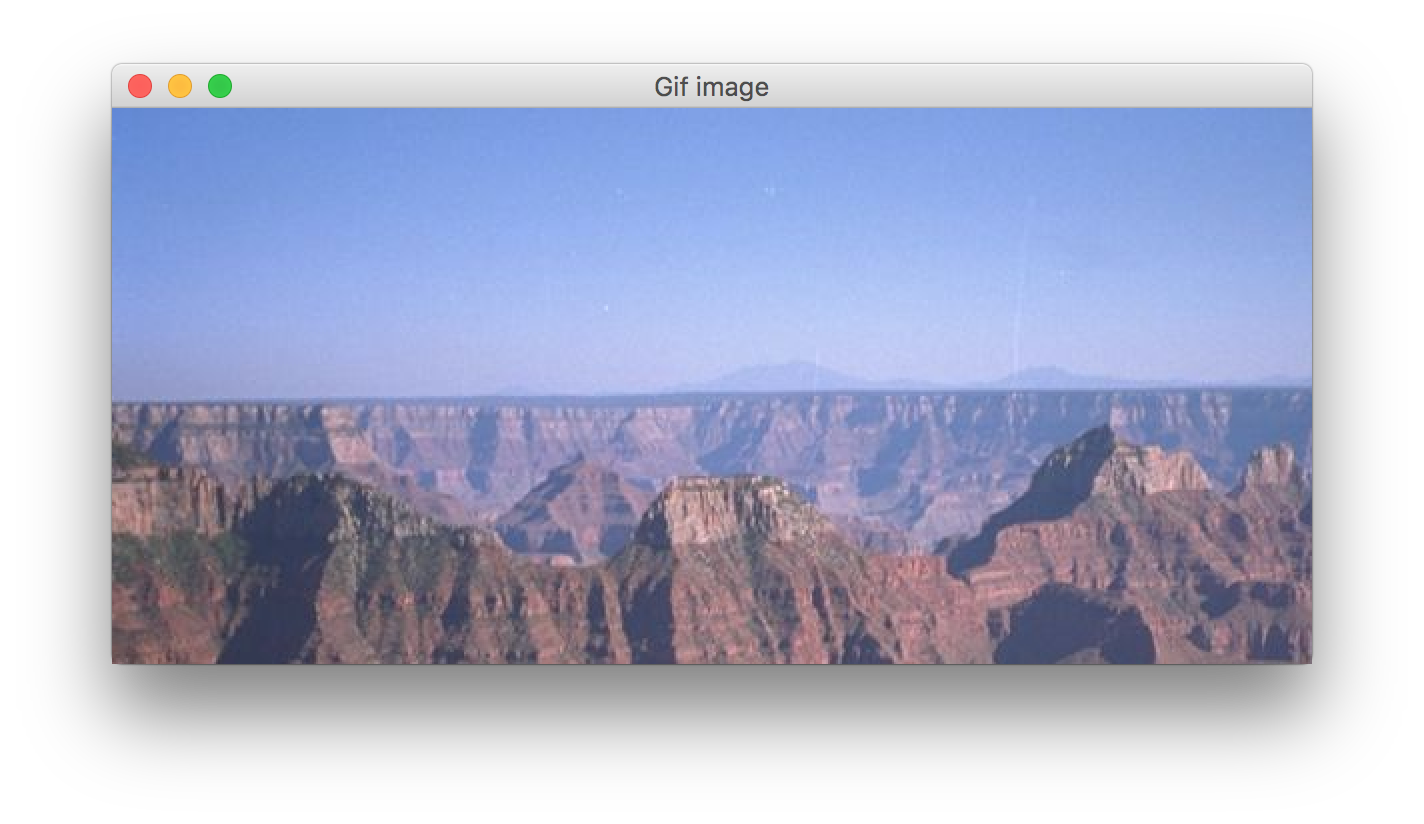
Note:
- The class URL is in package java.net.
- An actual URL is passed to the constructor of the class
URL:
URL u = new URL ("http://www.seas.gwu.edu/~simha/canyon.jpg");
- The getImage() method of Toolkit has
a form that takes in a URL instance.
- Large images can take
time to load.
Exercise 9.5:
Use the following
template to create a frame in which you
load the image at URL
http://www.seas.gwu.edu/~simha/mystery_person.jpg.
and then fit the image so that it fits exactly into the
drawable area. To do this:
- use the method getSize() in JPanel to get
a Dimension instance which contains the width
and height of the frame.
- use another version of drawImage() that allows
you to specify the desired width and height for the image:
  public boolean drawImage (Image img, int x, int y, int width,
                            int height, ImageObserver I);
Can you identify the person in the picture?
Next, we will use a MediaTracker instance to
complete loading before display:
(source file)
  public void paintComponent (Graphics g)
  {
      super.paintComponent (g);

      Toolkit tk = Toolkit.getDefaultToolkit ();

      try {
          URL u = new URL ("http://www.seas.gwu.edu/~simha/canyon.jpg");
          Image img = tk.getImage (u);

          // Create an instance of MediaTracker and
          // pass a Frame instance as parameter (via "this").
          MediaTracker mt = new MediaTracker (this);

          // Add the image instance to the tracker.
          mt.addImage (img, 1);

          // We will use a "wait" (clock) cursor while the
          // image is loading.
          this.setCursor (Cursor.getPredefinedCursor(Cursor.WAIT_CURSOR));

          // Ask the MediaTracker to wait.
          try {
  	      mt.waitForID (1);
          }
          catch (InterruptedException e) {
	      System.out.println (e);
          }
          // Now the image has been loaded.

          // Return to default cursor.
          this.setCursor (Cursor.getPredefinedCursor(Cursor.DEFAULT_CURSOR));

          // Draw the complete image.
          g.drawImage (img, 0, 0, this);
      }
      catch (MalformedURLException e) {
          System.out.println (e);
      }
  }
Exercise 9.6:
Use the following
template to create a frame in which you
load the four images person1.jpg,
person2.jpg, person3.jpg
and person4.jpg at URL
http://www.seas.gwu.edu/~simhaweb/java/.
(Thus, the URL for person1.jpg is
http://www.seas.gwu.edu/~simhaweb/java/person1.jpg).
Your goal is to fit all four images side by side and so
that each image is the same size.
The following methods will be useful:
- Use MediaTracker to wait for all images to be loaded.
- Class Image has methods getWidth() and
getHeight() to obtain the width and height of an image
(after its loaded).
- Both the above methods need to be given an ImageObserver
instance as a parameter.
- Use setSize(int w, int h) to set the size of the frame.
- Finally, use drawImage() to draw the images at the
right places.
- Identify the four people.
Interaction: buttons
Thus far, we have only drawn or painted on a window.
To allow a user to interact, we need to receive user input
in the form of mouse-clicks or keyboard characaters.
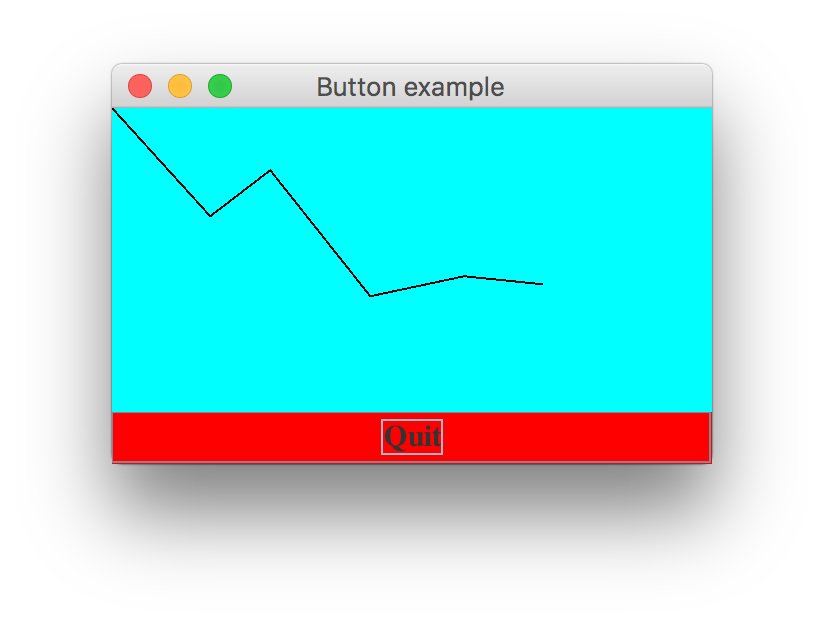
We will first consider a simple "quit" button as an example:
(source file)
import java.awt.*;
import javax.swing.*;

class NewFrame extends JFrame {

    // Constructor.
    public NewFrame (int width, int height)
    {
        // Set the title and other frame parameters.
        this.setTitle ("Button example");
        this.setResizable (true);
        this.setSize (width, height);

        // Extract the contentPane because we'll
        // need to refer to it a couple of times.
        Container cPane = this.getContentPane();
        cPane.setBackground (Color.cyan);

        // Create a Button instance and pass the button
        // label as a parameter to the constructor.
        JButton b = new JButton ("Quit");

        // Set the layout manager for our Frame.
        cPane.setLayout (new BorderLayout());

        // Add the button to the frame.
        cPane.add (b);

        // Show the frame.
        this.setVisible (true);
    }

} // End of class "NewFrame"


public class TestSwing16 {

    public static void main (String[] argv)
    {
        NewFrame nf = new NewFrame (300, 200);
    }

}
The result produced is:
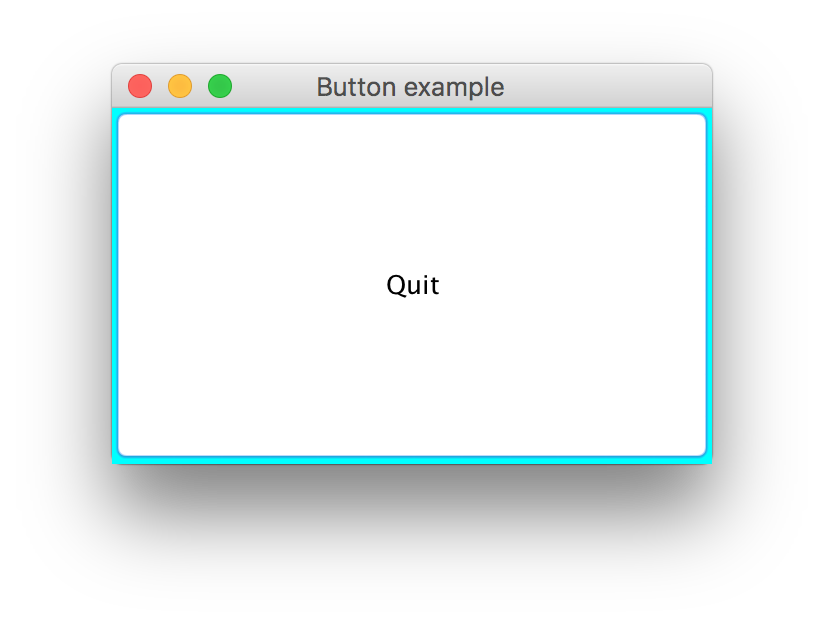
Note:
- The button occupies the entire visible area of the frame.
(This is a result of the layout method used).
- The default button color is grey.
- This button does flash when clicked, but nothing happens.
(We haven't created a button-pressed event-handler yet).
- Class javax.swing.JButton is used to create a button instance:
- Here is (part of) the definition of JButton:
  public class JButton extends AbstractButton implements Accessible {

      // Constructors.
      public JButton ();
      public Button (String label);
      public Button (Icon I);
      public Button (String label, Icon I);

      // Some important methods inherited from AbstractButton:
      public void addActionListener (ActionListener a);
      public String getText ();
      public synchronized void setText (String label);

      // ...
  }
- The text inside a button is passed as a String
to the JButton constructor:
JButton b = new JButton ("Quit");
- Since JButton extends JComponent
(and Component), it
inherits a whole bunch of methods, e.g.,
- setBackground (Color c) - set the background color
of the button.
- setForeground (Color c) - set the font color.
- setFont (Font) - set the font used.
- setText (String) - set label.
When one component (like a button) is placed inside another, there
are usually two aspects to pay attention to:
- A component that can hold other components is called a container.
- Sometimes, a component like a
JFrame
is not the right container.
- In fact,
we first need to retrieve
JFrame's
container to place something in it.
- Other components like
JPanel
are containers themselves with their own
add()
method.
- The other aspect to keep in mind is the layout:
- Each container uses a
layout manager to arrange components for display:
- Layout managers don't let you control exact locations,
but give you some options in controlling the layout.
- Layout managers also ignore sizes of components.
- These are examples of layout managers:
- BorderLayout: this manager tries to place components
either in one of five locations: North, South, East, West
or Center (default).
- FlowLayout: this manager places components left to right
and row-by-row (in standard scan order).
- CardLayout: this manager displays only one component at
a time, like a rolodex.
- GridLayout: this manager places components in a grid.
- GridBagLayout: this manager uses a grid-like approach
that allows for different row and column sizes.
- Each layout manager is a class in java.awt or
javax.swing.
- We will cover layout managers later.
- The setLayout() method is used to choose the layout manager.
- The default layout manager for a Frame is
BorderLayout, so the setLayout() call was not really
necessary, but was used here to highlight the layout manager.
- The add method is used to add a component:
- The add method above has this signature:
public Component add (Component c);
- Since JButton derives from Component,
it can be passed as a parameter.
- Note: we did not use the return value (it has an esoteric purpose).
Note: the code for creating and adding a button is inside
the constructor of NewFrame:
- Note that placing the button creation code in
paintComponent() won't work:
(source file)
  public void paintComponent (Graphics g)
  {
      super.paintComponent (g);

      JButton b = new JButton ("QUIT");

      // Add the button to the panel
      this.add (b);
      this.validate ();
  }
- An alternative (less desirable) is to place the code for
button creation outside the frame, e.g.,
(source file)
public class TestSwing18 {

    public static void main (String[] argv)
    {
        NewFrame nf = new NewFrame (300, 200);
        // Extract the contentPane because we'll
        // need to refer to it a couple of times.
        Container cPane = nf.getContentPane();
        cPane.setBackground (Color.cyan);

        // Create a Button instance and pass the button
        // label as a parameter to the constructor.
        JButton b = new JButton ("Quit");
        b.setBackground (Color.cyan);

        // Set the layout manager for our Frame.
        cPane.setLayout (new BorderLayout());

        // Add the button to the frame.
        cPane.add (b);

        nf.validate();
    }

}
- Note that we used the validate() method of Container
(inherited by NewFrame that is needed to "reset" the
interior, so that the button can be displayed.
Next, let us try making small changes in the layout:
- First, we will explicitly ask BorderLayout to
place the button in the "South" area of the window:
(source file)
    // Create a Button instance and pass the button
    // label as a parameter to the constructor.
    JButton b = new JButton ("Quit");
    b.setBackground (Color.cyan);

    // Set the layout manager for our Frame.
    cPane.setLayout (new BorderLayout());

    // Add the button to the frame.
    cPane.add (b, BorderLayout.SOUTH);

    // Show the frame.
    this.setVisible (true);
This produces:

Note:
- This time, the button has a "normal" height, but is stretched
to occupy all available width.
- A different version of add is used: a constant
is passed as parameter to indicate "South".
- To see where BorderLayout places items, let's
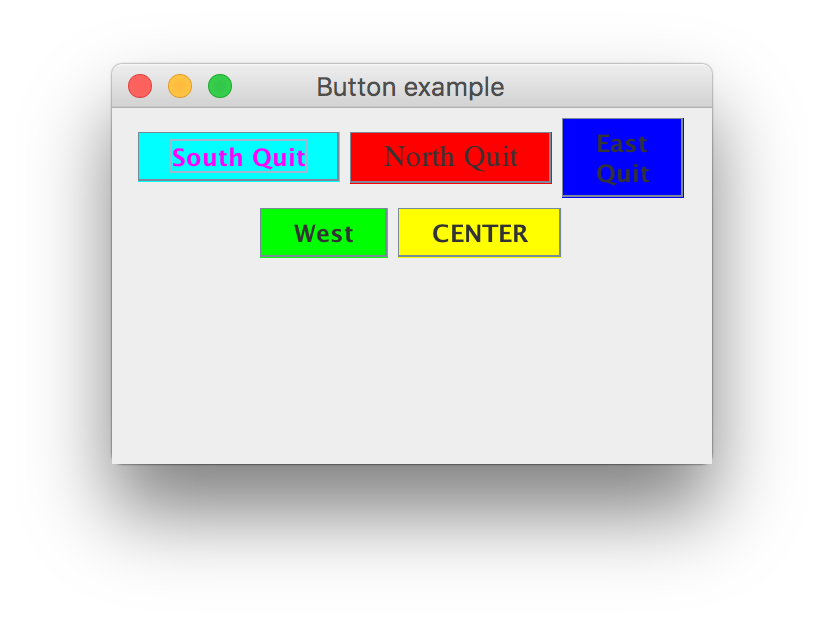
insert five buttons with this code:
(source file)
    // Add five buttons at the different locations:
    JButton b1 = new JButton ("South Quit");
    b1.setBackground (Color.cyan);
    b1.setForeground (Color.magenta);
    cPane.add (b1, BorderLayout.SOUTH);

    JButton b2 = new JButton ();
    b2.setBackground (Color.red);
    b2.setFont (new Font ("Serif", Font.PLAIN, 15));
    b2.setText ("North Quit");
    cPane.add (b2, BorderLayout.NORTH);

    JButton b3 = new JButton ("<html> East <p> Quit </html>");
    b3.setBackground (Color.blue);
    cPane.add (b3, BorderLayout.EAST);

    JButton b4 = new JButton ("West");
    b4.setBackground (Color.green);
    cPane.add (b4, BorderLayout.WEST);

    JButton b5 = new JButton ("CENTER");
    b5.setBackground (Color.yellow);
    cPane.add (b5, BorderLayout.CENTER);
- Here is the (ghastly) result:

NOTE:
- We can use limited HTML in the text:
JButton b3 = new JButton ("<html> East <p> Quit </html>");
- We set the Font in a component:
    b2.setFont (new Font ("Serif", Font.PLAIN, 15));
    b2.setText ("North Quit");
- The default on Mac-OS-X is to use Mac-compatible look-and-feel.
- To force Java on OS-X to use the cross platform look-and-feel,
one needs to add
	try {
	    UIManager.setLookAndFeel (UIManager.getCrossPlatformLookAndFeelClassName());
	} catch (Exception e) {
	    e.printStackTrace ();
	}
to the frame constructor.
- Next, let's use FlowLayout for these same buttons.
- The following code is used:
(source file)
    // Set the layout manager for our Frame.
    cPane.setLayout (new FlowLayout());

    // Add five buttons at the different locations:
    JButton b1 = new JButton ("South Quit");
    b1.setBackground (Color.cyan);
    b1.setForeground (Color.magenta);
    cPane.add (b1);

    JButton b2 = new JButton ();
    b2.setBackground (Color.red);
    b2.setFont (new Font ("Serif", Font.PLAIN, 15));
    b2.setText ("North Quit");
    cPane.add (b2);

    JButton b3 = new JButton ("<html> East <p> Quit </html>");
    b3.setBackground (Color.blue);
    cPane.add (b3);

    JButton b4 = new JButton ("West");
    b4.setBackground (Color.green);
    cPane.add (b4);

    JButton b5 = new JButton ("CENTER");
    b5.setBackground (Color.yellow);
    cPane.add (b5);
- Here is the result:
Next, we will add an event-listener that handles the
case when the button is pressed.
Here is the code:
(source file)
import java.awt.*;
import javax.swing.*;
import java.awt.event.*; // Needed for ActionListener.

class NewFrame extends JFrame implements ActionListener {

    // Constructor.
    public NewFrame (int width, int height)
    {
        // Set the title and other frame parameters.
        this.setTitle ("Button example");
        this.setResizable (true);
        this.setSize (width, height);

        Container cPane = this.getContentPane();

        // Create a new button.
        JButton b = new JButton ("<html> <b> Quit </b> </html>");
        b.setBackground (Color.red);

        // Add an ActionListener to the button.
        b.addActionListener (this);

        // BorderLayout is already the manager of the content pane
        // but leave a comment as a reminder.
        // cPane.setLayout (new BorderLayout());

        // Add the button to the south of the frame.
        cPane.add (b, BorderLayout.SOUTH);

        // Show the frame.
        this.setVisible (true);
    }

    // This method is required to implement the
    // ActionListener interface.

    public void actionPerformed (ActionEvent a)
    {
        System.out.println ("In actionPerformed");

        // Button must have been pressed - so really quit.
        System.exit (0);
    }

} // End of class "NewFrame"


public class TestSwing22 {

    public static void main (String[] argv)
    {
        NewFrame nf = new NewFrame (300, 200);
    }

}
Here is the result:
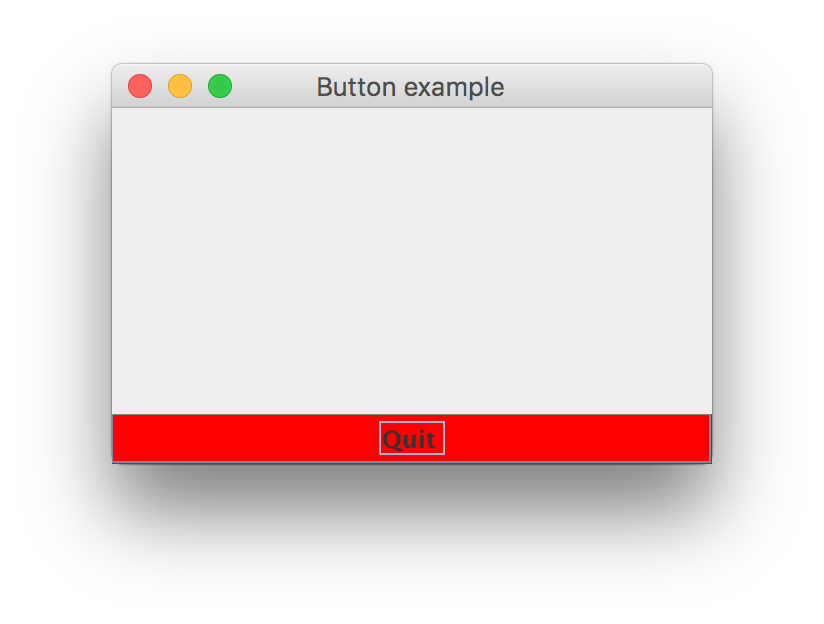
Note:
- JButton inherits a method called addActionListener.
- Exactly what is an ActionListener?
- The definition can be found in package java.awt.event:
    public interface ActionListener extends EventListener {
        public abstract void actionPerformed (ActionEvent e);
    }
- Note: interface EventListener is empty.
- Thus, an implementor of ActionListener needs
to implement only one method: ActionPerformed().
- This method will be called whenever an "action" takes
place.
- In the above case, the method is called when the button
is pressed.
- We have made our frame (NewFrame) itself implement
the ActionListener interface.
- Since NewFrame is an ActionListener, we
register it with our button:
    // Add an ActionListener to the button.
    b.addActionListener (this);
This tells the button, that the listener has a method called
ActionPerformed that can be called when the button
is pressed.
- Note that ActionPerformed is actually
called when the button is pressed:
- The only thing that needs to be done is to actually quit.
- The parameter ActionEvent contains some information
(that is not needed in this case).
- This information can be used as follows (an alternative
to method ActionPerformed():
  public void actionPerformed (ActionEvent a)
  {
      String event_desc = a.getActionCommand();
      if (event_desc.equalsIgnoreCase("Quit"))
          System.exit (0);
  }
- Here, we make doubly sure that it is the Quit button that
generated the event.
- If multiple buttons are used, we can distinguish between them, e.g.,
  public void actionPerformed (ActionEvent a)
  {
      String event_desc = a.getActionCommand();
      if (event_desc.equalsIgnoreCase("Quit"))
          System.exit (0);
      else if (event_desc.equalsIgnoreCase ("Refresh")) {
          // Whatever...
      }
  }
Exercise 9.7:
Use the following
template to create a frame:
- Create a JPanel and install it in
the CENTER of the frame's content pane.
Write "Hello World!" at location 100,100.
- Create a "Quit" button and install it in
the SOUTH location - quit when this button is pressed.
- Create a "Zoom" button - double the font size
of the "Hello World" string in the panel
when this button is pressed.
Thus, you need to add lines to ActionPerformed() to
change the fontsize in the panel.
Then, you need to call repaint() at the end of
ActionPerformed. Finally, you need to implement
the method paintComponent (as we have done before) to actually
draw the string "Hello World!" in the desired size.
Explain where polymorphism was used in this example.
Interaction: mouse clicks
We will now write a simple program to perform some drawing
based on mouse-clicks:
- Whenever the user clicks the mouse inside the frame, a line
is drawn from the last click-place to the current click place.
- The starting point for the first segment will be (0,0).
- The frame will have a quit button.
To "listen" for mouse-clicks, we need an object that implements
the MouseListener interface:
- Interface MouseListener is defined as:
   public interface MouseListener extends EventListener {
       public abstract void mouseClicked (MouseEvent e);
       public abstract void mouseEntered (MouseEvent e);
       public abstract void mouseExited (MouseEvent e);
       public abstract void mousePressed (MouseEvent e);
       public abstract void mouseReleased (MouseEvent e);
   }
- These five methods have to be overridden to successfully
implement the interface.
- However, we are only interested in mouse-click events.
Here is the code:
(source file)
import java.awt.*;
import javax.swing.*;
import java.awt.event.*; // Needed for ActionListener.

class NewPanel extends JPanel {

    public NewPanel ()
    {
        this.setBackground (Color.cyan);
    }

}


class NewFrame extends JFrame
    implements ActionListener, MouseListener {

    NewPanel panel;

    // Constructor.
    public NewFrame (int width, int height)
    {
        // Set the title and other frame parameters.
        this.setTitle ("Button example");
        this.setResizable (true);
        this.setSize (width, height);

        Container cPane = this.getContentPane();
        // cPane.setLayout (new BorderLayout());

        // The panel for drawing.
        panel = new NewPanel ();
        cPane.add (panel, BorderLayout.CENTER);

        // Add mouse-listening to panel.
        panel.addMouseListener (this);

        // Create a quit button.
        JButton b = new JButton ("Quit");
        b.setBackground (Color.red);
        b.setFont (new Font ("Serif", Font.PLAIN | Font.BOLD, 15));
        b.addActionListener (this);
        cPane.add (b, BorderLayout.SOUTH);

        // Show the frame.
        this.setVisible (true);
    }

    // This method is required to implement the
    // ActionListener interface.
    public void actionPerformed (ActionEvent a)
    {
        // Button must have been pressed - so really quit.
        System.exit (0);
    }

    // These methods are required to implement
    // the MouseListener interface.
    int currentX=0, currentY=0;
    public void mouseClicked (MouseEvent m)
    {
        System.out.println ("mouseClicked event: " + m.paramString());
        int x = m.getX();
        int y = m.getY();
        Graphics g = panel.getGraphics();
        g.drawLine (currentX, currentY, x, y);
        currentX = x;
        currentY = y;
    }

    // We need to implement these methods, but
    // don't actually have to do anything inside.
    public void mouseEntered (MouseEvent m) {}
    public void mouseExited (MouseEvent m) {}
    public void mousePressed (MouseEvent m) {}
    public void mouseReleased (MouseEvent m) {}

} // End of class "NewFrame"


public class TestSwing23 {

    public static void main (String[] argv)
    {
        NewFrame nf = new NewFrame (300, 200);
    }

}
The result (after a few random mouse clicks):
Note:
- To handle mouse events (clicking, dragging, entering etc),
a "mouse listener" needs to be passed to the widget that
"sees" the events:
- The mouse events take place in the frame.
- Thus, we need to pass a "mouse listener" to the panel:
panel.add ( /* mouse listener */ );
- In our example, the frame itself implements MouseListener.
- Therefore, we pass the frame itself:
    // Add mouse-listening to the frame itself.
    panel.addMouseListener (this);
- The MouseListener interface was implemented
by overriding all the abstract methods in the interface.
- The only one we were really interested in was
mouseClicked().
- For the others, we provided empty bodies:
  public void mouseEntered (MouseEvent m) {}
  public void mouseExited (MouseEvent m) {}
  public void mousePressed (MouseEvent m) {}
  public void mouseReleased (MouseEvent m) {}
- The method MouseClicked is called whenever the
mouse is clicked within the frame:
- The parameter MouseEvent carries information,
e.g., the pixel coordinates of the place the mouse was clicked.
- Observe that it is possible to draw in methods
other than paintComponent():
- We drew in the method MouseClicked():
    Graphics g = this.getGraphics();
    g.drawLine (currentX, currentY, x, y);
- To get the Graphics context, simply call the
getGraphics() method of Component
(inherited by NewPanel).
Now, consider a different version of the program that
makes the JPanel the mouselistener:
(source file)
import java.awt.*;
import javax.swing.*;
import java.awt.event.*; // Needed for ActionListener.

class NewPanel extends JPanel implements MouseListener {

    public NewPanel ()
    {
        this.setBackground (Color.cyan);
    }

    // These methods are required to implement
    // the MouseListener interface.
    int currentX=0, currentY=0;
    public void mouseClicked (MouseEvent m)
    {
        System.out.println ("mouseClicked event: " + m.paramString());
        int x = m.getX();
        int y = m.getY();
        Graphics g = this.getGraphics();
        g.drawLine (currentX, currentY, x, y);
        currentX = x;
        currentY = y;
    }

    // We need to implement these methods, but
    // don't actually have to do anything inside.
    public void mouseEntered (MouseEvent m) {}
    public void mouseExited (MouseEvent m) {}
    public void mousePressed (MouseEvent m) {}
    public void mouseReleased (MouseEvent m) {}

}


class NewFrame extends JFrame
    implements ActionListener {

    NewPanel panel;

    // Constructor.
    public NewFrame (int width, int height)
    {
        // Set the title and other frame parameters.
        this.setTitle ("Button example");
        this.setResizable (true);
        this.setSize (width, height);

        Container cPane = this.getContentPane();
        // cPane.setLayout (new BorderLayout());

        // The panel for drawing.
        panel = new NewPanel ();
        cPane.add (panel, BorderLayout.CENTER);

        // Add panel's mouse-listening to panel.
        panel.addMouseListener (panel);

        // Create a quit button.
        JButton b = new JButton ("Quit");
        b.setBackground (Color.red);
        b.setFont (new Font ("Serif", Font.PLAIN | Font.BOLD, 15));
        b.addActionListener (this);
        cPane.add (b, BorderLayout.SOUTH);

        // Show the frame.
        this.setVisible (true);
    }

    // This method is required to implement the
    // ActionListener interface.
    public void actionPerformed (ActionEvent a)
    {
        // Button must have been pressed - so really quit.
        System.exit (0);
    }

} // End of class "NewFrame"


public class TestSwing24 {

    public static void main (String[] argv)
    {
        NewFrame nf = new NewFrame (300, 200);
    }

}
Note:
- The code can be made a little cleaner by moving the
listener identification into the
JPanel itself:
  public NewPanel ()
  {
    this.setBackground (Color.cyan);
    // Make the panel the listener for the panel.
    this.addMouseListener (this);
  }
Panels as containers
Thus far, we have used panels to draw. Panels are also used
as containers for layout purposes.
Suppose we wish to build the following feature into our
"click drawing" example:
- A button called "Orange" which when clicked will change
the line color to orange.
- A button called "Green" which when clicked will change
the line color to green.
- We'll change the background to white.
Thus, this is what we want to observe:
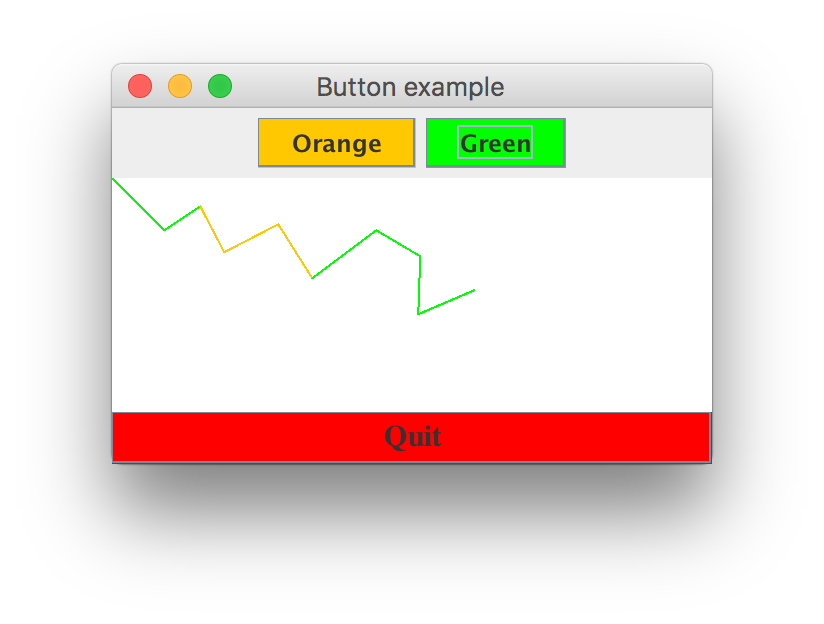
Now, let's look at some code to make this happen:
(source file):
import java.awt.*;
import javax.swing.*;
import java.awt.event.*; // Needed for ActionListener.

class NewPanel extends JPanel implements MouseListener {

    Color drawColor = Color.green;  // Default color.

    public NewPanel ()
    {
        this.setBackground (Color.white);
        // Add panel's mouse-listening to panel.
        this.addMouseListener (this);
    }

    // These methods are required to implement
    // the MouseListener interface.
    int currentX=0, currentY=0;
    public void mouseClicked (MouseEvent m)
    {
        System.out.println ("mouseClicked event: " + m.paramString());
        int x = m.getX();
        int y = m.getY();
        Graphics g = this.getGraphics();
        g.setColor (drawColor);
        g.drawLine (currentX, currentY, x, y);
        currentX = x;
        currentY = y;
    }

    // We need to implement these methods, but
    // don't actually have to do anything inside.
    public void mouseEntered (MouseEvent m) {}
    public void mouseExited (MouseEvent m) {}
    public void mousePressed (MouseEvent m) {}
    public void mouseReleased (MouseEvent m) {}

    public void setDrawingColor (Color c)
    {
        this.drawColor = c;
    }

}


class NewFrame extends JFrame
    implements ActionListener {

    NewPanel drawPanel;

    // Constructor.
    public NewFrame (int width, int height)
    {
        // Set the title and other frame parameters.
        this.setTitle ("Button example");
        this.setResizable (true);
        this.setSize (width, height);

        Container cPane = this.getContentPane();
        // cPane.setLayout (new BorderLayout());

        // The panel for drawing.
        drawPanel = new NewPanel ();
        cPane.add (drawPanel, BorderLayout.CENTER);

        // Create a quit button.
        JButton b = new JButton ("Quit");
        b.setBackground (Color.red);
        b.setFont (new Font ("Serif", Font.PLAIN | Font.BOLD, 15));
        b.addActionListener (this);
        cPane.add (b, BorderLayout.SOUTH);

        // Use a panel for clear and start buttons.
        JPanel topPanel = new JPanel ();
        topPanel.setLayout (new FlowLayout());
        cPane.add (topPanel, BorderLayout.NORTH);

        // Now insert the color buttons.
        JButton orangeB = new JButton ("Orange");
        orangeB.setBackground (Color.orange);
        orangeB.addActionListener (this);
        topPanel.add (orangeB);

        JButton greenB = new JButton ("Green");
        greenB.setBackground (Color.green);
        greenB.addActionListener (this);
        topPanel.add (greenB);

        // Show the frame.
        this.setVisible (true);
    }

    // This method is required to implement the
    // ActionListener interface.
    public void actionPerformed (ActionEvent a)
    {
        String label = a.getActionCommand();
        if (label.equalsIgnoreCase ("Quit"))
            System.exit (0);
        else if (label.equalsIgnoreCase ("Orange"))
            drawPanel.setDrawingColor (Color.orange);
        else if (label.equalsIgnoreCase ("Green"))
            drawPanel.setDrawingColor (Color.green);
    }

} // End of class "NewFrame"


public class TestSwing25 {

    public static void main (String[] argv)
    {
        NewFrame nf = new NewFrame (300, 200);
    }

}
Note:
- The panel keeps track of the current color:
class NewPanel extends JPanel implements MouseListener {

    Color drawColor = Color.green;  // Default color.

    // ...

}
- The setColor() method of Graphics is used
to set the drawing color:
    Graphics g = this.getGraphics();
    g.setColor (drawColor);
    g.drawLine (currentX, currentY, x, y);
- We defined a mutator for the panel:
class NewPanel extends JPanel implements MouseListener {

    // ...

    public void setDrawingColor (Color c)
    {
        this.drawColor = c;
    }

}
- The mutator is used when responded to button clicks:
  public void actionPerformed (ActionEvent a)
  {
      String label = a.getActionCommand();
      if (label.equalsIgnoreCase ("Quit"))
          System.exit (0);
      else if (label.equalsIgnoreCase ("Orange"))
          drawPanel.setDrawingColor (Color.orange);
      else if (label.equalsIgnoreCase ("Green"))
          drawPanel.setDrawingColor (Color.green);
  }
- We one panel for drawing:
    drawPanel = new NewPanel ();
    cPane.add (drawPanel, BorderLayout.CENTER);
and one to serve as a container:
    JPanel topPanel = new JPanel ();
    topPanel.setLayout (new FlowLayout());
    cPane.add (topPanel, BorderLayout.NORTH);

    // ...

    topPanel.add (orangeB);

    // ...

    topPanel.add (greenB);
- The default layout manager for panel's is a
FlowLayout
so we need not have explicitly set the layout:
    JPanel topPanel = new JPanel ();
    // topPanel.setLayout (new FlowLayout());
    cPane.add (topPanel, BorderLayout.NORTH);
Exercise 9.8:
Use a BorderLayout for the top-panel instead
of its FlowLayout and report what you observe.
Animation - a simple example
We will now put together a simple animation to see how
that works in Swing.
Exercise 9.9:
Download, compile and execute
Missile.java, a very
elementary game.
What constitutes an animation?
- First, there are items in the scene.
⇒
In our case, there are two geometric items, a circle and a square.
- Second, there needs to be "physics laws" that govern motion.
⇒
For realism, these are of course, based on real physics.
- Third, there is perspective, or where is the scene viewed from?
⇒
This matters in 3D, not in our 2D example.
The main idea:
- Seeing something move is merely an illusion:
- The eye is presented with a series of still images.
- A particular item is in a different position in each image.
- The brain then believes the item is moving.
- Thus, our goal is to create the series of images, with
the items in different positions.
- To calculate the new position in the next image, one
uses the rules of physics.
- Note: we can't present the different images too fast, or
it would "go by" too fast for the eye/brain.
- Thus, we also need to "pause" sufficiently long (but not
too long).
Next, let's build this in steps.
First, the code for drawing:
    public void paintComponent (Graphics g)
    {
        super.paintComponent (g);

        // Clear the screen by drawing a white rectangle
        that fills the screen.
        Dimension D = this.getSize();
        g.setColor (Color.white);
        g.fillRect (0,0, D.width,D.height);

        // Draw target (the square).
        // Assume the coordinates are calculated else where.
        g.setColor (Color.blue);
        int x = (int) targetX;
        g.fillRect (x,D.height-20, 20, 20);

        // Draw missile (circle).
        g.setColor (Color.red);
        x = (int) missileX;
        int y = D.height - (int) missileY;
        g.fillOval (x,y, 10, 10);
    }
Here:
- The drawing in
paintComponent()
is similar to the drawing we've seen before.
- It's the coordinates of the rectangle and circle that
change according to the physics of motion.
- We'll assume they are calculated elsewhere.
Next, let's build the GUI itself:
public class Missile extends JFrame implements ActionListener {

    // This is the JPanel on which we draw, and the one that
    // will override paintComponent()
    DrawPanel drawPanel;

    public Missile ()
    {
        this.setSize (500,500);
        Container cPane = this.getContentPane();

	// Create the center panel on which to draw and place in the center.
        drawPanel = new DrawPanel ();
        cPane.add (drawPanel, BorderLayout.CENTER);

	// This panel serves as the container for the two buttons:
        JPanel panel = new JPanel ();

        JButton resetB = new JButton ("Reset");
        resetB.addActionListener (this);
        panel.add (resetB);

        panel.add (new JLabel("    "));
        JButton fireB = new JButton ("Fire");
        fireB.addActionListener (this);
        panel.add (fireB);

        cPane.add (panel, BorderLayout.SOUTH);

        this.setVisible (true);
    }


    public void actionPerformed (ActionEvent a)
    {
	if (a.getActionCommand().equals("Reset")) {
	    // We'll put the animation and calculation code in DrawPanel
	    drawPanel.reset ();
	}
	else if (a.getActionCommand().equals("Fire")) {
	    drawPanel.fire ();
	}
	else {
	    System.out.println ("ERROR: no such action");
	}
    }


    public static void main (String[] argv)
    {
        new Missile ();
    }

}
The code above
- Builds the GUI.
- Uses the frame itself as the event "listener" for the buttons.
- Merely calls the appropriate method in the DrawPanel to
handle the events.
Next, let's look at the main animation loop:
    void animate ()
    {
        while (true) {

            // Do the "physics" for each step
            targetX += targetVX*delT;
            if (missileFired) {
                missileX += missileVX*delT;
                missileVY += missileAY*delT;
                missileY += missileVY*delT;
            }

	    // Redraw the screen: this will result in paintComponent() being called.
            this.repaint ();

	    // Pause between successive re-drawings to create animation effect.
            try {
                Thread.sleep (50);
            }
            catch (InterruptedException e){
                System.out.println (e);
            }

        } //endwhile
    }
Note:
- The animation loop is simply
- Use physics rules to compute new locations.
- Draw the next scene on the panel (with the new locations).
- Pause.
- The static
sleep()
method of the library class
Thread
handles the pausing.
- Notice the call to
repaint()
- This forces a call to
paintComponent()
to force the drawing to occur right away.
- We can't call
paintComponent()
directly without having the
Graphics
instance to pass as parameter.
-
repaint()
is merely the way to make this happen.
The rest of the code is the physics of those two moving items.
Advanced graphics
Recall: the
Graphics
class has methods to draw lines and shapes:
- It has very basic functionality.
- For example, you can't set the line thickness.
- You have to do your own computations for common
graphical transformations like rotations.
Java also provides a
Graphics2D
class for more sophisticated graphical rendering and transformations.
To see how this work, let's write code to produce this:
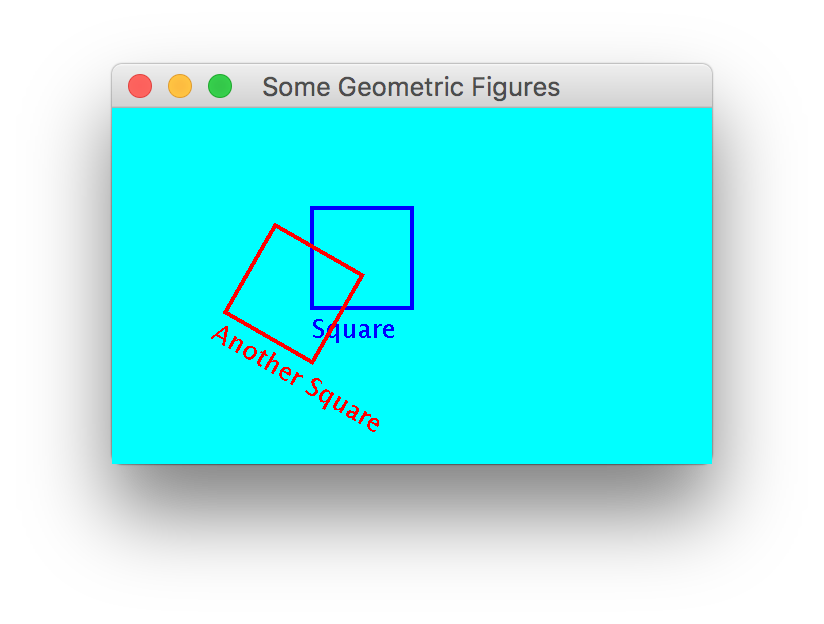
The relevant part of the program:
(source file)
    public void paintComponent (Graphics g)
    {
	super.paintComponent (g);
	setBackground (Color.CYAN);

	// g actually points to a Graphics2D instance:
	Graphics2D g2 = (Graphics2D) g;

	// Change the line thickness:
	BasicStroke drawStroke = new BasicStroke (2.0f);
	g2.setStroke (drawStroke);

	// Draw a Square:
	g2.setColor (Color.BLUE);
	g2.drawRect (100,50,50,50);
	g2.drawString ("Square", 100, 115);

	// Perform a rotation of axes:
	g2.rotate ( Math.toRadians(30.0) );

	// Then draw again in the rotated coordinate system:
	g2.setColor (Color.RED);
	g2.drawRect (100,10,50,50);
	g2.drawString ("Another Square", 100, 75);
    }
Note:
- As it turns out,
Graphics2D
extends
Graphics.
- The actual class that is passed into
paintComponent()
is an instance of
Graphics2D.
- Thus, to use the methods of
Graphics2D
one has to cast the variable into that type:
Graphics2D g2 = (Graphics2D) g;
Exercise 9.10:
What is the purpose of this seemingly roundabout way of getting
to use methods in
Graphics2D?
That is, why not define a newer version of
paintComponent()
that has a
Graphics2D
parameter? As in:
public void paintComponent (Graphics2D g2);
© 1998, Rahul Simha (revised 2017)