Module 14: Native Methods and JDBC

Warning: this module is probably too old and out of sync with newer versions of Java. We're leaving it here for consistency in the module numbering.


Native methods: what are they?

The reserved word native is used as a method modifier to let you call a C/C++ implementation of the method.

When would you want to use a C/C++ implementation?

Disadvantages of using native methods:

So, be warned.

There are two ways in which Java and C (or C++) can work together:

In this module, we will explain only the former.


Native methods: hello world

As a first example, let us call a C function that prints "Hello World!" to the screen.

A number of steps need to be followed carefully to make this work:

  1. First, write the Java code: (source file)
    
    // A class with a native method. 
    
    class HelloWorld {
      public native static void hello_world ();
    }
    
    public class native1 {
    
      public static void main (String[] argv)
      {
        // Need to load the C implementation first. 
        System.loadLibrary ("helloworld");
    
        // Now create an instance and call the method. 
        new HelloWorld().hello_world();
      }
    
    }
        
    Note:
    • The class HelloWorld contains the native method hello_world().
    • This method is an class method here. It need not be - it could very well be an instance method.
    • Eventually, when the C implementation is ready, it will be placed in a library called helloworld.
    • In main(), we need to load this library before calling the method (naturally).


  2. Next, compile the Java code, e.g.,
    
          % javac native1.java
        
    Now the current directory should have a class file for HelloWorld.

  3. Next, run the special standalone program javah on the class HelloWorld:
    
          % javah -jni HelloWorld
        
    Note:
    • You need to use the option -jni.
    • Use only the class name and not the extension.
    • The output of this execution is a C-headerfile called HelloWorld.h: (source file)
      
      /* DO NOT EDIT THIS FILE - it is machine generated */
      #include <jni.h>
      /* Header for class HelloWorld */
      
      #ifndef _Included_HelloWorld
      #define _Included_HelloWorld
      #ifdef __cplusplus
      extern "C" {
      #endif
      /*
       * Class:     HelloWorld
       * Method:    hello_world
       * Signature: ()V
       */
      JNIEXPORT void JNICALL Java_HelloWorld_hello_1world
        (JNIEnv *, jclass);
      
      #ifdef __cplusplus
      }
      #endif
      #endif
            
    • As you can see, the contents look strange.
    • However, by staring at it a little longer, you should be able to pick out a C function declaration:
      
      JNIEXPORT void JNICALL Java_HelloWorld_hello_1world
        (JNIEnv *, jclass);
             
    • Here, the Java Native Interface (JNI) provides some macros that it uses during compilation later.
    • Consider the parameters:
      • There are two parameters, specified only by their types (i.e., no variables are shown).
      • One is the type JNIEnv* (pointer to a JNIEnv).
      • The other is of type jclass.
      • Both of these provide some "context" information that can optionally be used by the C method.


  4. Next, create a new file called hello_world.c:
    • First, insert these include's:
      
      #include "HelloWorld.h"
      #include <stdio.h>
          
    • Note:
      • We have included the header file created earlier by javah.
      • You can add as many C or C++ header files as you like. For this example, we only need stdio.h.
    • Now, copy over all the function definitions from the header file (HelloWorld.h):
      
      #include "HelloWorld.h"
      #include <stdio.h>
      
      JNIEXPORT void JNICALL Java_HelloWorld_hello_1world
        (JNIEnv *, jclass);
            
    • Next, we need to fill in C code to implement the method: (source file)
      
      #include "HelloWorld.h"
      #include <stdio.h>
      
      JNIEXPORT void JNICALL Java_HelloWorld_hello_1world
        (JNIEnv * jenv, jclass jcl)
      {
        printf ("Hello World!\n");
        return;
      }
            
      Note:
      • We provided variable names for the parameters (of our choice).
      • We added braces and a function body.
      • Since this program is supposed to print "Hello World!", we use C's printf() method.


  5. Next, we need to compile the C program into a library:
    • The actual compilation command is complicated, for example:
      
               % gcc -I/usr/local/lib/jdk_1.1.2/include -I/usr/local/lib/jdk_1.1.2/include/solaris hello_world.c -o libhelloworld.so
            
    • Here, we need to load C libraries provided by Java. These are in the include subdirectory of the distribution.
    • The above compilation uses the gcc compiler and since it's on Solaris, needs an additional include directory.
    • If you're curious, you can take a peek at the files in these include directories.
    • Observe that the output of the compilation (specified by the -o option) is directed to a library.
    • Important: the library name must start with the prefix lib and must have the file suffix .so even though the library is referred to as helloworld.


  6. Finally, we can run the Java program:
    
          % java native1
        
Note:


Native methods: passing parameters and getting return values

The size of C types depends on the system. Therefore, Java defines C types (using C's typedef) that correspond to Java types:

This way, we can be sure that a jint variable uses (no less than) 4 bytes.

In the next example, we will pass some parameters and obtain return values.

Here is the Java program: (source file)


// A class with native methods. 

class TestParams {
  public native int factorial (int i);
  public native String replicate (String s);
}

public class native2 {

  static {
    System.loadLibrary ("testparams");
  }

  public static void main (String[] argv)
  {
    // Create 
    TestParams tp = new TestParams ();

    // Call the factorial method (native) 
    int k = tp.factorial (5);
    System.out.println ("Java: native2: main: 5! = " + k);

    // Call the native replicate method. 
    String s = tp.replicate ("Hello World!");
    System.out.println ("Java: native2: main: string s = " + s);
  }

}
  
Note:
  • The native method factorial() takes a Java int and returns a Java int.
    (The factorial of the parameter is returned).

  • Similarly, the method replicate() takes a Java String and returns a String.
    (We will implement this by concatening the input string to itself).

Java-compilation of the above file produces a class file for TestParams.

Next, we run javah -jni on TestParams to get the C-header file: (source file)


/* DO NOT EDIT THIS FILE - it is machine generated */
#include 
/* Header for class TestParams */

#ifndef _Included_TestParams
#define _Included_TestParams
#ifdef __cplusplus
extern "C" {
#endif
/*
 * Class:     TestParams
 * Method:    factorial
 * Signature: (I)I
 */
JNIEXPORT jint JNICALL Java_TestParams_factorial
  (JNIEnv *, jobject, jint);

/*
 * Class:     TestParams
 * Method:    replicate
 * Signature: (Ljava/lang/String;)Ljava/lang/String;
 */
JNIEXPORT jstring JNICALL Java_TestParams_replicate
  (JNIEnv *, jobject, jstring);

#ifdef __cplusplus
}
#endif
#endif
  
Note:
  • The first method now has a jint parameter and a jint return value (along with the "context" parameters).
  • Similary, the second method has a jstring parameter and return value.

Here is the implementation in C: (source file)


#include "TestParams.h"
#include <stdio.h>
#include <string.h>

JNIEXPORT jint JNICALL Java_TestParams_factorial
  (JNIEnv * env, jobject obj, jint i)
{
  jint j, k;

  printf ("Inside C: integer parameter i = %3d\n", i);

  j = i;  k = 1;
  while (j != 1) {
    k = k * j;
    j = j - 1;
  }

  printf ("Inside C: factorial k = %3d\n", k);

  return k;
}


JNIEXPORT jstring JNICALL Java_TestParams_replicate
  (JNIEnv * env, jobject obj, jstring s)
{
  const char *s2, *s2_copy, *s3;
  jboolean copy;
  jstring s4;

  copy = JNI_TRUE;
  s2 = (*env)->GetStringUTFChars (env, s, & copy);
  s2_copy = (*env)->GetStringUTFChars (env, s, & copy);

  printf ("Inside C: replicate String = %s\n", s2);

  s3 = strcat (s2, s2_copy);

  s4 = (*env)->NewStringUTF (env, s2);

  printf ("Inside C: replicate return value = %s\n", s3);

  return s4;
}
  
Note:
  • The jint type really translates to a C long.

  • This means that you can define other variables of type jint and treat them as you would treat long's.

  • Thus, in the code above, we have used jint's all the way in computing the result, printing values and returning a jint.

  • jstring's are quite different since Java strings are in Unicode and use different delimiters.

  • To handle strings, Java has provided some C methods to go back and forth.

  • The C method GetStringUTFChars() is used to convert a jstring type into a regular C string (of type char*).

  • To convert a C string into a jstring, use the method NewStringUTF().

  • Observe that both methods are called via function pointers and that these pointers are inside the "context" variable env.

  • Also, both methods are passed the context variable and the first is also given a boolean.

After this, compile the C file as shown earlier and run the Java program.

We have only scratched the surface of the C-Java connection:

  • It is possible to pass references to Java objects and their members.
  • It is possible to call Java methods from within the C code.
  • It is possible call access Java arrays from the C code.
  • It is possible to throw exceptions from the C code.
  • It is possible to invoke the JVM from a standalone C program and call Java methods.
In general, these advanced features are to be used with extreme caution, usually only if you are building a library of C-Java interfaces.


JDBC: an introduction

JDBC (Java DataBase Connectivity) is a set of classes provided in the package java.sql for the purpose of letting Java programmers access standing databases:


  • JDBC assumes that a (usually, well-known) dbase is already running in the background, listening in on an advertized port (socket).

  • JDBC classes let the Java programmer make a connection to the dbase, fire off SQL statements to the dbase and retrieve results of queries.

  • Since SQL's datatypes are standardized, JDBC provides equivalent Java types.
    (For example, the Java class java.sql.Data handles the SQL type DATE).

Here's what you need to get JDBC working:

  • The dbase vendor (or some third-party vendor) needs to provide either one of the following:
    • A JDBC driver.
    • An ODBC driver.


  • That is, there need to be Java classes that know how to talk to the dbase (Only the dbase people know how to do that).

  • Alternatively, the dbase vendor can provide a C version called ODBC. Then, you can use Java's JDBC-ODBC bridge (provided in java.sql) to connect via ODBC.

There are many JDBC drivers - we will assume the usage of any JDBC driver (such as SequeLink) for the example below.


  • Since the Oracle server listens on port 4003, the JDBC driver knows how to make the connection to that port and converse with the server.

  • This means that, when you issue an SQL statement, the JDBC driver will pass it on to Oracle and retrieve results for you.

  • We will assume you are familiar with Oracle and already have an Oracle account.
    Some Oracle tutorial information is also included:

  • We will also assume familiarity with dbases and SQL in general.

  • At this time, a few tables representing a toy "bank database" have been created in Oracle to test the code:
    • Table acc_type:
      
      create table acc_type (
        acc_code     integer,
        acc_name     varchar2(10)
      );
             
    • Table accounts:
      
      create table accounts (
        ssn           varchar2(12),
        acc_code      integer,
        accnum        integer,
        branchnum     integer,
        amount        integer
      );
             
    • Table customer:
      
      create table customer (
        ssn           varchar2(12),
        name          varchar2(12),
        addr          varchar2(25),
        city          varchar2(12),
        state         varchar2(4)
      );
             
    • Table branch:
      
      create table branch (
        branchnum     integer,
        bname         varchar2(15),
        city          varchar2(12),
        mgrssn        varchar2(12)
      );
             
    • Table managers:
      
      create table managers (
        ssn           varchar2(12),
        name          varchar2(12),
        addr          varchar2(25),
        city          varchar2(12),
        state         varchar2(4)
      );
             
    To access any of these tables, use my username to qualify the table, e.g., select * from simha.customer.


JDBC: getting started

The first thing we need to do is to make sure that JDBC is working. You can actually continue with the first example in the next section, since by this time the Driver will probably have been set up correctly for anyone to use. If the example did not work, come back here and use these instructions to test JDBC.


JDBC: the first program

Once JDBC is working, we are ready to write our first Java program that connects to the database.

Note: To run the program:

  • Oracle needs to be running.
  • The program needs to be run on the machine running Oracle.
    (Although, in general, JDBC drivers can be run anywhere).

In the example, we will write code to:

  • Connect to the Oracle server.
  • Execute the SQL query select NAME from simha.CUSTOMER.

Here is the code: (source file)


import java.net.*;
import java.sql.*;
import java.io.*;

public class Jdbc1 {

  public static void main (String[] argv)
  {
    try{

      // First, load the "SequeLinkDriver" class. 
      Class.forName ("intersolv.jdbc.sequelink.SequeLinkDriver");

      // Now prepare the strings needed to make the connection. 
      String connection_url =
	"jdbc:sequelink://delphi:4003/[Oracle];OSUser=simha;OSPassword=*";
      String oracle_username = "simha";
      String oracle_password = "*";
      
      System.out.println ("Trying connection ... ");

      // Make the connection. 
      Connection con = DriverManager.getConnection (connection_url, 
						    oracle_username,
						    oracle_password);

      System.out.println ("Connection succeeded");

      // Next, some SQL. 
      System.out.println ("Trying SQL ...");
      
      // Create a Statement instance first. 
      Statement st = con.createStatement();

      // Call the executeQuery method in the instance. 
      ResultSet rs = st.executeQuery ("select NAME from simha.CUSTOMER");

      System.out.println ("SQL execution returned with:");

      // Repeatedly fetch tuples from the result set. 
      while (rs.next()) {
        String name = rs.getString (1);
	System.out.println (name);
      }

      // Close the connection. 
      con.close();
    }
    catch (SQLException e){ System.out.println(e);}
  }

}
  

Note:

  • The very first step is to load the JDBC driver.
    • In the case of SequeLink, the driver is called SequeLinkDriver.
    • The preamble (intersolv.jdbc.sequelink) is really the pathname intersolv/jdbc/sequelink.
      (This path leads off from one of the CLASSPATH values).
    • The forName() method was discussed in the Module that covered reflection.


  • Next, the strings for making the dbase connection are created:
    • A connection URL, similar to a web URL is used:
      
            String connection_url =
      	"jdbc:sequelink://delphi:4003/[Oracle];OSUser=simha;OSPassword=*";
            
    • Note that the machine name and port number, and the dbase vendor are specified as well.
    • In addition, the Unix username and password (not shown) are required.
      Thus, instead of simha you will use your Unix username and instead of * you will use your Unix password.
    • If typing in your password makes you feel insecure (as it should), the next example will overcome the problem.
    • Similarly, strings are set up with the Oracle username and password.


  • Next, the Java class DriverManager is used to make the connection:
    
          // Make the connection. 
          Connection con = DriverManager.getConnection (connection_url, 
    						    oracle_username,
    						    oracle_password);
        
    DriverManager has methods that let you:
    • Change Drivers.
    • Set a timeout for waiting for a connection.
    • Set up a log file to store meta-data about connections.


  • A Connection instance is returned:
    • Connection is actually an interface in java.sql.
    • We use the createStatement() method as the next step in executing an SQL query.
    • The class Connection has a lot of other useful methods that, for example, let you
      • Change the commit status of a transaction or rollback.
      • Set a transaction's isolation level.
      • Set up an SQL statement to take values from variables.
      • Handle stored procedures.
      • Get dbase warning messages.


  • Once a Statement instance is obtained, an SQL query is actually passed to the executeQuery method of this instance.
    (Statement is actually an interface).

  • The Statement class can do other things. For example:
    • Set a limit on the size of the data returned.
    • Set a time limit on waiting for results.
    • Declare a cursor.


  • When executeQuery() returns, the results can be obtained using a ResultSet instance:
    • There is no way for JDBC to know how you want the results returned.
      (For example, is the actual integer 5 to be returned as an int or as the string "5"?)
    • That is why the ResultSet interface provides a large number of ways to extract results.


  • The call to the next() method returns true if there is more data to extract.

  • The getString() method:
    • This takes an int parameter that indicates which column you want from the output.
      (Here, "1" indicates the first column).
    • Recall, the order of columns in the output is the order of columns in the SQL select clause.
    • The method returns the value as a String.
    • We can even name the column, by using a different signature:
      
              String name = rs.getString ("NAME");
            

Exercise 14.1: Try the above code with your username and password.


JDBC: a more complex example

In this next example, we will:

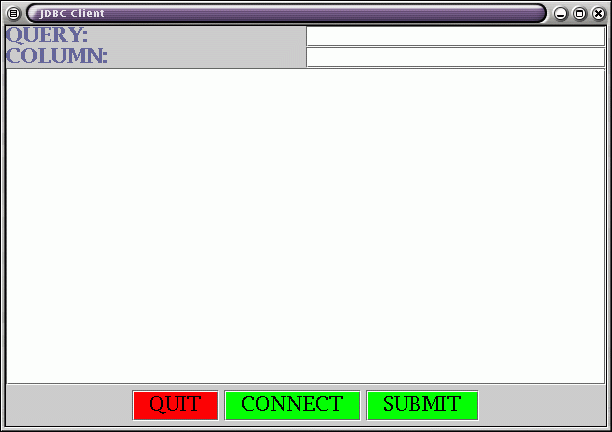
  • display a small frame that will allow the user to enter an SQL query and a column name;
  • display a buttons that allow a user to submit a query or make a connection;
  • bring up a connection dialog, when the user makes a connection.

The appearance of the application will be
Window
where

  • JTextField's are used for entering the query and the desired column name.
  • A JTextArea will be used to display results.
  • A JPanel of JButton's is used at the bottom for three buttons.

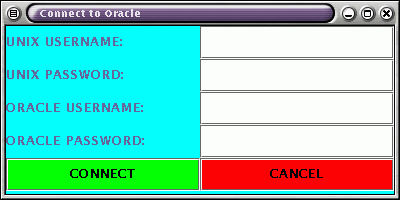
When the user connects by pressing the Connect button, we will present a dialog:
Window
Here:

  • Both Unix and Oracle username-password combinations are entered.
  • We will be careful to avoid echoing the actual password.

When the connection is made, we will indicate so to the user and let the user enter a query and a column name.

Finally, when the user presses the Submit button, we will execute the query and return the results.

Note: this application is somewhat crude because it only allows one column value to be displayed.

Here is are parts of the code: (complete source file)


import java.awt.*;
import java.awt.event.*;
import javax.swing.*;
import java.io.*;
import java.sql.*;
import java.net.*;

class JDBCClient extends JFrame {

  JTextField      // TextFields to read stuff from user. 
    queryfield,   // SQL query. 
    columnfield;  // A column name. 

  String         
    query,        // The string that will hold the query. 
    column;       // The column name. 
    
  boolean is_connected = false;

  JTextArea message_board;  // To display the results 

  JScrollPane sc;


  // Constructor. 

  public JDBCClient ()
  {
    // Create the frame (not shown). 
       // ... 

    // Create the scrollable panel (not shown). 
       // ... 

    // A top panel for the query and column name. 
    JPanel top_panel = new JPanel();
    top_panel.setLayout (new GridLayout (2,2));

    // The query textfield that gets the query string  
    // into "query" (not shown). 
       // ... 

    // The column textfield that gets the column name 
    // into the variable "column" (not shown) 
       // ... 

    // Add the top panel to the frame. 
    cPane.add (top_panel, BorderLayout.NORTH);

    // A bottom panel for three buttons. 
    JPanel bottom_panel = new JPanel ();

    // A quit button that calls quit() (not shown) 
       // ... 

    // A connect button that calls connect() (not shown). 
       // ... 

    // A submit button that calls submit() (not shown). 
       // ... 

    // Add the bottom panel. 
    cPane.add (bottom_panel, BorderLayout.SOUTH);

    // Display the frame. 
    this.setVisible (true);
  }


  // Display text on a message panel using Label's. 

  void display_text (String s, Color c)
  {
    // ... (not shown) ... 
  }


  // These variables will be used in the connection dialog. 
  JDialog connect_dialog;      // A connection dialog. 
  JTextField                   // Textfields in the dialog. 
    Unixnamef, 
    Oraclenamef;

  JPasswordField               // Password fields in the dialog. 
    Unixpassf,
    Oraclepassf;

  String                       // String variables for the 
    Unixname, Unixpass,        // usernames and passwords. 
    Oraclename, Oraclepass;

  void connect ()
  {
    // If already connected, return. 
    if (is_connected) return;

    // Set up the dialog. 
    connect_dialog = new JDialog (this, true);
    connect_dialog.setTitle ("Connect to Oracle");
    connect_dialog.setSize (400,200);
    connect_dialog.setLocation (200,200);

    Container cPane = connect_dialog.getContentPane();
    cPane.setBackground (Color.cyan);
    cPane.setLayout (new GridLayout(5,2));

    // Unix username textfield that gets the 
    // username into the String variable "Unixname". 
    JLabel L = new JLabel ("UNIX USERNAME:");
    cPane.add (L);
    Unixnamef = new JTextField (20);
    Unixnamef.setForeground (Color.blue);
    Unixnamef.addActionListener (
      new ActionListener () {		       
        public void actionPerformed (ActionEvent t)
	{
	  Unixname = Unixnamef.getText();
	}
      }
    );
    cPane.add (Unixnamef);

    // Unix password textfield. 
    L = new JLabel ("UNIX PASSWORD:");
    cPane.add (L);
    Unixpassf = new JPasswordField (20);
    Unixpassf.setForeground (Color.blue);
    Unixpassf.addActionListener (
      new ActionListener () {		       
        public void actionPerformed (ActionEvent t)
	{
	  Unixpass = new String (Unixpassf.getPassword());
	}
      }
    );
    cPane.add (Unixpassf);

    // Oracle username textfield (not shown) 
       // ... 

    // Oracle password textfield (not shown). 
       // ... 

    // A connect button. 
    JButton connectb = new JButton ("CONNECT");
    connectb.setBackground (Color.green);
    connectb.addActionListener (
      new ActionListener () {		       
        public void actionPerformed (ActionEvent a)
	{
	  connect_db ();
	  connect_dialog.dispose ();
	}
      }
    );
    cPane.add (connectb);

    // A cancel button (not shown). 
       // ... 

    // Display the dialog. 
    connect_dialog.setVisible (true);
  }


  Connection con;

  void connect_db ()
  {
    try {
      // Load the JDBC Driver. 
      Class.forName ("intersolv.jdbc.sequelink.SequeLinkDriver");

      // Set up the connection URL 
      String connection_url =
	"jdbc:sequelink://delphi:4003/[Oracle];OSUser=" + Unixname + 
        ";OSPassword=" + Unixpass;
      
      display_text ("Trying connection ... ", Color.blue);

      con = DriverManager.getConnection (connection_url, 
					 Oraclename,
					 Oraclepass);

      // It worked. 
      display_text ("Connection succeeded", Color.blue);
      display_text ("Enter query above", Color.blue);
      is_connected = true;
    }
    catch(SQLException e){ 
      System.out.println(e);
      display_text ("Connection attempt failed", Color.blue);
    }
    catch (ClassNotFoundException e) { System.out.println(e); }
  }


  // Handle a query. 

  void submit ()
  {
    // If not connected, don't do anything. 
    if (!is_connected) {
      display_text ("Not connected ... try connecting", Color.red);
      return;
    }

    // If bad strings are given, pass. 
    if ( (query == null) || (column == null) ) {
      display_text ("Null query or column... try again", Color.red);
      return;
    }

    // Otherwise, execute the query. 
    try {
      display_text ("Trying SQL: " + query, Color.blue);

      // Get a Statement instance first. 
      Statement st = con.createStatement();

      // Execute the query. 
      ResultSet rs = st.executeQuery (query);

      display_text ("SQL execution returned with:", Color.blue);

      int index = 1;
      try {
	// Use the given column name. 
	index = rs.findColumn (column);
      }
      catch (SQLException e){ 
	display_text ("Column name not found ... try again", Color.blue);
	return;
      }
      
      // If the column name was valid, get the values. 
      while (rs.next()) {
        String result = rs.getString (index);
	display_text (result, Color.black);
      }
    }
    catch (SQLException e){ 
      System.out.println(e);
      display_text ("SQL query failed ... try again", Color.blue);
    }
  }


  // Exit gracefully. 

  void quit ()
  {
    try {
      con.close ();
      System.exit (0);
    }
    catch (SQLException e){ System.out.println(e);}
  }

}


public class Jdbc2 {

  public static void main (String[] argv)
  {
    JDBCClient jc = new JDBCClient ();
  }

}
  

Note:

  • Not all the code is shown because a lot of it is standard Java GUI stuff.

  • Observe the number of packages that need to be import'ed.

  • We have defined our class JDBCClient to extend Frame, as the main GUI.

  • The Connect dialog uses a Dialog instance:
    • Each of the usernames and passwords (Unix and Oracle) are entered via TextField's.
    • The echo character in the password fields is set to *.
    • Once the user presses the Connect button in the dialog, we call our connect_db() method.
    • Once the connection is made, the dialog is disposed.


  • In the method connect_db():
    • The JDBC driver is loaded.
    • The connection URL is carefully constructed using the Unix username and password strings.
    • A connection is attempted with the URL and the Oracle username and password strings.
    • Messages are displayed using our method display_text().


  • In the submit() method (which is called when the user hits the Submit button):
    • The same methods as in the first example are used to execute the query.
    • The findColumn() method takes a column name as parameter and returns the index of the column name within the result (assuming it is IN the result).
    • This index is then used later in getting values.

Exercise 14.2: Try the above code with your username and password. Then modify the code so that a second column can be entered by the user. Then, show the results when a join is used to pair up customers and their account amounts.