Module 11: Swing Part II - GUI Components
An overview of some Swing GUI components
For GUI-building, here are some "standard" components:
- Components for writing and drawing:
- JPanel: an area in which to draw or write.
- JLabel: a rectangle in which you can
write a single line of text.
- Components used for reading in text:
- JTextField: to read in a single line of text.
- JTextArea: to read in multiple lines of text.
(Also comes with additional features, such as "selection").
- Other text components:
- JEditorPane, JTextPane.
- JPasswordField.
- JButton.
- Components to display lists and choices:
- JList: a scrollable list of items, allowing
single or multiple choices.
- JComboBox: a drop-down list.
- JCheckbox: a box to check (up or down), with
an associated label.
- JRadioButton: a
circular button to select, with an associated label.
- ButtonGroup: a widget to force only one
selection among a group of JRadioButton's.
- Components for scrolling:
- JScrollPane: a panel with scrollbars.
- JScrollBar: an individual scrollbar (e.g.,
for "volume control").
- Menu-related components:
- JMenuBar: to create a single menu-bar in a frame.
- JMenu: for each individual item in a menubar
(e.g, "File" in Netscape).
- JMenuItem: for each individual item in a menubar
(e.g, "Open" under the "File" menu in Netscape).
- JCheckboxMenuItem: to create a checkbox-type item in
a menu.
- JPopupMenu: to create a pop-up menu.
- Dialog-related components:
- JOptionPane: a simple dialog box.
- JFileChooser: similar to Netscape's file dialog.
- Others:
- JToolTip - the
occasionally helpful mouse-over balloon.
- JSlider - for sliding scales.
- JToolBar - obscurable
groups of buttons.
- JTable - for tabular, spreadsheet-like applications.
- JTree - for file-manager type applications.
Each component can generate events and therefore has one or more
associated event-listeners.
In the sequel, we will learn how to create some of these
components and handle events related to them.
Exercise 11.1:
Download Survey.java,
compile and execute it. It should produce a form. Try to identify
which of the above components are being used. Below, we will learn
to build this form step-by-step.
Setting up a form with a CardLayout
The program above used a CardLayout to place a number
of panels one behind another.
As a first step in constructing the form, we will do the
following:
- Display the instructions (single line of text) at the top.
- Display the buttons at the bottom (in a panel).
- Display a bunch of panels with the CardLayout.
(Later, we will place the actual questions in here).
As usual, we will create a frame and use it as follows:
class NewFrame extends JFrame {

  // Constructor.
  public NewFrame (int width, int height)
  {
  }

  // ... other stuff ...

}

public class Survey {
    public static void main (String[] argv)
    {
        NewFrame nf = new NewFrame (500, 300);
    }
}
We will place the code for creating the top panel (instructions),
centerpanel (questions) and bottom panel (buttons) in the
constructor.
But because the questions are large (a lot of code), we will
call methods to handle individual questions.
Here is the constructor:
import java.awt.*;
import java.awt.event.*;
import javax.swing.*;
import javax.swing.event.*;

class NewFrame extends JFrame {

    JPanel centerpanel;    // For the questions.
    CardLayout card;       // For the centerpanel.

    // Constructor.
    public NewFrame (int width, int height)
    {
        this.setTitle ("Snoot Club Membership Test");
        this.setResizable (true);
        this.setSize (width, height);

        Container cPane = this.getContentPane();
        // cPane.setLayout (new BorderLayout());

        // First, a welcome message, as a Label.
        JLabel L = new JLabel ("<html><b>Are you elitist enough for our exclusive club?"
                          + " <br>Fill out the form and find out</b></html>");
        L.setForeground (Color.blue);
        cPane.add (L, BorderLayout.NORTH);

        // Now the center panel with the questions.
        card = new CardLayout ();
        centerpanel = new JPanel ();
        centerpanel.setLayout (card);
        centerpanel.setOpaque (false);

        // Each question will be created in a separate method.
        // The cardlayout requires a label as second parameter.
        centerpanel.add (firstQuestion (), "1");
        centerpanel.add (secondQuestion(), "2");
        centerpanel.add (thirdQuestion(), "3");
        centerpanel.add (fourthQuestion(), "4");
        cPane.add (centerpanel, BorderLayout.CENTER);

        // Next, a panel of four buttons at the bottom.
        // The four buttons: quit, submit, next-question, previous-question.
        JPanel bottomPanel = getBottomPanel ();
        cPane.add (bottomPanel, BorderLayout.SOUTH);

        // Finally, show the frame.
        this.setVisible (true);
    }

    // ...
}
Note:
- A JLabel widget is used to write text:
- The String you want displayed is passed to the
constructor.
(Alternatively, you can use the setText() method
of JLabel).
- You can set the font and color as desired.
- A JLabel allows only one line of text.
(But you can place a <p> in an HTML string to create
a new line).
- JLabel's don't react to any user-input.
- You can set the alignment (justification) - left (default)
center or right, e.g.,
L.setHorizontalAlignment (Label.RIGHT);
- Rather than place all the code for the buttons in the constructor,
we will have a method do that:
    JPanel bottomPanel = getBottomPanel ();
    cPane.add (bottomPanel, BorderLayout.SOUTH);
- Similarly, each question is returned as a JPanel
from a method, e.g.,
    JPanel p = firstQuestion ();
    centerpanel.add (p, "1");
- Notice that we used a CardLayout:
- The default layout manager for a JPanel is
FlowLayout, so we need to set the layout:
    card = new CardLayout ();
    centerpanel.setLayout (card);
- Later, we will need to access methods in the cardlayout
and so, we retain a reference to the CardLayout instance,
instead of:
centerpanel.setLayout (new CardLayout());
- The add() method for adding stuff to a panel
requires a second argument when using a CardLayout, e.g,
centerpanel.add (p, "1");
- The second argument is usually a String that
contains an identifier. You will not need to use this anywhere.
Here is the complete source:
(source file)
class NewFrame extends JFrame {

    JPanel centerpanel;    // For the questions.
    CardLayout card;       // For the centerpanel.

    // Constructor.
    public NewFrame (int width, int height)
    {
        this.setTitle ("Snoot Club Membership Test");
        this.setResizable (true);
        this.setSize (width, height);

        Container cPane = this.getContentPane();
        // cPane.setLayout (new BorderLayout());

        // First, a welcome message, as a Label.
        JLabel L = new JLabel ("<html><b>Are you elitist enough for our exclusive club?"
                          + " <br>Fill out the form and find out</b></html>");
        L.setForeground (Color.blue);
        cPane.add (L, BorderLayout.NORTH);

        // Now the center panel with the questions.
        card = new CardLayout ();
        centerpanel = new JPanel ();
        centerpanel.setLayout (card);
        centerpanel.setOpaque (false);

        // Each question will be created in a separate method.
        // The cardlayout requires a label as second parameter.
        centerpanel.add (firstQuestion (), "1");
        centerpanel.add (secondQuestion(), "2");
        centerpanel.add (thirdQuestion(), "3");
        centerpanel.add (fourthQuestion(), "4");
        cPane.add (centerpanel, BorderLayout.CENTER);

        // Next, a panel of four buttons at the bottom.
        // The four buttons: quit, submit, next-question, previous-question.
        JPanel bottomPanel = getBottomPanel ();
        cPane.add (bottomPanel, BorderLayout.SOUTH);

        // Finally, show the frame.
        this.setVisible (true);
    }

    // No-parameter constructor.
    public NewFrame ()
    {
        this (500, 300);
    }


    JPanel getBottomPanel ()
    {
        // Create a panel into which we will place buttons.
        JPanel bottomPanel = new JPanel ();

        // A "previous-question" button.
        JButton backward = new JButton ("Previous question");
        backward.setFont (new Font ("Serif", Font.PLAIN | Font.BOLD, 15));
        backward.addActionListener (
            new ActionListener () {
                public void actionPerformed (ActionEvent a)
	        {
	            // Go back in the card layout.
	            card.previous (centerpanel);
	        }
            }
        );
        bottomPanel.add (backward);

        // A forward button.
        JButton forward = new JButton ("Next question");
        forward.setFont (new Font ("Serif", Font.PLAIN | Font.BOLD, 15));
        forward.addActionListener (
            new ActionListener () {
                public void actionPerformed (ActionEvent a)
	        {
	            // Go forward in the card layout.
	            card.next (centerpanel);
	        }
            }
        );
        bottomPanel.add (forward);

        // A submit button.
        JButton submit = new JButton ("Submit");
        submit.setFont (new Font ("Serif", Font.PLAIN | Font.BOLD, 15));
        submit.addActionListener (
            new ActionListener () {
                public void actionPerformed (ActionEvent a)
	        {
	            // Perform submit task.
	            computeResult();
	        }
            }
        );
        bottomPanel.add (submit);

        JButton quitb = new JButton ("Quit");
        quitb.setFont (new Font ("Serif", Font.PLAIN | Font.BOLD, 15));
        quitb.addActionListener (
            new ActionListener () {
                public void actionPerformed (ActionEvent a)
	        {
	            System.exit (0);
	        }
            }
        );
        bottomPanel.add (quitb);

        return bottomPanel;
    }


    // This method will handle the panel for the first question.

    JPanel firstQuestion ()
    {
        // We will package everything into a panel and return the panel.
        JPanel subpanel = new JPanel ();

        // For now, we'll just create a label.
        JLabel L1 = new JLabel ("Question 1:");
        subpanel.add (L1);

        return subpanel;
    }


    // Second question.

    JPanel secondQuestion ()
    {
        JPanel subpanel = new JPanel ();

        JLabel L1 = new JLabel ("Question 2:");
        subpanel.add (L1);

        return subpanel;
    }


    // Third question.

    JPanel thirdQuestion ()
    {
        JPanel subpanel = new JPanel ();

        JLabel L1 = new JLabel ("Question 3:");
        subpanel.add (L1);

        return subpanel;
    }


    // Fourth question.

    JPanel fourthQuestion ()
    {
        JPanel subpanel = new JPanel ();

        JLabel L1 = new JLabel ("Question 4:");
        subpanel.add (L1);

        return subpanel;
    }


    // This method is called after submit is pressed.

    void computeResult ()
    {
        // To be filled in ...
    }

}


public class Survey0 {
    public static void main (String[] argv)
    {
        NewFrame nf = new NewFrame (600, 300);
    }
}
Note:
- The method bottomPanel() now creates four buttons,
places them in a panel, and returns the panel.
  JPanel getBottomPanel ()
  {
      // Create a panel into which we will place buttons.
      JPanel bottomPanel = new JPanel ();

      // ... create the buttons ...

      return bottomPanel;
  }
- Recall that each button needs a ActionListener.
- This interface requires implementing the actionPerformed()
method.
- The "Quit" button simply quits the program:
    quitb.addActionListener (
        new ActionListener () {
            public void actionPerformed (ActionEvent a)
	    {
	        System.exit (0);
	    }
        }
    );
- The "Submit" button calls the method computeResults
(which we haven't written yet):
        public void actionPerformed (ActionEvent a)
	{
	    // Perform submit task.
	    computeResult();
	}
- The "Previous question" button asks the CardLayout to
display the previous panel:
        public void actionPerformed (ActionEvent a)
	{
	    // Go back in the card layout.
	    card.previous (centerpanel);
	}
- Note: the previous() method of CardLayout
is called, and is passed the container (centerpanel) instance.
- The "Next question" button is similarly handled:
        public void actionPerformed (ActionEvent a)
	{
  	    // Go forward in the card layout.
	    card.next (centerpanel);
	}
- For now, each "question" handler only writes a label:
  JPanel firstQuestion ()
  {
      // We will package everything into a panel and return the panel.
      JPanel subpanel = new JPanel ();

      // For now, we'll just create a label.
      JLabel L1 = new JLabel ("Question 1:");
      subpanel.add (L1);

      return subpanel;
  }
When executed, the result looks like this:
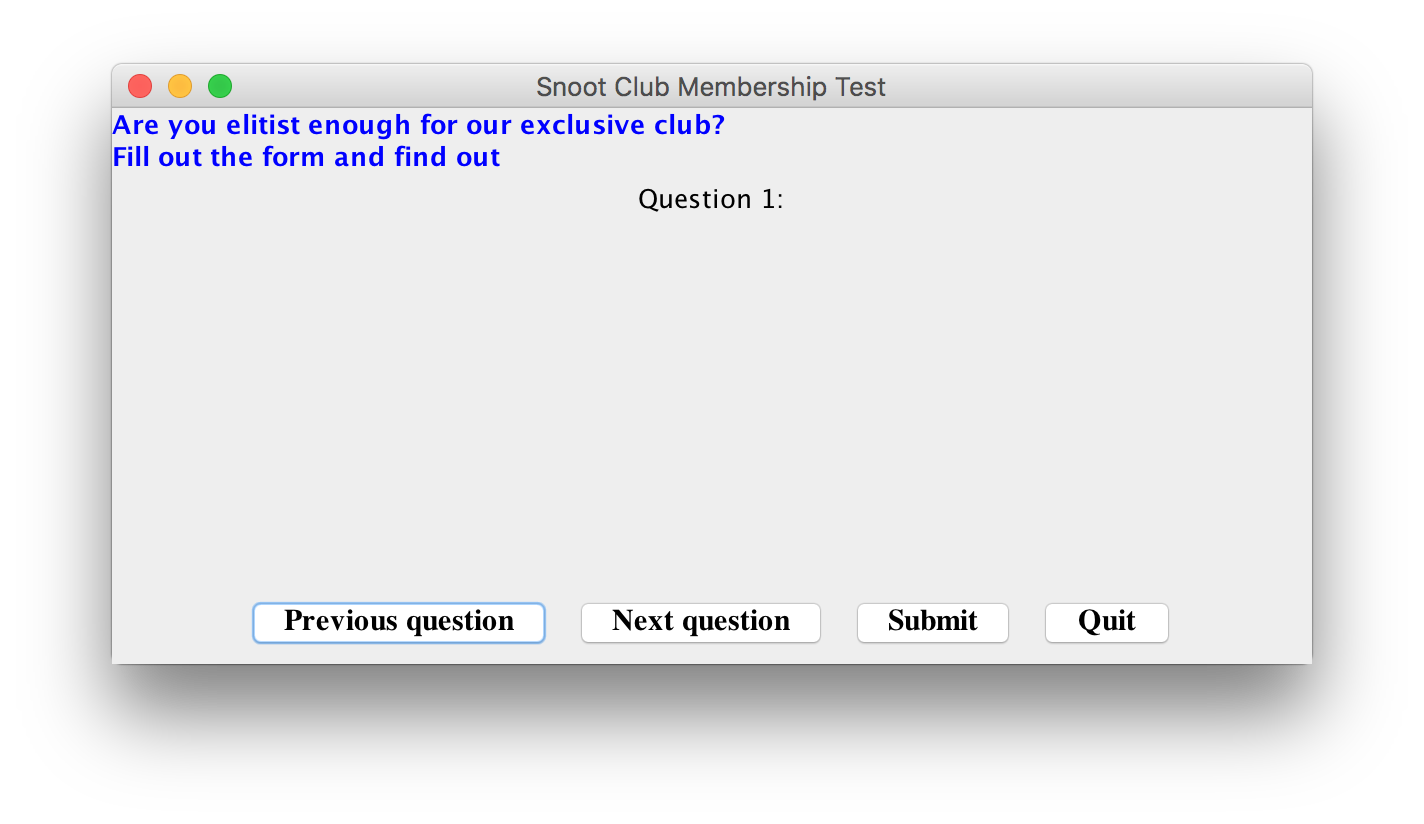
Exercise 11.2:
Add a 5th question to the survey.
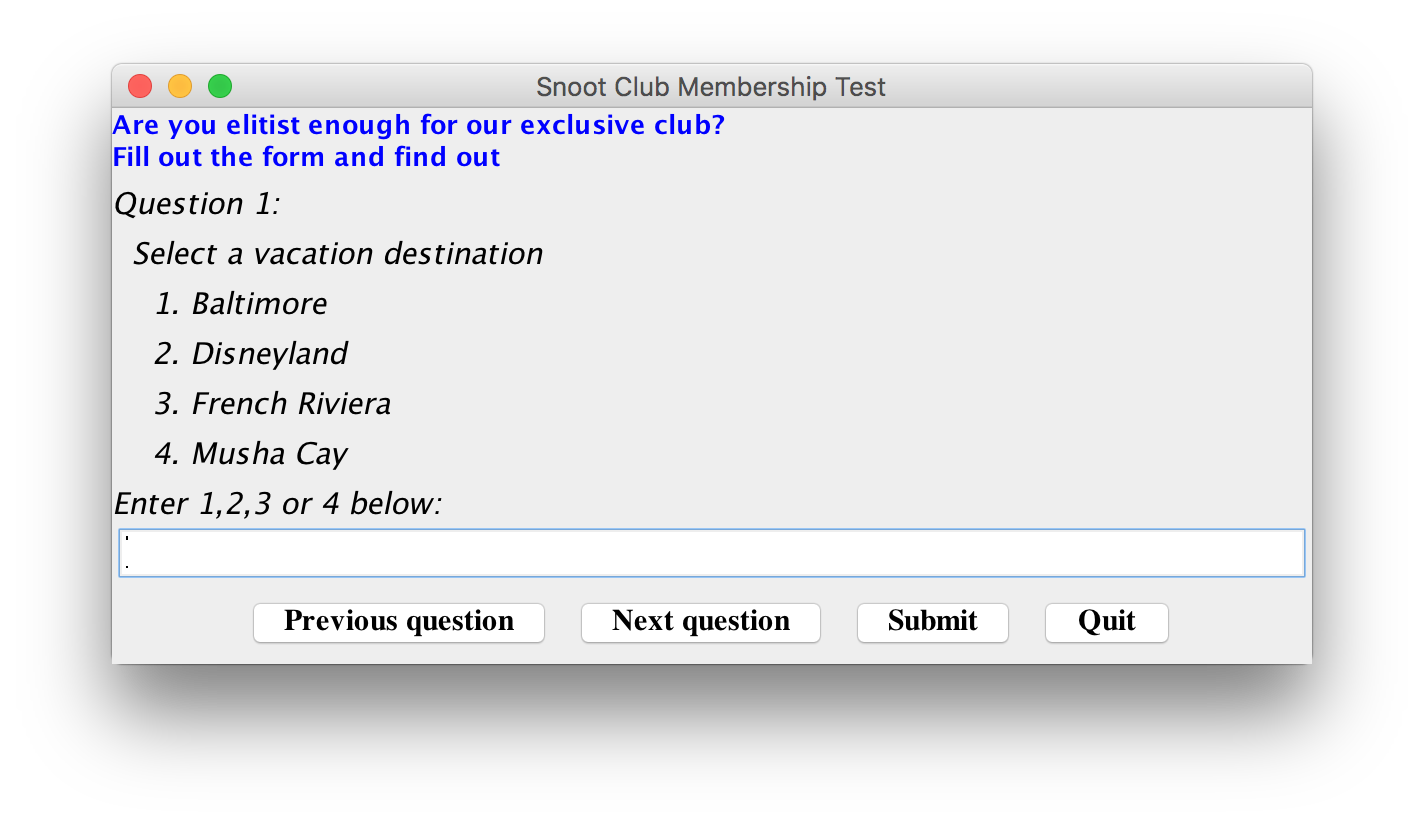
Using a JTextField for user input (Question 1)
For Question 1, the user needs to enter of the numbers 1,2,3 or 4.
To allow a simple one-line input from the user, a JTextField
is best.
Here is the code for Question1:
(source file)
    // We will package everything into a panel and return the panel.
    JPanel subpanel = new JPanel ();

    // We will place things in a single column, so
    // a GridLayout with one column is appropriate.
    subpanel.setLayout (new GridLayout (8,1));

    JLabel L1 = new JLabel ("Question 1:");
    L1.setFont (new Font ("SansSerif", Font.ITALIC, 15));
    subpanel.add (L1);

    JLabel L2 = new JLabel ("  Select a vacation destination");
    L2.setFont (new Font ("SansSerif", Font.ITALIC, 15));
    subpanel.add (L2);

    JLabel L3 = new JLabel ("    1. Baltimore");
    L3.setFont (new Font ("SansSerif", Font.ITALIC, 15));
    subpanel.add (L3);

    JLabel L4 = new JLabel ("    2. Disneyland");
    L4.setFont (new Font ("SansSerif", Font.ITALIC, 15));
    subpanel.add (L4);

    JLabel L5 = new JLabel ("    3. French Riviera");
    L5.setFont (new Font ("SansSerif", Font.ITALIC, 15));
    subpanel.add (L5);

    JLabel L6 = new JLabel ("    4. Musha Cay");
    L6.setFont (new Font ("SansSerif", Font.ITALIC, 15));
    subpanel.add (L6);

    JLabel L7 = new JLabel ("Enter 1,2,3 or 4 below:");
    L7.setFont (new Font ("SansSerif", Font.ITALIC, 15));
    subpanel.add (L7);

    // Here's the textfield to get user-input.
    tf = new JTextField ();
    tf.addActionListener (
        new ActionListener () {
            // This interface has only one method.
            public void actionPerformed (ActionEvent a)
   	    {
	        String q1String = a.getActionCommand();
   	        if (q1String.equals ("2"))
	            q1Score = 2;
   	        else if (q1String.equals ("3"))
    	            q1Score = 3;
	        else if (q1String.equals ("4"))
	            q1Score = 4;
	        else
	            q1Score = 1;
	    }
        }
    );
    subpanel.add (tf);

    return subpanel;
When executed, Question 1 looks like this:
Note:
- We used a JLabel for each line of output text, e.g.,
    JLabel L5 = new JLabel ("    3. French Riviera");
    L5.setFont (new Font ("SansSerif", Font.ITALIC, 20));
    subpanel.add (L5);
- A JTextField also uses an ActionListener.
-
A score is assigned (for our particular application)
based on the input.
- Some useful facts about JTextField's:
- You can set the length of a TextField (using
the setColumns() method or the constructor).
- You can control display and editing features using
methods in JTextComponent which JTextField extends.
Using Checkbox's for user input (Question 2)
When the user needs to select one or more items from
a known set of items, a collection of JCheckbox's is
convenient:
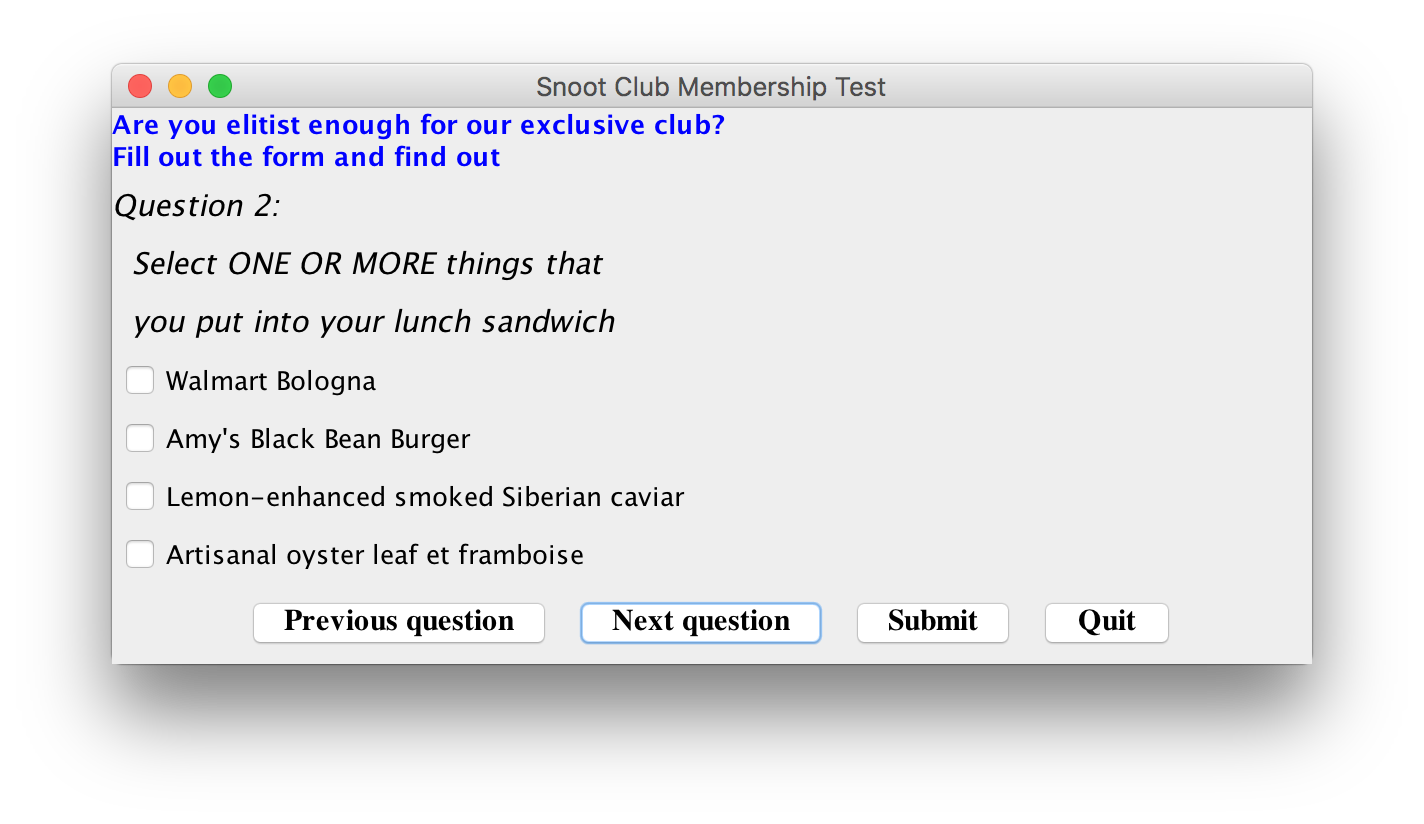
Here is the code for Question 2:
(source file)
  // For the second question, a collection of checkboxes
  // will be used. More than one selection can be made.
  // A listener is required for each checkbox. The state
  // of each checkbox is recorded.

  JPanel secondQuestion ()
  {
      JPanel subpanel = new JPanel ();
      subpanel.setLayout (new GridLayout (7,1));

      JLabel L1 = new JLabel ("Question 2:");
      L1.setFont (new Font ("SansSerif", Font.ITALIC, 15));
      subpanel.add (L1);

      JLabel L2 = new JLabel ("  Select ONE OR MORE things that ");
      L2.setFont (new Font ("SansSerif", Font.ITALIC, 15));
      subpanel.add (L2);

      JLabel L3 = new JLabel ("  you put into your lunch sandwich");
      L3.setFont (new Font ("SansSerif", Font.ITALIC, 15));
      subpanel.add (L3);

      // Initialize the selections to false.
      q2Option1 = q2Option2 = q2Option3 = q2Option4 = false;

      // First checkbox.
      JCheckBox c1 = new JCheckBox ("Ham, beef or turkey");
      c1.addItemListener (
          new ItemListener () {
             public void itemStateChanged (ItemEvent i)
	     {
	         JCheckBox c = (JCheckBox) i.getSource();
                 q2Option1 = c.isSelected();
	     }
          }
      );
      subpanel.add (c1);

      // Second checkbox etc ... (similar) ...
  }
Note:
- There are four JCheckbox's for the four selections.
- The text for a JCheckbox is passed to the constructor.
- The JCheckbox uses an ItemListener.
- The itemStateChanged() is the only method in
ItemListener.
- The isSelected() method
returns true if the box is "clicked on".
- To call the isSelected() method, we need a reference
to the JCheckbox itself, which we can get from the parameter:
	  JCheckbox c = (JCheckbox) i.getSource();
          q2Option1 = c.isSelected();
- The following code will NOT compile:
q2Option1 = c1.isSelected();
(Since c1 is a local variable and not on the heap).
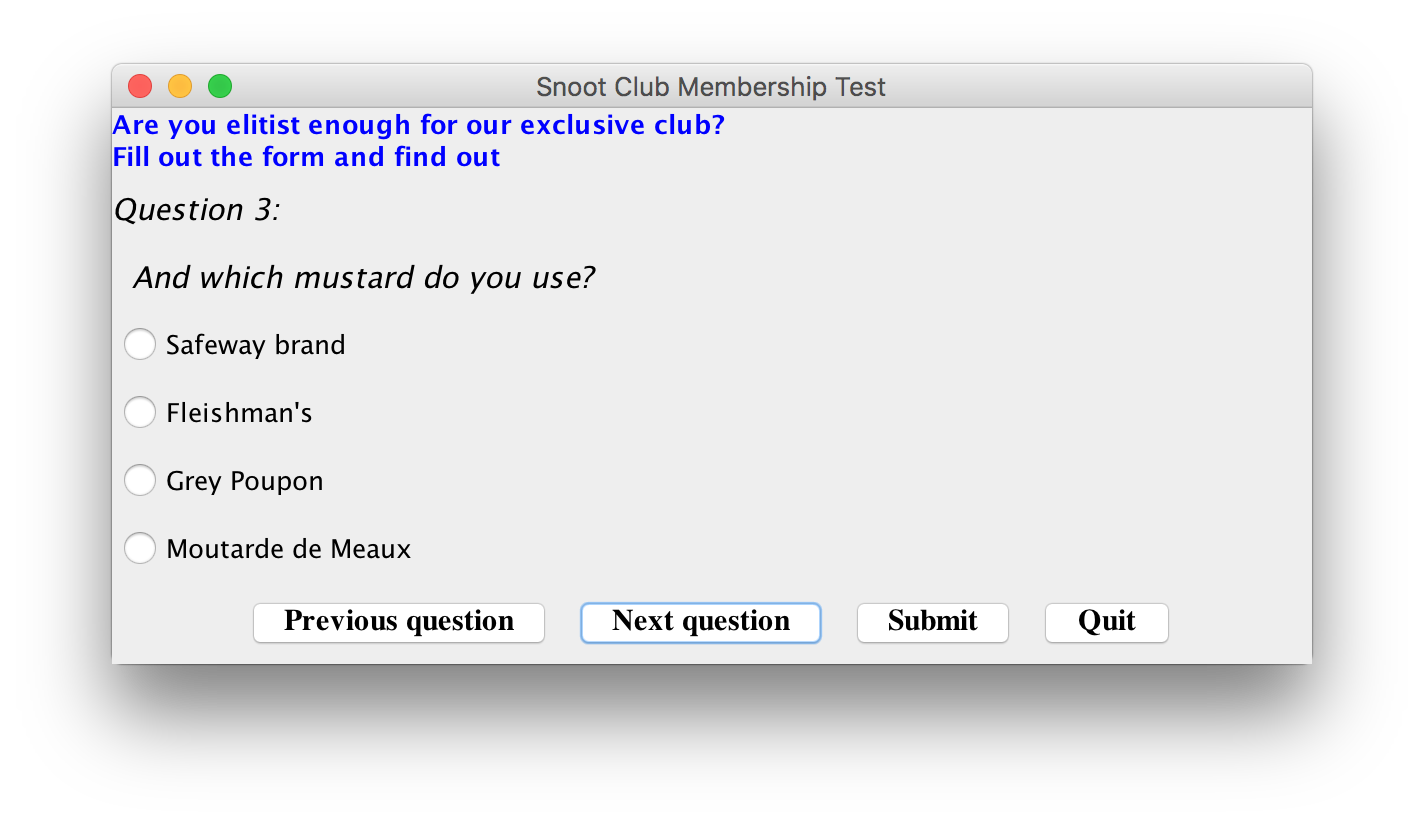
Using a ButtonGroup to force only one selection (Question 3)
Suppose we want to allow only one selection to be made.
This can be achieved by associating a ButtonGroup
instance with a group of JRadioButton's.
For example, in Question 3:
(source file)
  // The third question allows only one among four choices
  // to be selected. We will use radio buttons.

  JPanel thirdQuestion ()
  {
      JPanel subpanel = new JPanel ();
      subpanel.setLayout (new GridLayout (6,1));

      JLabel L1 = new JLabel ("Question 3:");
      L1.setFont (new Font ("SansSerif", Font.ITALIC, 15));
      subpanel.add (L1);

      JLabel L2 = new JLabel ("  And which mustard do you use?");
      L2.setFont (new Font ("SansSerif", Font.ITALIC, 15));
      subpanel.add (L2);

      // First, create the ButtonGroup instance.
      // We will add radio buttons to this group.
      ButtonGroup bGroup = new ButtonGroup();

      // First radiobutton.
      JRadioButton r1 = new JRadioButton ("Safeway brand");
      r1.addItemListener (
          new ItemListener () {
              public void itemStateChanged (ItemEvent i)
	      {
	          JRadioButton r = (JRadioButton) i.getSource();
                  if (r.isSelected()) q3Score = 1;
	      }
          }
      );
      bGroup.add (r1);
      subpanel.add (r1);

    // Second radiobutton etc ... (similar)
  }
Note:
- First, an instance of ButtonGroup is created:
ButtonGroup bGroup = new ButtonGroup();
- We then add radio buttons to this instance.
    JRadioButton r1 = new JRadioButton ("Who cares?");
    bGroup.add (r1);
Here is the result (the radio button looks different - a circle):
Using a JList (Question 4)
For Question 4, we want a list:
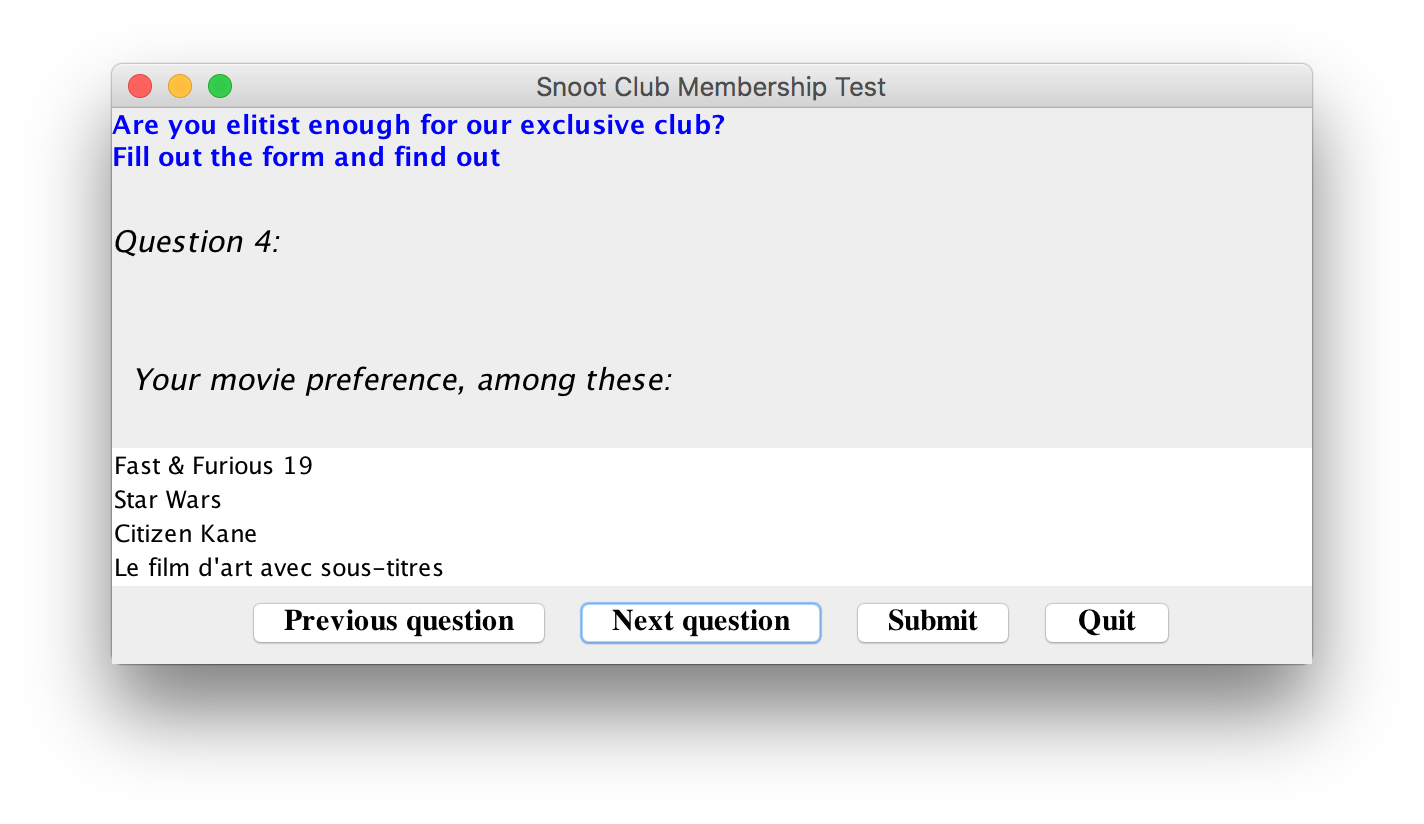
Such lists are implemented using a Choice instance:
(source file)
    JPanel subpanel = new JPanel ();
    subpanel.setLayout (new GridLayout (3,1));

    JLabel L1 = new JLabel ("Question 4:");
    L1.setFont (new Font ("SansSerif", Font.ITALIC, 15));
    subpanel.add (L1);

    JLabel L2 = new JLabel ("  Your movie preference, among these:");
    L2.setFont (new Font ("SansSerif", Font.ITALIC, 15));
    subpanel.add (L2);

    // Create a JList with options.
    String[] movies = { "Fast & Furious 19", "Star Wars", "Citizen Kane",
                        "Le film d'art avec sous-titres"};
    q4Choice = new JList (movies);
    q4Score = 1;
    q4Choice.addListSelectionListener (
        new ListSelectionListener () {
            public void valueChanged (ListSelectionEvent e)
	    {
	        q4Score = 1 + q4Choice.getSelectedIndex();
	    }
        }
    );
    subpanel.add (q4Choice);

    return subpanel;
Note:
- The constructor of JList is used to
add items.
- The listener used is ListSelectionListener, which
requires implementation of the valueChanged()
method.
- To find out which item has been selected, use the
getSelectedIndex() method of the JList instance.
Now the four questions are done. A few more observations:
- The calculation of a score is done in the method
computeResults() (see the complete
source).
- After the calculation, the centerpanel is replaced
with the "score".
(Thus, the questions are removed).
- To replace, the following steps are used (in computeResults):
  void computeResult ()
  {
      // Clear the center panel.
      centerpanel.removeAll();

      // Create a new panel to display in the center.
      JPanel subpanel = new JPanel (new GridLayout (5,1));

      // ... Compute scores

      // Now add the new subpanel.
      centerpanel.add (subpanel, "5");

      // Need to mark the centerpanel as "altered"
      centerpanel.invalidate();

      // Everything "invalid" (e.g., the centerpanel above)
      // is now re-computed.
      this.validate();
  }
- An alternative to using a JList is to use
a JComboBox.
Exercise 11.3:
In this exercise, you are to use a JComboBox instead
of a JList in Question 4 of the above survey.
Download this template and add
code to the method fourthQuestion() to support
a JComboBox.
Note that a JComboBox uses an ActionListener.
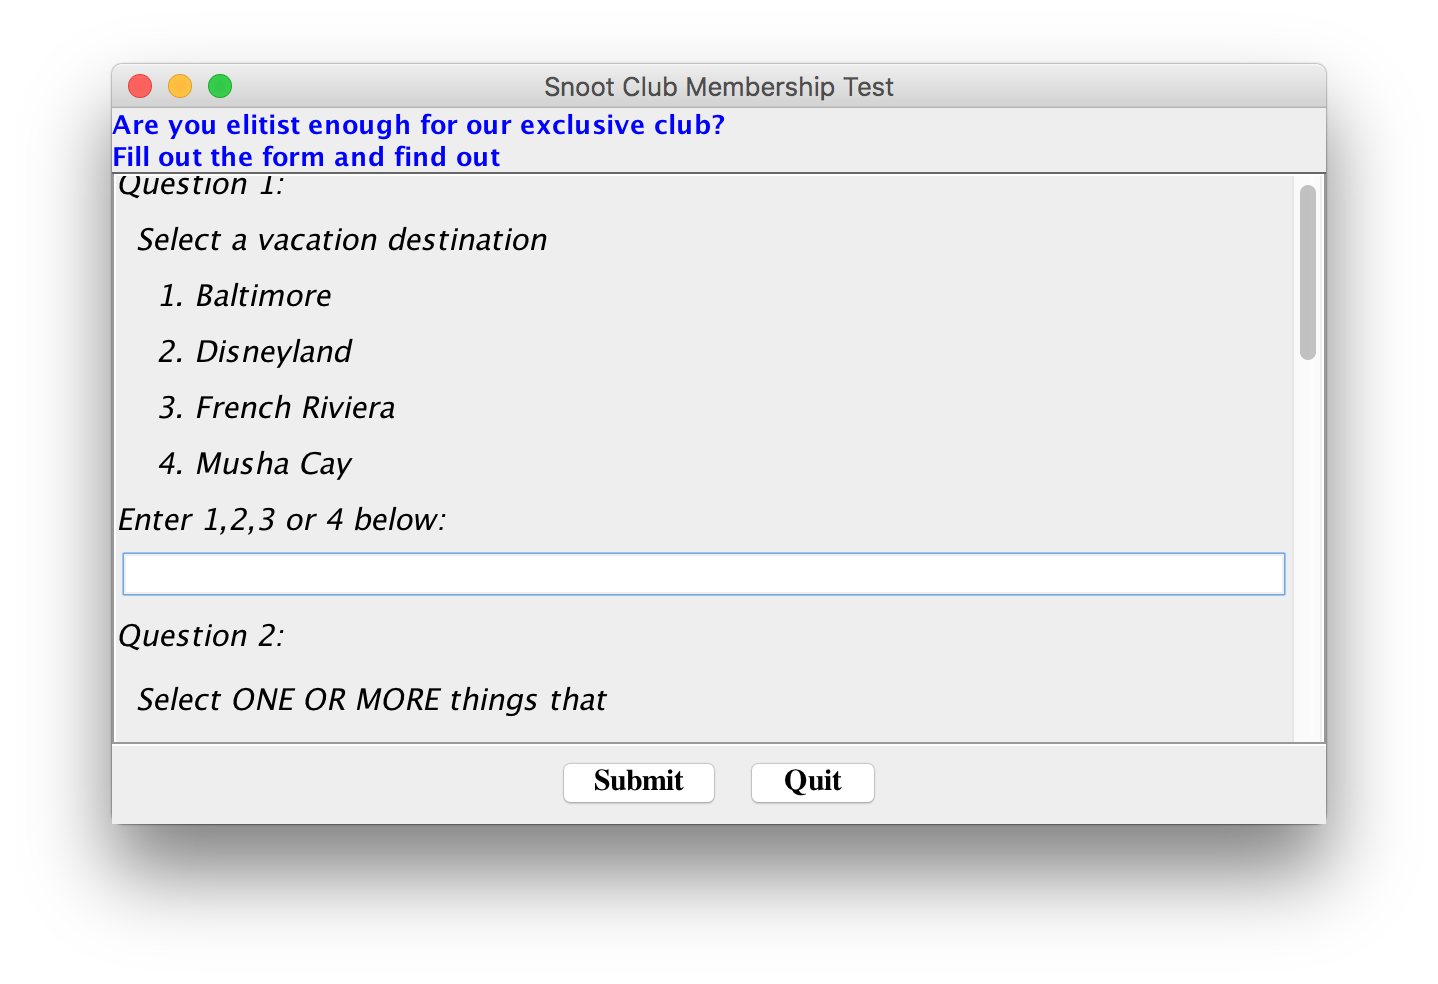
Using a JScrollPane to display large panels
Often, a panel or some other widget is too large to fit the
window.
Swing provides a JScrollPane which lets you place the
large widget inside, and has scrollbars to allow scanning of
the whole widget.
Let us take the four questions in the above survey, place them
all on one panel, and put the panel inside a JScrollPane.
Here is the desired effect:
To implement these changes
- We will remove the "Previous" and "Next" buttons from our survey.
- We will remove the CardLayout.
- And we will add in a ScrollPane.
Here is the code in the constructor:
(source file)
    // The center panel with the questions.
    centerpanel = new JPanel ();

    // Use GridLayout for vertical layout of questions.
    centerpanel.setLayout (new GridLayout (4,1));

    // Each question will be created in a separate method.
    // The cardlayout requires a label as second parameter.
    centerpanel.add (firstQuestion (), "1");
    centerpanel.add (secondQuestion(), "2");
    centerpanel.add (thirdQuestion(), "3");
    centerpanel.add (fourthQuestion(), "4");

    // Add the center panel to the scroll pane and put it in the frame.
    // A scrollpane for the center.
    JScrollPane scrollpane = new JScrollPane (centerpanel);
    cPane.add (scrollpane, BorderLayout.CENTER);

    // ...
Note:
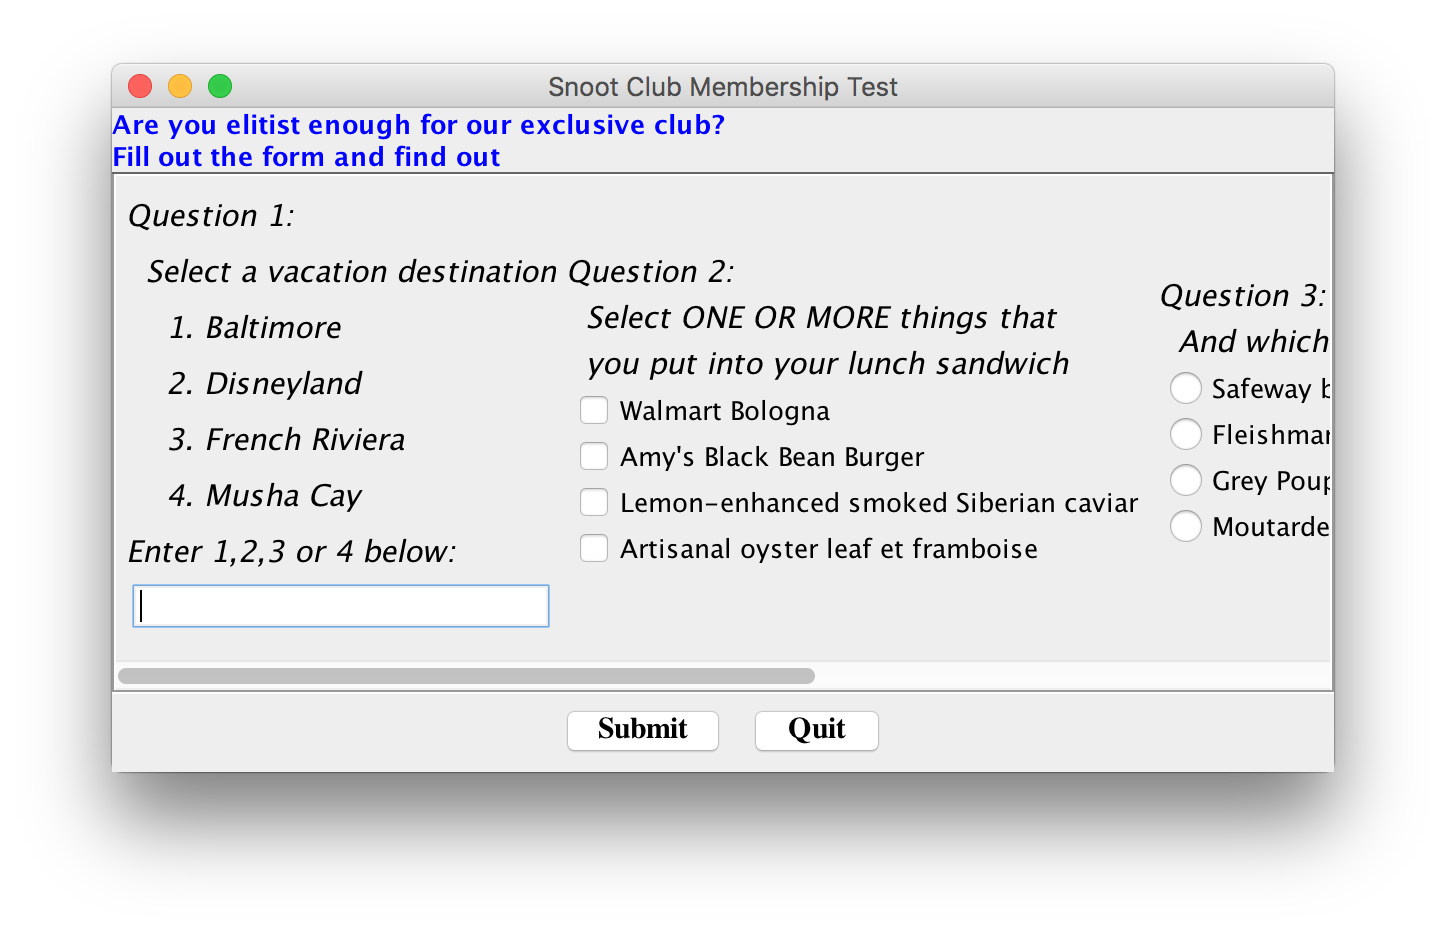
- We used a GridLayout to lay the subpanels vertically.
Not using it causes horizontal layout:
- A JScrollPane is a special kind of container.
- Some useful facts about JScrollPane:
- You can set the initial "viewport".
- You can set the "scrollbar policy", which decides whether
you always display scrollbars or only when they are needed.
- You can control the size of the scrollbar.
- You can retrieve the current position of the scrollbar.
Designing a form with a menubar and dialog
We will next design a simple form with a few text fields
that will have the following features:
- It will store data to a file and be able to read from the file.
- A menubar will provide load/store and submit options.
- A filedialog will allow the user to indicate which file.
- An error in the filename will bring up a dialog box.
- A popup menu will allow quick movement to the top and bottom
of the form.
Exercise 11.4:
First, familiarize yourself with the form by downloading
the file Form.java,
compiling and executing it. In particular, fill out the form,
"submit" it and look at the properties file it creates in
the same directory. Also observe the following features:
a file dialog, a popup menu.
We will design the form in stages, starting with a simple
form that writes to a properties file.
Step 1 in creating the form: building the widgets
As a first step, we will do the following:
- Create a JFrame by extending the class JFrame
(as usual).
- Create JTextField's for:
- First name.
- Last name.
- Net worth.
- Create a JTextArea (in which multiple lines can be
entered) for the address.
- Create a menu bar with a "File" and "Action" menu.
- When the "File" menu is dropped: show menu items
"Load From File" and "Quit".
- When the "Action" menu is dropped: show menu items
"Clear" and "Submit".
- Right now, we will not save to a file, but just print
the values read from the widgets (to System.out).
Here is the code:
(source file)
import java.awt.*;
import java.awt.event.*;
import javax.swing.*;
import javax.swing.event.*;
import java.util.*;

class NewFrame extends JFrame {

    // Data.
    JPanel centerpanel;         // For the questions.
    JScrollPane sc;             // For placing the centerpanel.

    JTextField lastnameTextF;   // To get the lastname.
    String lastname;

    JTextField firstnameTextF;  // Firstname.
    String firstname;

    JTextField networthTextF;   // Net worth
    String networth;

    JTextArea addressTextA;     // Address (TextArea)
    String address;

    JMenuBar mb;                // The menubar.


    // Constructor.
    public NewFrame (int width, int height)
    {
        this.setTitle ("Snoot Club Membership Form");
        this.setResizable (true);
        this.setSize (width, height);

        Container cPane = this.getContentPane();
        // cPane.setLayout (new BorderLayout());

        // First, a welcome message:
        JLabel L = new JLabel ("Please fill out the following membership form:");
        L.setFont (new Font ("Serif", Font.BOLD | Font.ITALIC, 15));
        L.setForeground (Color.blue);
        cPane.add (L, BorderLayout.NORTH);

        // Now the center panel.
        centerpanel = new JPanel ();
        centerpanel.setLayout (new GridLayout (4,1));

        // Each widget is created in a separate method.
        centerpanel.add ( firstName() );
        centerpanel.add ( lastName() );
        centerpanel.add ( netWorth() );
        centerpanel.add ( address () );

        // Next, the scrollpane to contain the main panel.
        sc = new JScrollPane (centerpanel);
        cPane.add (sc, BorderLayout.CENTER);

        // Create a menubar and add two menus.
        mb = new JMenuBar ();
        mb.add ( makeFileMenu() );
        mb.add ( makeActionMenu() );

        // Note how a menubar is added to a Frame.
        this.setJMenuBar (mb);

        // Finally, show the frame.
        this.setVisible (true);
    }


    // No-parameter constructor.
    public NewFrame ()
    {
         this (500, 300);
    }


    // Read in the first name.

    JPanel firstName ()
    {
        JPanel subpanel = new JPanel ();

        // First, a label before the textfield.
        JLabel L = new JLabel ("First Name");
        L.setFont (new Font ("SansSerif", Font.ITALIC, 20));
        subpanel.add (L);

        // Create and add the textfield.
        firstnameTextF = new JTextField (20);
        firstnameTextF.setForeground (Color.blue);
        subpanel.add (firstnameTextF);

        return subpanel;
    }


    // Get last name.

    JPanel lastName ()
    {
        JPanel subpanel = new JPanel ();

        // The "last name" label.
        JLabel L = new JLabel ("Last Name");
        L.setFont (new Font ("SansSerif", Font.ITALIC, 20));
        subpanel.add (L);

        lastnameTextF = new JTextField (20);
        lastnameTextF.setForeground (Color.blue);
        subpanel.add (lastnameTextF);

        return subpanel;
    }


    // Get net worth.

    JPanel netWorth ()
    {
        JPanel subpanel = new JPanel ();

        JLabel L = new JLabel ("Net worth (in millions)");
        L.setFont (new Font ("SansSerif", Font.ITALIC, 20));
        subpanel.add (L);

        networthTextF = new JTextField (10);
        networthTextF.setForeground (Color.blue);
        subpanel.add (networthTextF);

        return subpanel;
    }


    // Get address via a TextArea.

    JPanel address ()
    {
        JPanel subpanel = new JPanel ();

        JLabel L = new JLabel ("Address");
        L.setFont (new Font ("SansSerif", Font.ITALIC, 20));
        subpanel.add (L);

        addressTextA = new JTextArea (4, 30);
        addressTextA.setForeground (Color.blue);
        subpanel.add (addressTextA);

        return subpanel;
    }


    // Create the File menu and associated listeners.

    JMenu makeFileMenu ()
    {
        // Add a "File" menu with two items.
        JMenu fileMenu = new JMenu ("File");

        // "Load From File" menu item
        JMenuItem loadFromFileMenuItem = new JMenuItem ("Load From File");
        loadFromFileMenuItem.addActionListener (
            new ActionListener () {
                public void actionPerformed (ActionEvent a)
	        {
                    loadFromFile ();
	        }
           }
        );
        fileMenu.add (loadFromFileMenuItem);

        // "Quit" menu item
        JMenuItem quitMenuItem = new JMenuItem ("Quit");
        quitMenuItem.addActionListener (
            new ActionListener () {
                public void actionPerformed (ActionEvent a)
	        {
	            System.exit (0);
	        }
            }
        );
        fileMenu.add (quitMenuItem);

        return fileMenu;
    }


    // Create the Action Menu and its listeners.

    JMenu makeActionMenu ()
    {
        // Add an "Action" menu with two items.
        JMenu actionMenu = new JMenu ("Action");

        // "Submit" menu item
        JMenuItem submitMenuItem = new JMenuItem ("Submit");
        submitMenuItem.addActionListener (
            new ActionListener () {
                public void actionPerformed (ActionEvent a)
	        {
                    submit ();
	        }
            }
        );
        actionMenu.add (submitMenuItem);

        // "Clear" menu item
        JMenuItem clearMenuItem = new JMenuItem ("Clear");
        clearMenuItem.addActionListener (
            new ActionListener () {
                public void actionPerformed (ActionEvent a)
	        {
                    // Clear all the fields.
                    firstname = "";  firstnameTextF.setText (firstname);
                    lastname = "";  lastnameTextF.setText (lastname);
                    networth = "";  networthTextF.setText (networth);
                    address = "";  addressTextA.setText (address);
	        }
            }
        );
        actionMenu.add (clearMenuItem);

        return actionMenu;
    }


    // Process data when ready.

    void submit ()
    {
        System.out.println ("Submit");
    }


    // Use a file dialog.

    void loadFromFile ()
    {
        System.out.println ("Load From File");
    }

}


public class Form1 {
    public static void main (String[] argv)
    {
        NewFrame nf = new NewFrame (500, 200);
    }
}
Note:
- Each of the four entries was created in a separate method.
(e.g., firstName()).
- An entry consisted of a JLabel and a
JTextField or JTextArea (for the address).
This combination was placed in a panel.
- A JScrollPane was used for the centerpanel.
- To set (or clear) the text out of a JTextField
or JTextArea,
call the setText() method.
          firstname = "";  firstnameTextF.setText (firstname);
          lastname = "";  lastnameTextF.setText (lastname);
          networth = "";  networthTextF.setText (networth);
          address = "";  addressTextA.setText (address);
- The menubar is created with a JMenuBar instance,
and is "added" using a special method:
this.setJMenuBar (mb);
- To a menubar, we add JMenuItem's.
- Each JMenuItem has an associated
ActionListener, e.g.,
    // "Quit" menu item
    JMenuItem quitMenuItem = new JMenuItem ("Quit");
    quitMenuItem.addActionListener (
        new ActionListener () {
            public void actionPerformed (ActionEvent a)
	    {
	        System.exit (0);
	    }
        }
    );
    fileMenu.add (quitMenuItem);
Step 2 in creating the form: working with files.
Next, we will use a Properties instance to store
the data:
Here is the code:
(source file)
  Properties info;

  void submit ()
  {
      // Retrieve data from the widgets.
      lastname = lastnameTextF.getText();
      firstname = firstnameTextF.getText();
      networth = networthTextF.getText();
      address = addressTextA.getText();

      // Create a file by concatenating firstname and lastname.
      String filename = firstname + lastname;
      if (filename.length() == 0) return;

      // We will use a "Properties" instance to store data.
      Properties p = new Properties ();
      p.put ("firstname", firstname);
      p.put ("lastname", lastname);
      p.put ("networth", networth);
      p.put ("address", address);

      // Use the "save" feature of the Properties instance.
      try {
          FileOutputStream f = new FileOutputStream (filename);
          p.store (f, "Member information");
      }
      catch (IOException e) {
          System.out.println (e);
          System.exit (0);
      }
  }
Note:
- A java.util.Properties instance is used to store the data:
    Properties p = new Properties ();
    p.put ("firstname", firstname);
    p.put ("lastname", lastname);
    p.put ("networth", networth);
    p.put ("address", address);
- The store() method of Properties is used
to write the data to a (text) file:
      FileOutputStream f = new FileOutputStream (filename);
      p.store (f, "Member information");
- The filename was created by concatenating the first and
last names.
Exercise 11.5:
In this exercise, you will use the following
template to add a "Help"
menu to the menubar:
- Your help menu will have two items: "About" and "Help...".
- When activated, the "About" menu item should call the
method about() in the frame.
- Similarly, the method help() should be called
whenever the user goes to "Help..." in the menu.
- For now, do not implement anything in the about()
method. You will deal with this in Ex.11.6 below.
- In the method help(), display a new top-level
frame with a quit button and any rude help message you like,
such as "Sorry, you're on your own".
Once you've completed the above, see what happens when you
use the setHelpMenu() method of JMenuBar
instead of add() when adding the help menu.
Step 3 in creating the form: a file dialog.
Next, we will fill out the loadFromFile method:
- We will use a JFileChooser to prompt the
user for a file name.
Here is the code in loadFromFile():
(source file)
  void loadFromFile ()
  {
      // Create the FileDialog instance.
      JFileChooser fc =  new JFileChooser();
      int returnCode = fc.showOpenDialog (null);

      File file = fc.getSelectedFile();

      info = new Properties ();
      try {
          // Load the properties file.
          FileInputStream f = new FileInputStream (file);
          info.load (f);

          // Extract the info.
          firstname = info.getProperty ("firstname");
          firstnameTextF.setText (firstname);
          lastname = info.getProperty ("lastname");
          lastnameTextF.setText (lastname);
          networth = info.getProperty ("networth");
          networthTextF.setText (networth);
          address = info.getProperty ("address");
          addressTextA.setText (address);
      }
      catch (IOException e) {
          System.out.println ("Couldn't load file");
          System.exit (0);
      }

  }
Note:
- A JFileChooser can be brought up to "open"
or "save" a file.
- To "open", use
int returnCode = fc.showOpenDialog (null);
- The return code indicates whether a file was selected.
- The load() method of Properties is
used to load data from a file:
      FileInputStream f = new FileInputStream (filename);
      info.load (f);

      // ...
Step 4 in creating the form: an error dialog.
Thus far, we have not handled errors gracefully.
For example, if the filename was incorrect, we killed
the program:
    try {
        FileInputStream f = new FileInputStream (filename);

        // ...

    }
    catch (IOException e) {
        System.out.println ("Couldn't load file");
        System.exit (0);
    }
Next, we will bring up a simple dialog box with an "OK" button
to indicate the error.
This code is added to the load() method:
(source file)
  void loadFromFile ()
  {
      // Create the FileDialog instance.
      JFileChooser fc =  new JFileChooser();
      int returnCode = fc.showOpenDialog (null);

      File file = fc.getSelectedFile();

      info = new Properties ();
      try {
          FileInputStream f = new FileInputStream (file);
          info.load (f);

          firstname = info.getProperty ("firstname");
          firstnameTextF.setText (firstname);
          lastname = info.getProperty ("lastname");
          lastnameTextF.setText (lastname);
          networth = info.getProperty ("networth");
          networthTextF.setText (networth);
          address = info.getProperty ("address");
          addressTextA.setText (address);
      }
      catch (IOException e) {
          // Handle a file error gracefully with a dialog.
          JOptionPane.showMessageDialog (this,
                                         "File does not exist",
                                         "Error dialog",
                                         JOptionPane.INFORMATION_MESSAGE);
      }

  }
Note:
Exercise 11.6:
In this exercise, use your code from Ex.11.5
to add a dialog for the "About" option in the "Help" menu.
Typically, "About" displays copyright and version information.
Step 5 in creating the form: a popup menu
Finally, we will add a simple popup menu with two items:
- "top": to scroll to the top.
- "bottom": to scroll to the bottom.
(Along the way, we will learn how to set the scroll position).
Popup menus are a little more complicated than regular menus:
- They are not explicitly added, but rather, displayed when
the mouse is clicked.
- We need to decide which of the other components should
listen for popup-menu clicks.
Here are the relevant parts of the
source file:
class NewFrame extends JFrame {

    // ...

    JPopupMenu pm;            // The popup menu.


    // Constructor.
    public NewFrame (int width, int height)
    {
        // ...

        // A pop-up menu is handled a little different from the other menus.
        makePopupMenu ();


        // ...
    }


    // Methods like firstName() method are slightly modified:

    JPanel firstName ()
    {
        JPanel subpanel = new JPanel ();

        // First, a label before the textfield.
        JLabel L = new JLabel ("First Name");
        L.setFont (new Font ("SansSerif", Font.ITALIC, 20));
        subpanel.add (L);

        // Need to have each component listen for a Popup click.
        L.addMouseListener (getMouseListener (L));

        // Create and add the textfield.
        firstnameTextF = new JTextField (20);
        firstnameTextF.setForeground (Color.blue);
        subpanel.add (firstnameTextF);

        // Make the subpanel listen for mouseclicks too.
        subpanel.addMouseListener (getMouseListener(subpanel));

        return subpanel;
    }

    // ...


    // Create a Listener for popup's.

    MouseListener getMouseListener (Component c)
    {
        class PopupMouseListener extends MouseAdapter {
            Component c;
            public PopupMouseListener (Component c)
            {
	        this.c = c;
            }
            public void mousePressed (MouseEvent m)
            {
   	        // We need this special check.
	        if (m.isPopupTrigger ())
	            pm.show (c, m.getX(), m.getY());
                    // The "show" method requires the component reference,
                    // which is why we store it in the variable c.
            }
        }

        return new PopupMouseListener (c);
    }


    // Create the popup menu and its listeners.

    void makePopupMenu ()
    {
        // Note: pm is a top-level variable, which we will need to access elsewhere.
        pm = new JPopupMenu ();

        // Move to "top"
        JMenuItem topMenuItem = new JMenuItem ("Top");
        topMenuItem.addActionListener (
            new ActionListener () {
                public void actionPerformed (ActionEvent a)
	        {
                    top ();
	        }
            }
        );
        pm.add (topMenuItem);

        // Move to "bottom"
        JMenuItem bottomMenuItem = new JMenuItem ("Bottom");
        bottomMenuItem.addActionListener (
            new ActionListener () {
                public void actionPerformed (ActionEvent a)
	        {
                    bottom ();
	        }
            }
        );
        pm.add (bottomMenuItem);

    }

    // Handle the "go to top" event.

    void top ()
    {
        // Get the viewport out of the JScrollPane.
        JViewport vp = sc.getViewport();
        // Set the new view.
        vp.setViewPosition (new Point (0,0));
    }

    // Handle the "go to bottom" event.

    void bottom ()
    {
        // Get the viewport out of the JScrollPane.
        JViewport vp = sc.getViewport();
        // Set the new view.
        Dimension D = vp.getViewSize();
        vp.setViewPosition (new Point (0,D.height));
    }

}
Note:
- A JPopupMenu is similar to a JMenu
in that we add JMenuItem's:
    pm = new JPopupMenu ();

    JMenuItem topMenuItem = new JMenuItem ("Top");
    topMenuItem.addActionListener (
        new ActionListener () {
            public void actionPerformed (ActionEvent a)
	    {
                top ();
	    }
        }
    );
    pm.add (topMenuItem);
- We need to set up a MouseListener wherever
we want the popup menu to appear:
- In our case, that's each JLabel in the form.
- Thus, the "first name" JLabel is given
a MouseListener:
  JPanel firstName ()
  {
      JPanel subpanel = new JPanel ();

      // ...
      JLabel L = new JLabel ("First Name");
      // ...

      // Need to have each component listen for a Popup click.
      L.addMouseListener (getMouseListener (L));

      // ...
      subpanel.addMouseListener (getMouseListener(subpanel));

      return subpanel;
  }
- Since the MouseListener is similar for
all the labels, we have written a method to create one:
  MouseListener getMouseListener (Component c)
  {
      class PopupMouseListener extends MouseAdapter {
          Component c;
          public PopupMouseListener (Component c)
          {
	       this.c = c;
          }
          public void mousePressed (MouseEvent m)
          {
	      // We need this special check.
	      if (m.isPopupTrigger ())
	          pm.show (c, m.getX(), m.getY());
          }
      }

      return new PopupMouseListener (c);
  }
- Note that a special method isPopupTrigger()
is used to detect whether the mouse-event is a genuine
popup (e.g, a right-click).
- Only if this is the case do we display the popup menu.
- The popup menu itself is displayed via a special method
in JPopupMenu called show():
pm.show (c, m.getX(), m.getY());
This method takes as parameters the component (e.g., label)
in which the menu pops up and the location.
About scroll positions:
- The scroll position of a JScrollPane
can be adjusted using the associated "viewport".
    JViewport vp = sc.getViewport();
    // Set the new view.
    vp.setViewPosition (new Point (0,0));
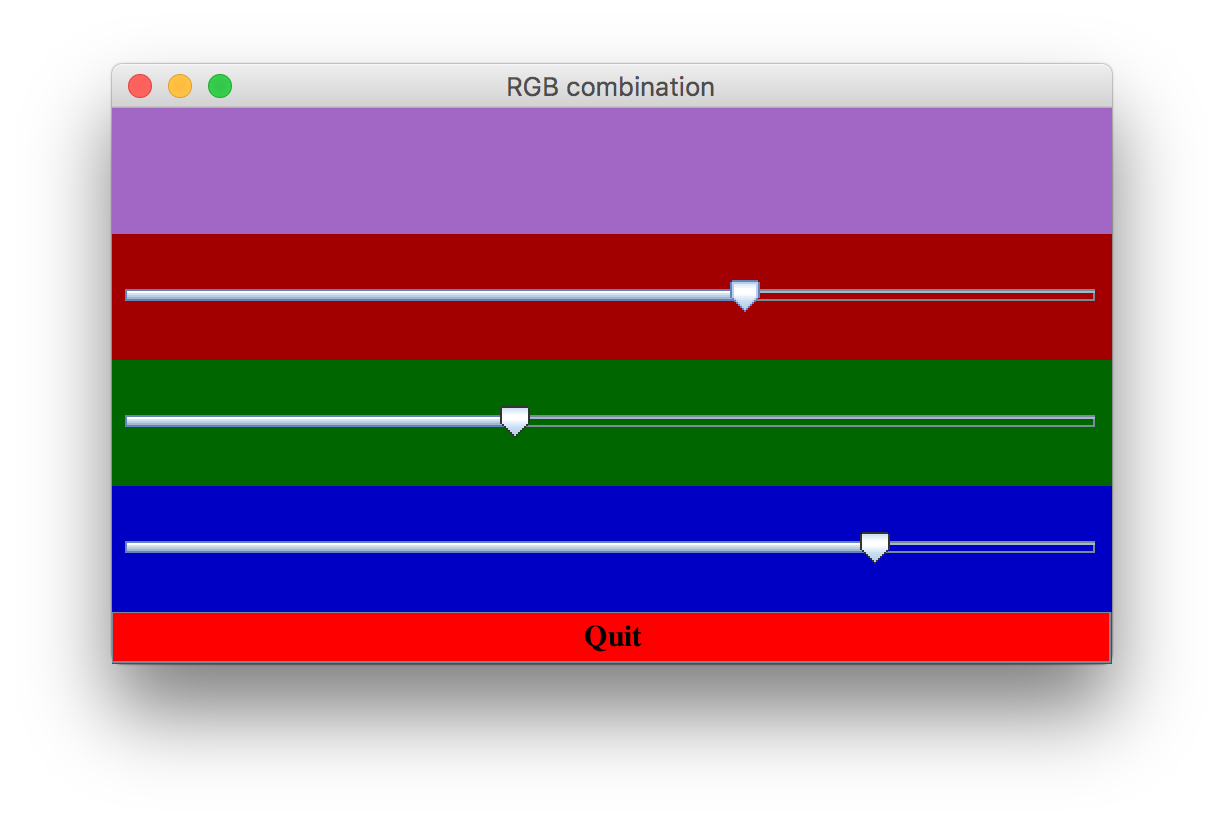
Sliders
In this section, we will learn how to use JSlider's
with the time-honored example of setting a gnarly red-green-blue
combination:
- One JSlider for each of red, blue and green.
- The setting on each slider will be translated to a
value between 0 and 255.
- The RGB (red-blue-green) combination will be used to
create a color, which will be displayed on a canvas.
For example:
Here is the code:
(source file)
import java.awt.*;
import java.awt.event.*;
import javax.swing.*;
import javax.swing.event.*;
import java.util.*;
import java.io.*;

class NewFrame extends JFrame {

    // Data.

    JSlider               // One scrollbar for each color.
      redSlider,
      blueSlider,
      greenSlider;

    int                   // Intensity value for each color.
      redValue = 0,
      blueValue = 0,
      greenValue = 0;

    JPanel drawingArea;   // To display the mixed color.


    // Constructor.

    public NewFrame (int width, int height)
    {
        this.setTitle ("RGB combination");
        this.setResizable (true);
        this.setSize (width, height);

        Container cPane = this.getContentPane();
        // cPane.setLayout (new BorderLayout());

        // Three sliders and the JPanel will
        // be added to a panel.
        JPanel p = new JPanel ();
        p.setLayout (new GridLayout (4,1));

        // The canvas on which to display the result.
        drawingArea = new JPanel ();
        drawingArea.setBackground (Color.white);
        p.add (drawingArea);

        // A local Listener for the sliders
        class ColorChangeListener implements ChangeListener {
            public void stateChanged (ChangeEvent e)
   	    {
   	        adjust ();
	    }
        }

        // Red one.
        redSlider = new JSlider(JSlider.HORIZONTAL, 0, 255, 0);
        redSlider.addChangeListener (new ColorChangeListener());
        p.add (redSlider);

        // Green one.
        greenSlider = new JSlider (JSlider.HORIZONTAL, 0, 255, 0);
        greenSlider.addChangeListener (new ColorChangeListener());
        p.add (greenSlider);

        // Blue one.
        blueSlider = new JSlider (JSlider.HORIZONTAL, 0, 255, 0);
        blueSlider.addChangeListener (new ColorChangeListener());
        p.add (blueSlider);

        cPane.add (p, BorderLayout.CENTER);

        // A quit button for the application.
        Button quitb = new Button ("Quit");
        quitb.setBackground (Color.red);
        quitb.setFont (new Font ("Serif", Font.PLAIN | Font.BOLD, 15));
        quitb.addActionListener (
            new ActionListener () {
                public void actionPerformed (ActionEvent a)
    	        {
	            System.exit (0);
	        }
            }
        );
        cPane.add (quitb, BorderLayout.SOUTH);

        // Finally, show the frame.
        this.setVisible (true);
    }


    // No-parameter constructor.
    public NewFrame ()
    {
        this (500, 300);
    }


    // Create the composite color.

    public void adjust ()
    {
        // Get the new values.
        redValue = redSlider.getValue();
        greenValue = greenSlider.getValue ();
        blueValue = blueSlider.getValue ();

        // Set the color in each scrollbar.
        redSlider.setBackground (new Color (redValue, 0, 0));
        greenSlider.setBackground (new Color (0, greenValue, 0));
        blueSlider.setBackground (new Color (0, 0, blueValue));

        // Create the composite color.
        Color newColor = new Color (redValue, greenValue, blueValue);
        drawingArea.setBackground (newColor);
        drawingArea.repaint ();
    }

}


public class TestSlider {
    public static void main (String[] argv)
    {
        NewFrame nf = new NewFrame (500, 300);
    }
}
Note:
- The constructor for JSlider is given four
parameters above:
redSlider = new Scrollbar (Scrollbar.HORIZONTAL, 0, 255, 0);
- An orientation (the constant Scrollbar.VERTICAL
or Scrollbar.HORIZONTAL).
- The low-end of the range (0, above).
- The high-end of the range (255, above).
- An initial value (0, above).
- A ChangeListener is required to listen
for slider movements.
- Above, we used a local class to create these listeners.
- The method getValue() returns the current
position of the bar in terms of the specified range.
Keyboard events
Next, we will look at an example of handling keyboard events:
We will modify the slider example above in the following ways:
- We will quit the application if the letter "q" is typed.
- We will increase the red-intensity when the Right-arrow
is pressed.
- We will decrease the red-intensity when the Left-arrow
is pressed.
Here are the relevant parts of the
source file:
class NewFrame extends JFrame {

    // ...

    // Constructor.
    public NewFrame (int width, int height)
    {
        // ...

       // A KeyListener for the panel
       drawingArea.addKeyListener ( getKeyListener() );

       // A KeyListener for the red scrollbar.
       redSlider.addKeyListener (getKeyListener());

       // A KeyListener for the green scrollbar.
       greenSlider.addKeyListener (getKeyListener());

       // A KeyListener for the blue scrollbar.
       blueSlider.addKeyListener (getKeyListener());

       // ...
    }


    // ...


    // Create a KeyListener to be used everywhere.
    KeyListener getKeyListener ()
    {
        return new KeyAdapter () {
            public void keyPressed (KeyEvent k)
            {
	        if (k.getKeyCode() == KeyEvent.VK_Q)
     	            // "q" for quit.
	            System.exit (0);
  	        else if (k.getKeyCode() == KeyEvent.VK_LEFT) {
	            // Left arrow.
                    redSlider.setValue (Math.max (0, redValue-10));
	            adjust ();
	        }
	        else if (k.getKeyCode() == KeyEvent.VK_RIGHT) {
  	            // Right arrow.
		    redSlider.setValue (Math.min (255, redValue+10));
		    adjust ();
		}
            }
        };
    }

}
Note:
- We added a KeyListener to the various components:
the canvas and the three sliders.
- A KeyListener is defined as:
  interface KeyListener extends EventListener {
      public void keyPressed (KeyEvent e);
      public void keyReleased (KeyEvent e);
      public void keyTyped (KeyEvent e);
  }
- We have overridden only the keyPressed() method.
- The actual key pressed is returned via the KeyEvent
parameter.
- The getKeyCode() method of KeyEvent
returns a code for the key pressed.
- Each code is a constant in the class KeyEvent.
- The codes usually start with "VK" (for Virtual Key).
- Examples of codes: (the list is long)
- KeyEvent.VK_Q - the letter "q" (or "Q").
- KeyEvent.VK_SHIFT - shift key.
- KeyEvent.VK_CONTROL - control key.
- KeyEvent.VK_F3 - the F3 function key.
- KeyEvent.VK_UP - the up arrow.
Exercise 11.7:
Download the following template
and add the following functionality to the above slider program:
the user should be able to use the UP and DOWN arrows to
cycle between the colors (sliders). The only code you need
to add is in the keyPressed() method.
Additional Swing topics
Swing topics we have not covered:
- Borders:
- How to create borders for components, e.g., etched, bevel, titled.
- Use the javax.swing.border package.
- Look and Feel:
- How to change the appearance of widgets.
- Use the static method
javax.swing.UIManager.setLookAndFeel()
and classes in javax.swing.plaf.
- More containers:
- JSplitPane - use this for a movable boundary in a split panel.
- JTabbedPane - use this to create a "tabbed" layout.
- More layout managers:
- GridBagLayout - the most flexible (and most
complicated) layout manager.
- BoxLayout - a simpler version of GridBagLayout.
- Icons:
- Almost every Swing widget can include icons.
- Use javax.swing.ImageIcon.
- Toolbars and Tooltips:
- javax.swing.JToolBar - for removable toolbars.
- javax.swing.JToolTips - for balloon-like tooltips.
- Text:
- JEditorPane - for styled documents that can be user-edited.
- javax.swing.text.html - package for HTML editing
and display.
- Advanced components:
- JTable - widget for generic tables (e.g., to build
a spreadsheet).
- JTree - widget for tree-structured data (e.g.,
to explore file directories).
- Miscellaneous:
- File filters - use these along with file dialogs to restrict
files displayed.
- JColorChooser - a color selection dialog.
- JProgressBar - a progress bar to show how much
progress has been made so far (e.g., in uploading a file).
- Printing.
- Sophisticated graphics with Graphics2d.
© 1998, Rahul Simha (revised 2017)