where each row is the same as its corresponding column.
0.1 Exercise:
In
MyWordSquare.java
use
charAt()
to solve this problem. That is, write a method called
isWordSquare(String[] words)
that returns true or false, depending on whether the words
form a valid word square. Then, in
main()
write the above two lines of code to test.
Let's now look at how two-dimensional (2D) arrays can be
used for this problem:
refers to the element ('e') in position 2 of that 1D array.
Let's print out the word square:
	for (int i=0; i<letters.length; i++) {
	    for (int j=0; j<letters.length; j++) {
                // Use print so that the row appears on one line:
                System.out.print (letters[i][j]);
	    }
            // Go to next line for next row:
            System.out.println ();
	}
When we work with actual Cartesian coordinates, it's useful
to print in this fashion, and to track x,y in the familiar
Cartesian way.
We will see an example of this in later modules.
0.2 2D arrays: applications
We'll examine two applications:
A simulation of Brownian motion.
Images.
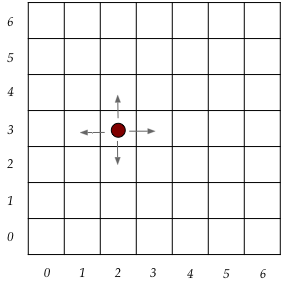
Let's start with Brownian motion:
We'll simulate a randomly moving particle on the xy-plane.
To simplify we will:
Impose a grid (for which we'll use a 2D array) and have the
particle move by choosing a random direction (north, south,
east, west).
The cells of the grid are addressed with integer Cartesian
coordinates. In the above example, it's a 7×7 grid.
At any given time the particle is in a cell.
At each step we chose a random direction and move the particle.
If the random direction takes the particle outside the grid,
it stays put.
To visualize, we'll track the location of the particle in
a simple 2D array consisting of 0's and a single 1.
The array has a 1 where the particle is located, and 0
everywhere else.
Here's part of the program:
public class Brownian {

    static int N = 10;                        // Size.
    static int x = 5, y = 5;                  // Current location
    static int[][] grid = new int [N][N];     // grid[x][y] = 1

    public static void main (String[] argv)
    {
        // Initial location of particle:
	grid[x][y] = 1;

	int numSteps = 0;

	// Move randomly.
	while (numSteps < 100) {
	    numSteps++;
	    moveRandom ();
	    print (numSteps);
	}

    }

    static void print (int numSteps)
    {
	System.out.println ("After " + numSteps + ": ");

	// INSERT YOUR CODE here for a Cartesian print.

    }

    static void moveRandom ()
    {
	// Default: stay in place
	int nextX = x, nextY = y;


	double r = Math.random ();
	// INSERT YOUR CODE HERE to choose a random direction based on
        // the value of r and set nextX and nextY accordingly.

        // ...

	// Move if within bounds:
	if ( (nextX >= 0) && (nextX < N) && (nextY >= 0) && (nextY < N) ) {
            // Change current location to 0 and new location to 1.
	    grid[x][y] = 0;
	    grid[nextX][nextY] = 1;
	    x = nextX;  y = nextY;
	}
    }

}
0.8 Exercise:
Add code to
MyBrownian.java
to make this work.
0.9 Exercise:
Download
Brownian2.class
and
DrawTool.java.
Then compile
DrawTool.java
but do not execute it.
Instead, execute
Brownian2.
Note:
Brownian2
is already compiled and you are only downloading the
compiled file without the original Java file.
Next, let's examine images and start with
greyscale (black-and-white) images:
Consider this example:
	ImageTool imTool = new ImageTool ();
	int[][] pixels = imTool.imageFileToGreyPixels ("eniac.jpg");
	imTool.showImage (pixels, "ENIAC");

        System.out.println ("Image size: " + pixels.length + " by " + pixels[0].length);

	int N = 20;
	// INSERT YOUR CODE HERE to print the first N rows and columns:
0.10 Exercise:
Download
eniac.jpg
and
ImageTool.java
and write the above code (adding the printing part) in
MyImageExample.java.
Note: we only want to print the top left corner because printing
the whole image would fill up the terminal. Also, use control-c in the terminal to quit the
program.
Next, let's deliberately mess with the image:
	// Overwrite part of what's in the pixel array with this:
	for (int i=0; i<N; i++) {
	    for (int j=0; j<N; j++) {
		pixels[i][j] = 255;
	    }
	}

	// Then, display:
	imTool.showImage (pixels, "ENIAC");
0.11 Exercise:
Add the above code to
MyImageExample.java.
What do you observe? Then, instead of 255 use 0.
About images and pixels:
Every greyscale image is really a 2D array of numbers.
Each number is an intensity: the amount of "white".
Typically, the intensity is a number between 0 and 255.
The number of pixels per square inch is called
the resolution. Clearly, the more, the better (but more
storage or transmission costs).
Pixel arrays are the starting point for any image analysis,
such as face recognition.
0.12 Audio:
0.3 Lists
Consider a problem in which we need to read a text file
character by character and store the characters for processing:
Here's code that uses an array, as we've done countless times:
    public static void main (String[] argv)
    {
	IOTool.openFileByChar ("frost.txt");

	// The array in which to store all the chars in the file:
	char[] fixedSizeArray = new char [1000];

	// Read char by char:
	int k = IOTool.getNextChar ();
	int count = 0;
	while (k >= 0) {
	    char c = (char) k;
	    fixedSizeArray[count++] = c;
	    k = IOTool.getNextChar ();
	}

	// Print:
	for (int j=0; j<count; j++) {
	    System.out.print (fixedSizeArray[j]);
	}
	System.out.println ();
	System.out.println (count + " chars in file");
	// Note: fixedSizeArray.length is NOT the # chars we read.
    }
0.13 Exercise:
Write the above in
MyArrayExample.java.
Then download
frost.txt
and run.
You will also need
IOTool.java.
Next, download
macbeth.txt,
change the filename accordingly and execute.
What do you notice?
Clearly, we need to anticipate the largest possible size
and create the initial array accordingly.
Alternatively, we could first read the file to count
the number of chars and then allocate.
However, in some applications it is not possible to
read the whole data set ahead of time, such when data is
pulled out of a device (such as a medical device).
Allocating extra large space is a waste if rarely needed.
What's needed: an array-like structure that grows as needed.
Here's an alternative approach using an
ArrayList,
which is a sort-of array that grows as needed.
	IOTool.openFileByChar ("frost.txt");

	// An ArrayList starts out empty and grows as needed:
	ArrayList<Character> anySizeList = new ArrayList<Character> ();

	// Read char by char:
	int k = IOTool.getNextChar ();
	while (k >= 0) {
	    char c = (char) k;
	    // Use the add() method to put something in:
	    anySizeList.add (c);
	    k = IOTool.getNextChar ();
	}

	// Print:
	for (char c: anySizeList) {
	    System.out.print (c);
	}
	System.out.println ();
	System.out.println (anySizeList.size() + " chars in file");
	// Use size() to get the exact # elements
This is an example of a more complex data structure,
one with its own methods (like String has methods).
The declaration describes what types of things go into the arraylist:
ArrayList<Character> anySizeList = new ArrayList<Character> ();
Why doesn't the following work?
ArrayList<char> anySizeList = new ArrayList<char> ();
The answer lies in the way Java's advanced data structures are
designed to handle any type of object.
When we study objects we will see that data
structures like the array-list can store any kind of object.
To make these structures capable of storing int's and char's
Java has corresponding objects for int's and char's like
Integer
and
Character.
For now, we won't need to worry about what these mean.
An arraylist has a number of useful methods. One is the
add()
method to add elements in order:
anySizeList.add (c);
Conveniently, we don't need to worry about incrementing an index.
The
size()
method is similar to the
length()
method of String.
One can access the i-th element if desired, as in:
	for (int i=0; i<anySizeList.size(); i++) {
            char c = anySizeList.get (i);
	    System.out.print (c);
	}
0.14 Exercise:
Write the above in
MyArrayListExample.java
and change the file to
macbeth.txt.
You will need to import
java.util.*.
One of the most useful methods is the
contains()
method, which can be used to see if a particular exists
in the list:
        if ( anySizeList.contains('q') ) {
	    System.out.println ("Yes, this has the letter q");
	}
Let's put this to use in analyzing two novels (large text files).
We will read a file word-by-word and examine which of them
are long words.
Then, we'll identify which long words are common to both.
Let's start with the goal:
import java.util.*;

public class BigWordAnalysis {

    // This will have the total number of words in a file.
    static int numWords;

    public static void main (String[] argv)
    {
	int bigWordLength = 7;
	ArrayList<String> bigWords = getBigWords ("alice.txt", bigWordLength);

	double fogIndex = (100 * (double) bigWords.size()) / numWords;

	System.out.println ("# big words: " + bigWords.size());
	System.out.println ("fog index: " + fogIndex);
    }

    static ArrayList<String> getBigWords (String filename, int wordSize)
    {
        // We'll work on this shortly ...
    }

}
Before proceeding, notice how the method
getBigWords()
returns an arraylist:
static ArrayList<String> getBigWords (String filename, int wordSize)
Now, the code inside that method:
    static ArrayList<String> getBigWords (String filename, int wordSize)
    {
	// Open a file to read word-by-word:
	IOTool.openFileByWord (filename);

	// We'll put big words in an array list:
	ArrayList<String> bigWords = new ArrayList<String> ();

	String w = IOTool.getNextWord ();
	numWords = 0;

	while (w != null) {
	    numWords++;
	    if (w.length() >= wordSize) {
		bigWords.add (w);
	    }
	    w = IOTool.getNextWord ();
	}

	return bigWords;
    }
0.15 Exercise:
Write the above in
MyBigWordAnalysis.java
and download both
alice.txt
and
sherlockholmes.txt.
Who writes denser (higher fog index) text?
0.16 Exercise:
In
MyBigWordAnalysis2.java,
obtain the big words in each text and then use the
contains()
method to identify the big words that appear in both files.
About data structures:
We've seen how to use an array-list but have no
idea how it works "under the hood".
There all kinds of data structures, most aimed at storing
data for efficient access, but some for specialized purposes.
Data structures are a critical part of programming.
Every sophisticated application uses lots of them.
For example, the Chrome browser uses thousands of
hash tables, a particular type of data structure.
Because it's so important, we will spend a significant
part of units 3-5 on data stuctures.
0.17 Audio:
0.4 Objects: a preview
We've now already worked with a few objects: strings and arraylists.
We will in later units delve into how objects work in great detail.
For now, let's look at an example just to see how objects
can be defined and used:
// The entire class Money is defined outside the ObjectExample class:

class Money {

    int dollars = 0;
    int cents = 0;

    void set (int d, int c)
    {
	dollars = d;
	cents = c;
    }

    void add (int d, int c)
    {
	dollars += d;
	int temp = cents + c;
	if (temp >= 100) {
	    cents = temp - 100;
	    dollars++;
	}
    }

    void sub (int d, int c)
    {
	// INSERT YOUR CODE HERE:
    }

    void print ()
    {
	System.out.println ("$ " + dollars + "." + cents);
    }

} // the closing brace of the Money class


// The ObjectExample class that contains main() and has the same
// name as the file (ObjectExample.java)

public class ObjectExample {

    public static void main (String[] argv)
    {
	// This makes a particular instance of the Money object:
	Money m = new Money ();

        // We can now call the methods we defined:
	m.set (1, 50);
	m.add (2, 75);
	m.print ();        // Should print $4.25
	m.sub (1, 50);
	m.print ();        // Should print $2.75
    }

}
Observe:
Here, the file is called
ObjectExample.java,
which forces three things:
The class that contains
main()
needs to be in a class called
ObjectExample
public class ObjectExample {

    public static void main (String[] argv)
    {
         // ...
    }

}
And, that class has to have the
public
modifier.
And it's the only class in the file that can be
public.
The class
Money,
is outside the main class:
class Money {
    // ... stuff inside ...
}

public class ObjectExample {
    // ... stuff inside, main() etc ...
}
We have defined methods inside the class
Money.
To use them elsewhere, we first have to make
a so-called instance of the class using the
new
statement:
	Money m = new Money ();
	m.set (1, 50);
        // ... etc
After which, we can use the variable name and call methods.
Note: the methods in the class
Money
do NOT use the
static
reserved word. This is how object methods work.
0.18 Exercise:
Complete the code for
sub(),
in
ObjectExample.java.
About objects:
Understanding how objects work is essential to the dominant
paradigm in programming today: object-oriented programming.
There are many details to be mastered, which we will
address in units 6-8.
For now, our goal was only to provide a preview.
0.5 Bits and bytes
We've all heard the terms bits and bytes.
Let's now gain a little understanding and see how they look
in Java.
0.19 Exercise:
Download, compile and execute
SoundExample.java.
You will also need
SoundTool.java.
Note: turn up the volume on your computer.
What we see is that
SoundTool.playMusic ("CDEFGABC");
causes the musical notes C, D etc to be played
(not necessarily with the highest quality).
0.20 Exercise:
In
SoundExample2.java.
type up the following
	byte[] rawSamples = SoundTool.getBytesMusic ("CDEFGABC");
	System.out.println ("# bytes: " + rawSamples.length);

	// Print the first 100.
	for (int i=0; i<100; i++) {
	    System.out.println (rawSamples[i]);
	}
Let's point out a few things:
The values were all between -127 to 127.
The values were undulating in sequence. This is how
sound "waves" work, a topic that is complex and will not
be further explored.
It takes many values (bytes) for each sound (musical note).
To explain a byte, we'll first need to understand binary:
And to explain binary, let's first review our
familiar decimal numbering system.
Consider the number 243
          2      4      3
        2×100  +  4×10   +   3×1
The first digit, 3, is the number of units or 3×100
The second digit, 4, is the number of tens or 4×101
The third digit, 2, is the number of hundreds or 2×10²
This is what we do in our base-10 system.
The same principles apply to a binary system that
uses powers of 2 instead of 10.
A base-10 system uses 10 symbols (0, 1, ..., 9) for
the values in any digit.
Since we're using powers of 2, there are only 2 symbols (0
and 1).
Computer memory is designed in units of bytes. Many memories
are so-called byte-addressable, meaning that there's
a separate address for each byte.
Most small devices operate at the byte level.
This is why it's useful to work with bytes.
Occasionally, one has to work at the bit-level,
by accessing a particular bit within a particular byte.
Some computers operate in groups of 32 or 64 bits. These
are sometimes called words.
All digital hardware is fundamentally binary: either working
on bits or groups of bits (bytes, words etc).
Because it's cumbersome to work at the bit or byte-level,
we prefer higher-level languages like Java to hide the detail.
When code finally executes on the hard metal of
computer, it's all at the binary level.
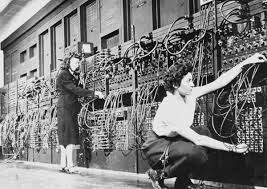
Finally, a historical note:
In the 1950s when the earliest computers were built, a
single bit was something you could hold in your hand.
The ENIAC picture you saw earlier showed that massive
connecting wires were needed between such bits.
Today, a single bit is in the nanometer range,
meaning that billions of them easily fit in a square inch,
the size of a typical chip.
0.6 Jars and CLASSPATH
This is a slightly advanced and optional
topic, introduced here only
as a glimpse into the larger world of Java you will see in later
courses.
Most programming languages allow convenient ways to share code.
What might seem like the obvious way is in fact impractical:
Share code by posting it somewhere.
This already happens at large scale.
But most programmers want to use other programmer's
programs directly, without copying over their code and working
that code into an existing program.
Also, people who make a living writing code for others
do not necessarily want to share the source code
(written in a higher-level language). Instead, they'd like
to sell compiled code.
Lastly, most distributed code is significant in size,
which means there needs to be a nice way to package it.
A packaged body of programs that are intended for
other programmers to use is often called a library
or API.
In Java, a library is distributed as a jar file.
We'll now show how this is done in Java. First an overview of
the steps:
Download a jar file (sometimes inside a zip file).
Once you unpack, edit a certain file (.profile)
to do two things;
Set or update the CLASSPATH environment variable
to tell Java where to find the library (jar file).
Set one or more environment variables unique to
the downloaded library.
Write your program, ensuring you have "imported"
the library.
Compile and execute.
Now let's do this step by step for an example:
Start by making a directory called
off of your Desktop called
thesaurus.
Open a Terminal and get to the
thesaurus
directory using
cd.
Type
ls
to see the contents:
A file called
samplethesaurus.jar.
This is the packaged library.
A called called
thesaurus.txt.
This is the data (in plain text format).
A directory called
licenses
that contains copyright info.
Now type
pwd
in the terminal.
If your username is
gwashington (for example),
you should see something like
/Users/gwashington/Desktop/thesaurus
If what you see is different, fine, remember what you see because
that's what will be important next.
Now type
cd
all by itself to take you to your home directory,
above Desktop.
From this point onwards, the instructions will differ depending
on whether you have Windows, an old Mac, or a newer Mac.
Older macs (that use
bash):
How do you know which kind of Mac you have?
Open a Terminal
Type
echo $SHELL
at the command-line to find out.
In the home directory, type
pico .profile
to open up a file called
.profile
in the
pico
editor.
Note: the file
.profile
has only an extension and nothing before the period.
Either you'll already have stuff in this file or
it will be empty.
Next, we'll explain the instructions as if your file is empty.
In either case type the following two lines with a blank
line in between. Note: each line
must be one single line (cannot be split),
and cannot leave any spaces before the start of the line.
Here, we have colorized the username for emphasis: you must
use your username instead of
gwashington.
And also, note the colon and period at the end of the first line.
Note: earlier you saw the full path to the
thesaurus
directory when you typed
pwd.
This is exactly what needs to be in
.profile
as shown above. If your path is different, please use it.
Then save and exit from
pico.
Newer macs (that use
z-shell):
In the home directory, type
pico .zshrc
to open up a file called
.zshrc
in the
pico
editor.
Note: the file
.zshrc
has only an extension and nothing before the period.
Either you'll already have stuff in this file or
it will be empty.
Next, we'll explain the instructions as if your file is empty.
In either case type the following two lines with a blank
line in between. Note: each line
must be one single line (cannot be split),
and cannot leave any spaces before the start of the line.
Here, we have colorized the username for emphasis: you must
use your username instead of
gwashington.
And also, note the colon and period at the end of the first line.
Note: earlier you saw the full path to the
thesaurus
directory when you typed
pwd.
This is exactly what needs to be in
.zshrc
as shown above. If your path is different, please use it.
Then save and exit from
pico.
Windows:
There three possibilities here:
If you are using Gitbash, we'll provide instructions below.
If you are using a Linux VM, use the instructions for
older macs above but you will need to edit
.bash_profile
instead of
.profile.
If you are using some other solution, then you will need to
find tutorials on how to set CLASSPATH and other variables.
The rest of the instructions now are for Gitbash.
While the instructions are similar to those for older
macs, there is one additional twist.
Start by reading through (but not following) the
instructions for older macs above so that you are
familiar with the ideas.
For Gitbash, you will be editing the
.bash_profile file
(creating it, if needed).
There are two different forms of editing
.bash_profile:
Note: The Windows-style capitalizes the drive C, uses backslash,
and semicolons.
Which style should you use? The only way to know is what
your installation already uses. To see which one, type
echo $CLASSPATH
at the command-line (in the terminal).
If this shows anything, it will be in one of the above
styles, and that's the one to use.
If nothing appears, you can use either style.
Now for the application:
The instructions now continue for either newer or older macs.
Type
echo $CLASSPATH
on the command to see your path displayed (possibly with others
concatenated).
Likewise type
echo $THESAURUS_HOME
to see the same.
Finally, get rid of the Terminal window and open a new one
(this will force the changes made to the variables above).
NOTE: the steps up to here are done just once for
a particular library. Thus, we can write any number of
programs that use the thesaurus without going through the
above steps again.
Next,
cd
your way to the module folder where you are doing
exercises from this module.
Type the following program, then compile and execute:
import org.samplethesaurus.*;
import java.util.*;

public class ThesaurusExample {

    public static void main (String[] argv)
    {
        // Open the thesaurus (a large file) for reading:
	SampleThesaurus.openThesaurus ();

        // Perform a search for a particular word, such as "house"
	int numCategories = SampleThesaurus.search ("house");

        // This returns the number of categories ("house" as dwelling,
        // "house" as legislature etc).
	System.out.println ("# categories found = " + numCategories);

        // Next, extract the synonyms in each category:
	for (int i=0; i<numCategories; i++) {

            // Get the category name (noun, adj etc)
	    String type = SampleThesaurus.getTypeName (i);

            // Pull out the synonyms as an arraylist
	    ArrayList<String> syns = SampleThesaurus.getSynonyms (i);

            // Print:
	    System.out.print ("Type #" + i + ": " + type + ": ");
	    for (String w: syns) {
		System.out.print (" | " + w);
	    }
	    System.out.println ();
	}
    }

}
Lastly, let's explain:
The
.profile
or
.zshrc
file is something available to software programs for each user.
This allows a program to discover the location of various
things on the particular computer (if it's different from standard).
The way this is done is to define so-called
environment variables in the
like
CLASSPATH.
The
CLASSPATH
variable is special to Java. This where all externally downloaded
libraries are listed. And they are listed by concatenating
the full path to each library (jar-file). This way, Java
can find what's needed when a particular program
imports
something.
Often, an external library will need to find things.
In this example, it needs to know where the thesaurus data is
located via the
THESAURUS_HOME
environment variable.
So, it's a bit tedious but this is how it works
with Unix-based systems. Windows also has environment
variables but you need to use the Control Panel to set those.