Module 2: Multidimensional Arrays
Supplemental material
A simple example - magic squares
A magic square of size N is an arrangement of the numbers 1,2, ...,
N2 in a square array so that the row sums and column sums
are all identical. For example, you can see that the rows and columns
of this 3 x 3 square add up to 15:
About magic squares:
- Magic squares have fascinated mathematicians since antiquity
(earliest known example: 2200 B.C.)
- The number (e.g., 15 above) that is the sum along a row or
column is n (n2 + 1) / 2.
- There is no known algorithm for generating even squares.
For odd squares, there is a simple algorithm called the Staircase
Algorithm:
public class MagicSquare {

    public static void main (String[] argv)
    {
        // Some test cases.
        int[][] square = generateSquare (3);
        print (square);

        square = generateSquare (5);
        print (square);
    }


    // Current row/column and next row/column.
    static int row, col;
    static int nextRow, nextCol;


    static int[][] generateSquare (int size)
    {
        // This algorithm only works for odd-sizes.
        if (size % 2 != 1) {
            System.out.println ("size must be odd");
            System.exit (0);
        }

        int[][] A = new int [size][size];

        // Start with middle in top row.
        row = 0;
        col = size/2;
        A[row][col] = 1;
        for (int n=2; n<=size*size; n++) {

            // Go up diagonally to the right.
            computeNext (size);

            if (A[nextRow][nextCol] == 0) {
                // Place next number here if unoccupied.
                A[nextRow][nextCol] = n;
            }
            else {
                // Else, place directly below current number.
                nextRow = row + 1;
                nextCol = col;
                A[nextRow][nextCol] = n;
            }

            // Update.
            row = nextRow;
            col = nextCol;

        } //end-for

        return A;
    }


    static void computeNext (int size)
    {
        if (row == 0) {
            // If we're at the top, next row wraps around.
            nextRow = size - 1;
        }
        else {
            // Otherwise, go to previous row.
            nextRow = row - 1;
        }

        if (col == size-1) {
            // If we're at the rightmost col, wrap around to leftmost.
            nextCol = 0;
        }
        else {
            // Otherwise, next column is the one to the right.
            nextCol = col + 1;
        }
    }


    static void print (int[][] A)
    {
        System.out.println ("Square: ");
        for (int i=0; i < A.length; i++) {
            for (int j=0; j < A[i].length; j++) {
                System.out.printf ("%3d", A[i][j]);
            }
        }
    }

}
Note:
- The program prints:
Square of size 3:
  8  1  6
  3  5  7
  4  9  2
Square of size 5:
 17 24  1  8 15
 23  5  7 14 16
  4  6 13 20 22
 10 12 19 21  3
 11 18 25  2  9
- Here's how it works:
- You start by placing "1" in the middle of the top row.
- Then, you try to place each successive number at the right
and above (Northwest direction) of the current number.
If that takes you out of the square, you wrap around.
- If the Northwest neighbor is occupied, then place the
next number in directly below the current one.
- You do not need to understand how it works to use it.
In-Class Exercise 1:
Download the above program and execute.
Then modify the print() method so that it prints out
row and column sums as follows:
Square of size 3:
  8  1  6 | 15
  3  5  7 | 15
  4  9  2 | 15
---------
 15 15 15

Square of size 5:
 17 24  1  8 15 | 65
 23  5  7 14 16 | 65
  4  6 13 20 22 | 65
 10 12 19 21  3 | 65
 11 18 25  2  9 | 65
---------------
 65 65 65 65 65
2D arrays in memory
Let's look at a simpler example
public class MagicSquare2 {

    public static void main (String[] argv)
    {
        // Some test cases.
        int[][] square = {
            {8, 1, 6},
            {3, 5, 7},
            {4, 9, 2}
        };
        print (square);
    }

    static void print (int[][] A)
    {
       // ... same as in MagicSquare.java ...
    }

}
Note:
- A 2D array can be initialized to a "constant" just as
a unidimensional array can:
        int[][] square = {
            {8, 1, 6},
            {3, 5, 7},
            {4, 9, 2}
        };
Here, the rows are enclosed in braces, and separated by commas.
- Java stores arrays using pointers:
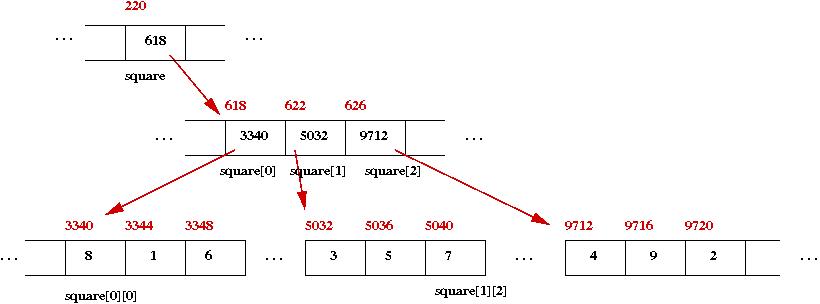
- The variable square is a pointer: it points to
a sequence of "row pointers" at address "818" above.
- Each of the "row pointers" points to a unidimensional array.
- The three unidimensional arrays are the rows of the square.
Now let's consider a variation
public class MagicSquare3 {

    public static void main (String[] argv)
    {
        // Create space for the array, but not assign individual values:
        int[][] square = new int [3][3];
        assignValues (square);
        print (square);
    }

    static void assignValues (int[][] A)
    {
        // ... the Staircase algorithm ...
    }

    static void print (int[][] A)
    {
        // ... same as before ...
    }

}
Note:
- Thus, the new operator is used to create space:
int[][] square = new int [3][3];
- If we wished, we could separate variable declaration from space-creation:
        int[][] square;
        square = new int [3][3];
- An alternative to creating space:
        // This is the main pointer.
        int[][] square;

        // This creates the (unidimensional) array of row-pointers.
        square = new int [3][];

        // For each row pointer, we create a row of three int's
        for (int i=0; i < 3; i++) {
            square[i] = new int [3];
        }
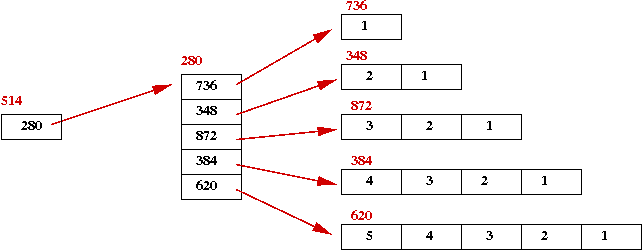
Because arrays are implemented via pointers, we can create
irregular arrays.
public class Triangle {

    public static void main (String[] argv)
    {
        // Different-length rows.
        int[][] A = {
            {1},
            {2, 1},
            {3, 2, 1},
            {4, 3, 2, 1},
            {5, 4, 3, 2, 1}
        };
        print (A);
    }

    static void print (int[][] A)
    {
        // The number of rows is still A.length.
        for (int i=0; i < A.length; i++) {

            System.out.print ("Row i=" + i + " has " + A[i].length + " elements: ");

            // Note: we must use A[i].length, since they are all different.
            for (int j=0; j < A[i].length; j++) {
                System.out.print (" " + A[i][j]);
            }

            System.out.println ();
        }
    }

}
Note:
- The number of rows is A.length.
- A[i] is the i-th row.
- Each row has a different length: row i has length
A[i].length.
- The "memory picture" for this array is something like this:
Images as 2D arrays
What is an image?
- An image is a 2D collection (array) of pixels:
- Each pixel itself
- can be a single number for a grey-scale image
⇒ the number = the intensity
- can be three numbers for a color image
⇒ each number = the intensity of that color
- Color images commonly use the intensity of the colors: Red,
Green, Blue (called RGB).
- Images sometimes have a 4-th number called
transparency, also called the alpha number.
- If the screen is painted with pixels according to the
given intensities, the eye is fooled into seeing a continuous image
provided the resolution is fine enough.
Image file formats:
- While images in main memory are stored as 2D arrays of pixels,
a file need not store all pixels.
⇒ instead, images are compressed (to take up less space)
- There are three popular file formats:
- GIF: a lossless compression format, but with some legal
problems.
- PNG: a lossless version of GIF without the legal problems.
- JPEG: a lossy format (much better compression).
Images in Java:
- Java uses the Image class to hold image data.
- Java supports the reading/writing of images in all three
formats: GIF, JPG and PNG.
- The format is recognized from the file type (usually
.gif, .jpg or .png).
- To manipulate pixels, we need the array of pixels.
- For some reason, Java has made it cumbersome to get the
pixels. Instead, you can use our own
ImageTool.java, which
simplifies pixel-access.
Useful methods in ImageTool:
- The very first thing to do is to make an instance of the tool:
ImageTool imTool = new ImageTool ();
- Use readImageFile() to read an image from a file:
Image image = imTool.readImageFile ("mymugshot.jpg");
- Use imageToPixels() to extract the pixels:
int[][][] pixels = im.imageToPixels (image);
- Use pixelsToImage() to convert pixels to an Image:
Image image2 = imTool.pixelsToImage (pixels);
- Use writeToJPGFile() to create a JPG file:
imTool.writeToJPGFile (image, "doctoredMugshot.jpg");
- Finally, use showImage() to view an image:
imTool.showImage (image);
Notice that the pixels are a 3D array:
int[][][] pixels = imTool.imageToPixels (image);
- Here, pixels[i][j] is the pixel in the i-th row
and j-th column.
- Each pixel is represented by four integers:
- pixels[i][j][0] is the
alpha value (the transparency, which for the most part we won't use).
- pixels[i][j][1] is the red intensity.
- pixels[i][j][2] is the green intensity.
- pixels[i][j][3] is the blue intensity.
- Each pixel intensity is an integer between 0 and 255 (inclusive).
- For example, here's how we can create a pure-white image with
500 x 500 pixels:
        int size = 500;
        pixels = new int [size][size][4];
        for (int i=0; i < pixels.length; i++) {
            for (int j=0; j < pixels[0].length; j++) {
                for (int k=0; k < 4; k++) {
                    pixels[i][j][k] = 255;
                }
            }
        }
- Let's draw a black box inside this image:
        int start = size/4;
        int end = (int) (3.0*size/4.0);
        for (int i=start; i <= end; i++) {
            for (int j=start; j <= end; j++) {
                for (int k=1; k < 4; k++) {
                    pixels[i][j][k] = 0;
                }
            }
        }
- To view the image:
        ImageTool imTool = new ImageTool ();
  	Image image = imTool.pixelsToImage (pixels);
	imTool.showImage (image);
Image transformations
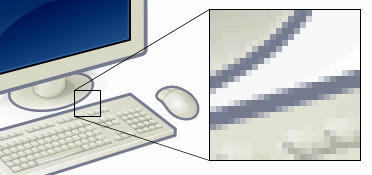
Now let's manipulate some image pixels, starting with a "Thumbnail"
application:
- We'll read in an image and convert to pixels.
- Then, we'll create a new image that's smaller and display
that (the thumbnail).
Here's the program:
import java.awt.*;
import java.awt.image.*;

public class ImageShrinker {

    // We'll declare this up here so that it can be shared
    // across methods.
    static ImageTool imTool = new ImageTool ();


    public static void main (String[] argv)
    {
        // Read in an image and display it.
        Image image = imTool.readImageFile ("bugs.jpg");
        imTool.showImage (image, "original");

        // All the work of shrinking is done in the shrink() method.
        // We'll shrink to 20% of the current size.
        Image shrunkImage = shrink (image, 0.2);

        // Now display the result.
        imTool.showImage (shrunkImage, "shrunk");
    }


    static Image shrink (Image image, double factor)
    {
        // Extract the pixels.
        int[][][] pixels = imTool.imageToPixels (image);

        // The array dimensions.
        int numRows = pixels.length;
        int numCols = pixels[0].length;

        // The resulting shrunk image will have fewer rows and columns.
        int numTargetRows = (int) (factor * numRows);
        int numTargetCols = (int) (factor * numCols);

        // What we'll do is skip pixels in the original. This is the
        // skip amount:
        int multiplier = numRows / numTargetRows;

        // Make a pixel array to hold the shrunk image.
        int[][][] shrunkPixels = new int [numTargetRows][numTargetCols][4];

        // Now fill the pixel values in the new image.
        for (int i=0; i < numTargetRows; i++) {
            for (int j=0; j < numTargetCols; j++) {
                // For each pixel in the new image, we'll get
                // one of the original pixels as determined by the "skip".
                int originalRow = i * multiplier;
                int originalCol = j * multiplier;

                // Pay attention to this pointer copy:
                shrunkPixels[i][j] = pixels[originalRow][originalCol];
            }
        }

        // Now convert pixels into an instance of Image and return that.
        Image shrunkImage = imTool.pixelsToImage (shrunkPixels);
        return shrunkImage;
    }

}
Note:
- Let's take a second look at this line:
shrunkPixels[i][j] = pixels[originalRow][originalCol];
- First, recall that shrunkPixels is a 3D array (not 2D).
- That means we should expect to use it as
shrunkPixels[i][j][k] = something ...
- So, how come we use only two dimensions?
- To see how it works, first let's consider an alternative to
the above:
                shrunkPixels[i][j][0] = pixels[originalRow][originalCol][0];
                shrunkPixels[i][j][1] = pixels[originalRow][originalCol][1];
                shrunkPixels[i][j][2] = pixels[originalRow][originalCol][2];
                shrunkPixels[i][j][3] = pixels[originalRow][originalCol][3];
- This is correct because we copy over each of the four pixel values.
- Alternatively, we could also do:
                for (int k=0; k < 4; k++) {
                    shrunkPixels[i][j][k] = pixels[originalRow][originalCol][k];
                }
- So, again, why did the 2D copy work?
- The reason is, we performed a pointer copy
- To see what that means, suppose that i=2, j=1 in
the loop, and that originalRow=10, originalCol=5.
- When the copy occurs, both shrunkPixels[2][1]
and pixels[10][5] point to the same block of four pixels.
In general, pointer copies are efficient but require care.
They should not be used if the original or copy will be modified,
as this example shows:
public class PointerCopyProblem {

    public static void main (String[] argv)
    {
        // Make a 3 x 2 array.
        int[][] A = {
            {1, 2},
            {3, 4},
            {5, 6}
        };

        // Now make a new array B that is to be a copy of A.

        // To B, we assign space for 3 pointers:
        int[][] B = new int [3][];
        for (int i=0; i < A.length; i++) {
            B[i] = A[i];
        }

        print (A, B);

        // Make a change in B.
        B[0][0] = 9;

        print (A, B);
    }

    static void print (int[][] A, int[][] B)
    {
        System.out.println ("\nArray A: ");
        for (int i=0; i < A.length; i++) {
            for (int j=0; j < A[i].length; j++) {
                System.out.print (" " + A[i][j]);
            }
            System.out.println ();
        }

        System.out.println ("Array B: ");
        for (int i=0; i < B.length; i++) {
            for (int j=0; j < B[i].length; j++) {
                System.out.print (" " + B[i][j]);
            }
            System.out.println ();
        }
    }

}
The output is:
Array A:
 1 2
 3 4
 5 6
Array B:
 1 2
 3 4
 5 6

Array A:
 9 2
 3 4
 5 6
Array B:
 9 2
 3 4
 5 6
Thus, array A is modified.
In-Class Exercise 2:
Download the above code
and fix the problem. That is, do the
copy correctly.
More image transformations
Let's continue image transformations with enlargement: take
an image and make it larger:
import java.awt.*;
import java.awt.image.*;

public class ImageEnlarger {

    static ImageTool imTool = new ImageTool ();


    public static void main (String[] argv)
    {
        Image image = imTool.readImageFile ("bugsThumb.jpg");
        imTool.showImage (image, "original");

        Image enlargedImage = enlarge (image, 5);

        imTool.showImage (enlargedImage, "enlarged");
    }


    static Image enlarge (Image image, double factor)
    {
        // Extract the pixels and array dimensions.
        int[][][] pixels = imTool.imageToPixels (image);
        int numRows = pixels.length;
        int numCols = pixels[0].length;

        // The resulting shrunk image will have more rows and columns.
        int numTargetRows = (int) (factor * numRows);
        int numTargetCols = (int) (factor * numCols);

        int multiplier = numTargetRows / numRows;

        // Make the pixel array for the target.
        int[][][] enlargedPixels = new int [numTargetRows][numTargetCols][4];

        for (int i=0; i < numRows; i++) {
            for (int j=0; j < numCols; j++) {

                // Copy a single pixel from the smaller into a region of the larger.
                int startRow = i * multiplier;
                int startCol = j * multiplier;
                for (int m=0; m < multiplier; m++) {
                    for (int n=0; n < multiplier; n++) {
                        // This time, we'll do the copy correctly.
                        for (int k=0; k < 3; k++) {
                            enlargedPixels[startRow+m][startCol+n][k] = pixels[i][j][k];
                        }
                    }
                }
                // End-copy-region
            }
        }

        Image enlargedImage = imTool.pixelsToImage (enlargedPixels);
        return enlargedImage;
    }

}
Note:
- The enlarged image has more pixels
⇒
this means we have to "make up" pixels in the enlarged image.
- To solve the problem, we simply copy over a single pixel
into a region (collection of pixels) of the enlarged image.
⇒
see the nested double-for-loop.
- This time around, we did the copying correctly (i.e., NOT a
pointer copy).
In-Class Exercise 3:
Download and execute the above code.
You'll also need a thumbnail.
Either find one yourself or use this one.
Why is the enlarged image so grainy?
In-Class Exercise 4:
Write code to convert a color image to a greyscale image (with only
shades of grey). To do this, recall that every pixel is four values
(alpha, red, green, blue). If you make the values of red, green and
blue the same, it becomes grey. So, what you need to do is:
- Download this template and
this test image.
- Implement your code in the method toGreyScale(). The
pixels for the original image and the creation of the pixel array
for the grey-image have been done for you.
- Remember to copy the alpha value without changing it.
- To make the RGB values the same in the grey-image,
simply take the average of the R, G and B values in the original.
The structure of the code will be similar to the other image
examples we've seen. Can you identify the who's in the
image and where it is?
Next, let's consider a linear map:
- In this transformation, each pixel value is multiplied by a
constant and added to a second constant.
- Linear mappings are useful for contrast (the multiplication)
and brightness (the addition).
Here's the program:
import java.awt.*;
import java.awt.image.*;

public class LinearMap {

    static ImageTool imTool = new ImageTool ();

    public static void main (String[] argv)
    {
        // Read in an image and display.
        Image image = imTool.readImageFile ("prof.jpg");
        imTool.showImage (image, "original");

        // Convert to grey scale and display.
        Image mappedImage = linearMap (image, 2.0, 1.0);
        imTool.showImage (mappedImage, "mapped image");
    }

    static Image linearMap (Image image, double a, double b)
    {
        // Extract pixels and size.
        int[][][] pixels = imTool.imageToPixels (image);
        int numRows = pixels.length;
        int numCols = pixels[0].length;

        // Make the new pixels.
        int[][][] mappedPixels = new int [numRows][numCols][4];

        // Almost like a copy.
        for (int i=0; i < numRows; i++) {
            for (int j=0; j < numCols; j++) {
                mappedPixels[i][j][0] = pixels[i][j][0];
                // Multiply by "a" and add "b".
                mappedPixels[i][j][1] = enforcePixelBounds (a * pixels[i][j][1] + b);
                mappedPixels[i][j][2] = enforcePixelBounds (a * pixels[i][j][2] + b);
                mappedPixels[i][j][3] = enforcePixelBounds (a * pixels[i][j][3] + b);
            }
        }

        // Returned transformed image.
        Image mappedImage = imTool.pixelsToImage (mappedPixels);
        return mappedImage;
    }


    // Each pixel value needs to be between 0 and 255.

    static int enforcePixelBounds (double pixelValue)
    {
        int value = (int) pixelValue;
        if (value < 0) {
            return 0;
        }
        if (value > 255) {
            return 255;
        }
        return value;
    }

}
In-Class Exercise 5:
Download the above program and this
image and try the following:
- Set b=0 and try different values of a to
explore how contrast works.
- Set a=1 and try different values of b to
explore how brightness works.
- You can make the "negative" of an image by subtracting each
pixel value from 255. Choose values of a and b
to make this happen and demonstrate that your "negative" is working.
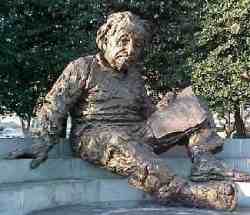
Can you identify the person in the image?
Odds and ends: arrays as parameters
Recall that Java only supports pass-by-value parameters,
as this example shows:
public class Parameters {

    public static void main (String[] argv)
    {
        int a = 1;
        int b = 2;
        System.out.println ("BEFORE: a=" + a + " b=" + b);

        swap (a, b);
        System.out.println ("AFTER:  a=" + a + " b=" + b);
    }

    static void swap (int x, int y)
    {
        System.out.println ("  BEFORE: x=" + x + " y=" + y);
        int temp = x;
        x = y;
        y = temp;
        System.out.println ("  AFTER:  x=" + x + " y=" + y);
    }

}
Note:
- A copy of a and b get sent into swap().
- The value in a is copied into the parameter
variable x.
- Similarly, the value in b is copied into the parameter
variable y.
- Thus, the output is:
BEFORE: a=1 b=2
  BEFORE: x=1 y=2
  AFTER:  x=2 y=1
AFTER:  a=1 b=2
- The values of x and y do actually get
swapped.
⇒
But this has no effect on a and b.
Now let's consider the same question for arrays, with
this example:
import java.util.*;

public class Parameters2 {

    public static void main (String[] argv)
    {
        int[] A = {1, 2};
        int[] B = {3, 4};

        System.out.println ("BEFORE: A=" + Arrays.toString(A) + " B=" + Arrays.toString(B));

        swap (A, B);
        System.out.println ("AFTER:  A=" + Arrays.toString(A) + " B=" + Arrays.toString(B));
    }

    static void swap (int[] X, int[] Y)
    {
        System.out.println ("  BEFORE: X=" + Arrays.toString(X) + " Y=" + Arrays.toString(Y));
        int[] temp = X;
        X = Y;
        Y = temp;
        System.out.println ("  AFTER:  X=" + Arrays.toString(X) + " Y=" + Arrays.toString(Y));
    }

}
In-Class Exercise 6:
What is the output? Explain.
Next, consider this variation:
public class Parameters3 {

    public static void main (String[] argv)
    {
        int[] A = {1, 2};
        int[] B = {3, 4};

        System.out.println ("BEFORE: A=" + Arrays.toString(A) + " B=" + Arrays.toString(B));

        swap (A, B);
        System.out.println ("AFTER:  A=" + Arrays.toString(A) + " B=" + Arrays.toString(B));
    }

    static void swap (int[] X, int[] Y)
    {
        System.out.println ("  BEFORE: X=" + Arrays.toString(X) + " Y=" + Arrays.toString(Y));
        for (int i=0; i < X.length; i++) {
            int temp = X[i];
            X[i] = Y[i];
            Y[i] = temp;
        }
        System.out.println ("  AFTER:  X=" + Arrays.toString(X) + " Y=" + Arrays.toString(Y));
    }

}
In-Class Exercise 7:
What is the output? Explain.
Odds and ends: array assignment
The wrong way to copy an array:
import java.util.*;

public class ArrayAssignment {

    public static void maiyn (String[] argv)
    {
        int[] A = {1, 2, 3};
        System.out.println ("A: " + Arrays.toString(A));

        // Declare a new array variable.
        int[] B;

        // Pointer copy!
        B = A;

        // A modification of B affects A
        B[1] = 5;
        System.out.println ("A: " + Arrays.toString(A));
    }

}
The right way:
import java.util.*;

public class ArrayAssignment2 {

    public static void main (String[] argv)
    {
        int[] A = {1, 2, 3};
        System.out.println ("A: " + Arrays.toString(A));

        int[] B;

        // First make the space - getting the length from A.
        B = new int [A.length];

        // Copy each entry.
        for (int i=0; i < A.length; i++) {
            B[i] = A[i];
        }

        // A modification of B does not affect A.
        B[1] = 5;
        System.out.println ("A: " + Arrays.toString(A));
    }

}
In-Class Exercise 8:
Download ArrayCopy.java and
implement array copying for 2D arrays.
© 2006, Rahul Simha (revised 2017)