Reading: Find material on Dijstra's Algorithm
and read through carefully at least once.
For example: section 8.9 of
Module 8 of the
Algorithms course.
You won't need this material for the assignment below but will need
it for the next assignment.
This assignment builds on the CarSim exercises in the Intro module.
You will write a controller for the Dubin car
(non-accelerative case) to perform a single task and to do so
optimally.
But first, let's see how a car simulator can be used without
the GUI. Suppose you have written a controller.
There are two ways you can test your controller:
- Load your controller into the GUI and run the GUI. This has
the advantage that you can see what's going on, but has
the disadvantage of being slow. For example, if you were
seeking to optimize a parameter and wanted to try a thousand
values - it could take a lot of time.
- Alternatively, you can create an instance of the appropriate
simulator and use it directly.
Here's an example of using an instance of SimpleCarSimulator
(for the unicycle, say):
public class SimpleCarControlTest {
    public static void main (String[] argv)
    {
        // Build an instance of the simulator. Note: no obstacles in this example.
        // The constructor: isAccel=false, isUnicycle=true
        SimpleCarSimulator simulator = new SimpleCarSimulator (false, true);
        simulator.init (50, 50, 0, null);

        // This example moves the unicycle from (50,50) to (550,50).
        double x = 50;

        while (x < 550) {

            // Pass the controls (v=10, theta=0) to the simulator. DeltaT=0.1.
            simulator.nextStep (10, 0, 0.1);

            // Now extract the new location and other info.
            double t = simulator.getTime ();
            x = simulator.getX ();
            double y = simulator.getY ();

            // Display.
            System.out.println ("t=" + t + " x=" + x + " y=" + y);

            // The CarGUI merely adds an animation delay and drawing here.

        } //end-while

    }
}
To use the DubinCarSimulator, your code would be similar:
public class DubinCarControlTest {
    public static void main (String[] argv)
    {
        // Build an instance of the simulator. Note: no obstacles in this example.
        // The constructor: isAccel=false
        DubinCarSimulator simulator = new DubinCarSimulator (false);
        simulator.init (50, 50, 0, null);

        // This example moves the car from (50,50) to (550,50).
        double x = 50;

        while (x < 550) {

            // Pass the controls (v1=10, v2=10) to the simulator. DeltaT=0.1.
            simulator.nextStep (10, 10, 0.1);

            // Now extract the new location and other info.
            double t = simulator.getTime ();
            x = simulator.getX ();
            double y = simulator.getY ();

            // Display.
            System.out.println ("t=" + t + " x=" + x + " y=" + y);

        } //end-while

    }
}
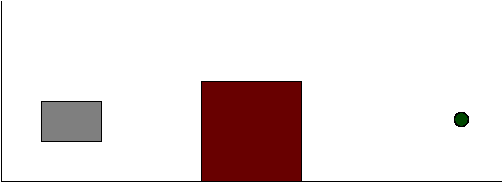
You are to use the configuration in Scene-3:
- The car starts at (50, 50) and pointing right (theta=0).
- There is an obstacle - a rectangle with top-left corner
at (150,100) and width=100, height=100.
- The target is at (500,50).
Thus, the initial position is:
The ultimate goal is to reach the target quickly and in the
orientation facing rightwards. However, you are
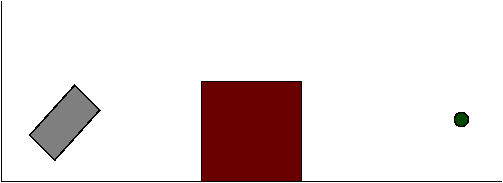
to do this in four discrete phases:
- Phase 1: Rotate the car so that it points at an angle
of A degrees (for example A = 45 degrees).
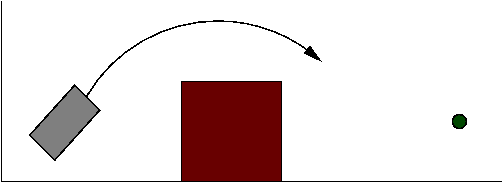
- Phase 2: Then adjust the two wheel velocities
(v1=right-wheel-velocity, v2=left-wheel-velocity) so that
they are at a fixed ratio. If the ratio is selected appropriately,
the car will turn in an arc all the way around the obstacle to
"hit" the target. If it doesn't hit the target, it will at least
hit the horizontal line y=50.
- Phase 3: Turn the car so that it is facing right.
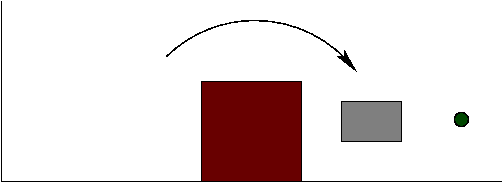
- Phase 4: If needed, move the car rightwards until it reaches the target.
You should experiment with various values of A, v1 and v2 to
see which values get you to the target (and facing rightwards) the soonest.
Write code to systematically try different values of A, v1 and
v2, using the GUI-less simulator.
This latter program is different than the controller that uses
the best values. Then, when you have the optimal values, use these
in your controller so that the version loaded into the GUI uses
the optimal values.
Guidelines:
- You are really going to write two sets of code. The first is
going to be the code that experiments with control parameters
and searches in the space of control-parameter values
for optimal parameters. This does not need a GUI.
The second is to use the results of
your search (optimal parameters) and code those up in a
controller that can be uploaded into the GUI.
The idea is that you would develop your optimal strategy
without the GUI by directly experimenting with the controls
as shown above in the
DubinCarControlTest
example. Then, after you know your
optimal control strategy, you would implement it in
a controller that would be uploaded into the GUI.
Thus, the development part that uses the
DubinCarSimulator
does not need a
move()
method or anything like that.
- Your code for the controller should be written in
the move()
method of your controller so that, we can see your controller
at work using the GUI, and with your best values of A,
v1 and v2.
To understand how the GUI works,
think of the
move()
method as the "intelligence" in control. This is where you
decide on the control parameters of the vehicle. However, the
move()
method does not itself return the control values. Instead, the
simulator calls your
getControl()
method to get each control value, right after your
move()
method is called.
- To have your controller run in the GUI, your controller
needs to implement the CarController
interface.
- You can call several useful methods in the
SensorPack in the
such as:
-
getX()
and
getY()
for the current location of the vehicle.
- getTheta()
for the current orientation.
- getTime()
for the current time.
The sensor-pack is passed to your controller by the GUI in the
into your controller's init()
method. You should save this object reference so that you can use
it in your
move() method.
Note: the position and orientation values will work correctly after
move() is called at least once.
- The GUI has two levels of accuracy. You can use the lower
one, which results in termination if the distance to the
target is within 25 pixels.
- Do NOT change deltaT
so that we have a consistent comparison across all students.
Submission:
- Make sure all your
Java classes are named such have your username is embedded
in each class name. This is to avoid name clashes with other students.
Thus, if your username is karel, you can call
your controller KarelCarController.java.
- Place all your code, including the CarSim code in a directory
called karel-a1
- Name your zip file karel-a1.zip (for username karel).
- Upload your zip file to Blackboard under "Assignment 1".