
Eclipse and Java
In this lab you are going to learn how to use Eclipse to write Java programs. Unlike the previous labs, which have been closely tied to a chapter of the textbook, this lab is standalone. The textbook shows you how to use DrJava rather than Eclipse. Make sure that you read chapter 4 in the textbook, and follow closely this lab.
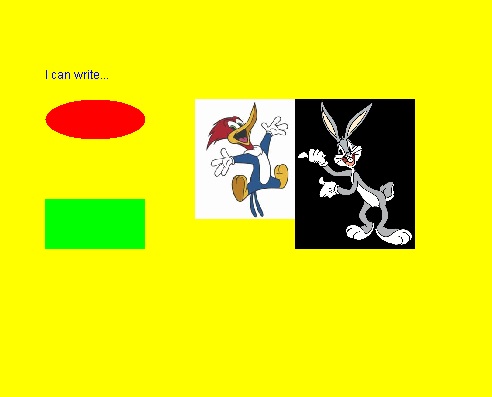
Our goal would be to create a Java program similar to the following:
Eclipse
Eclipse is an Integrated Development Environment (IDE) that is used to develop programs. We will use it as our environment for writing java programs.
It should be available on your lab computer. If you want to install it on your own computer it is a free download. But before you install Eclipse, make sure that you have installed Java.
Installing Java
You may skip this section if you are using a lab computer.
You should download the JDK version 6.0 or later. You can download JDK 6.0 from sun.com.
Next, follow the installation instructions.
Installing Eclipse
You may skip this section if you are using a lab computer.
Go to the Eclipse site where you will find all the directions you need. You might find the section for new users particularly helpful.
Customizing Eclipse
Eclipse in its default condition can generate some annoying warnings. You can live with those warnings or you can set your preferences so that Eclipse will stop generating them. An example is that by default Eclipse warns you about not declaring a serialVersionUID. (I don't care if you know what this is or not, but if you're curious look here.) To turn off the warning, go to: Preferences -> Java -> compiler -> Errors/Warnings -> Potential programming problems and change the "Serializable class without serialVersionUID" from a "Warning" to "Ignore".
Getting Started
The first time you run Eclipse you will need to answer some questions. These mostly concern where stuff will be kept. There are no wrong answers, but a thoughtful approach will lead to a better setup for you.
I'm going to assume that you will want to keep your Eclipse stuff on the T drive of the lab machines. If you are working on your own computer, of course, you will want to keep your stuff on your own hard drive.
Let's begin by firing up Eclipse. Do that by double clicking the desktop icon (Windows) or selecting the Eclipse icon from the dock (Macintosh).
You will be confronted with a dialog. You can see how I satisfied the dialog in this picture:
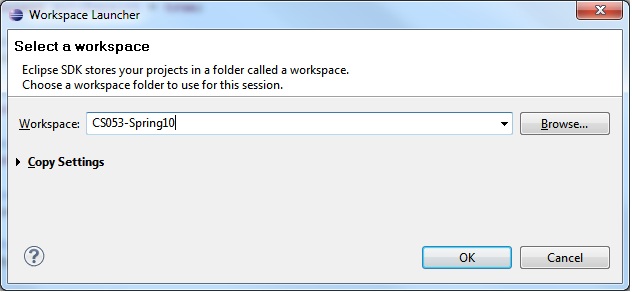
Satisfy the dialog by providing sensible information about where you want your workspace etc. Your workspace should either be on the T drive of a lab machine (so you can retrieve it later) or on your own computer or on your own thumb drive. I suggest that you use a name like "CS53" for the workspace you use this semester. It will make it easier for you to keep track of your stuff so you will be able to hand your work in neatly. As you become more proficient with Eclipse you will be able to decide yourself how you want to organize your workspace(s).
You will not need to hand in anything for this exercise. Just do it, and ask your lab instructor for help if you have any doubts whatsoever about what you're doing.
After you've selected your workspace, Eclipse will spend a little time setting itself up before presenting you with a window like this:
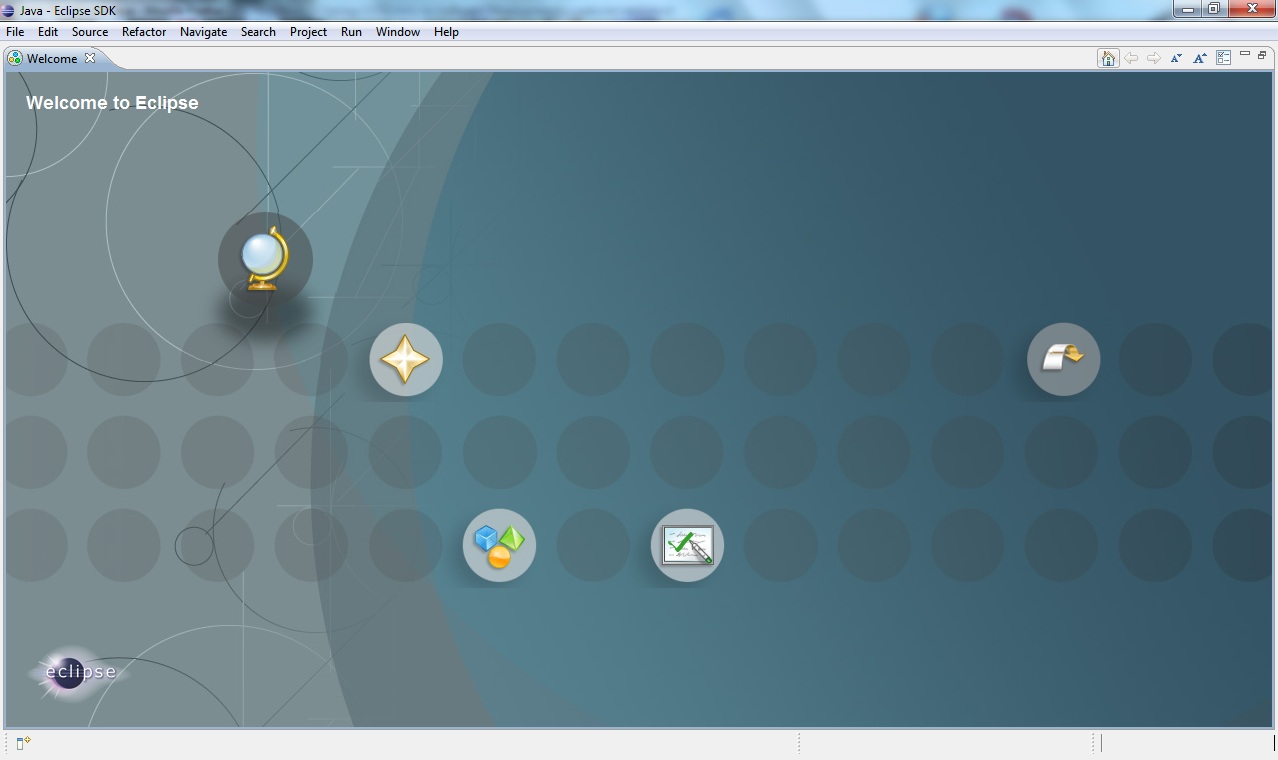
Clicking on the various icons will take you places. Mousing over the icons will tell you roughly what they do. For example, if you click on:
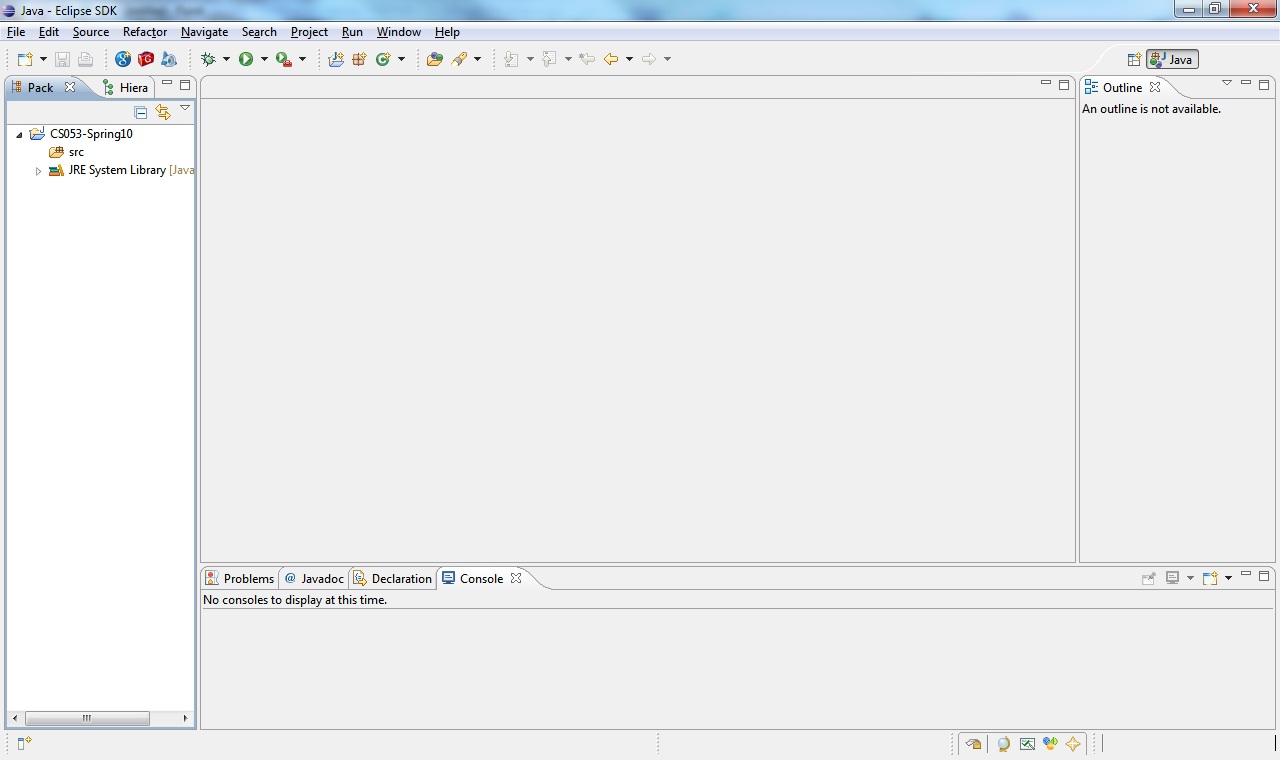
you will enter tutorials. To get to work in Eclipse you want to fire up the workbench. Can you figure out which icon to click?Once you've clicked the correct icon, you will get to a window that looks like this:

The world - your first Java program
Now I'm sorry to say I'm going to ask you to do things blindly and unthinkingly. It's a problem with learning any new programming language that you have to start out accepting things on faith. So please trust me for a short time and do exactly what I tell you.
Go to the "File" menu and select "New" -> "Java Project". Name your Java Project "lab3", like this:
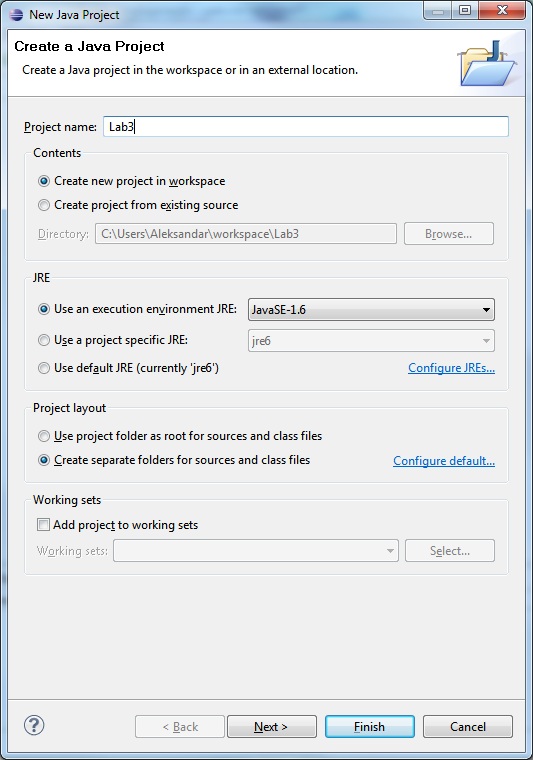
(your Directory will not be the same as mine, so the "C:\Users\Aleksandar\..." in the image above will actually be different in your case.)
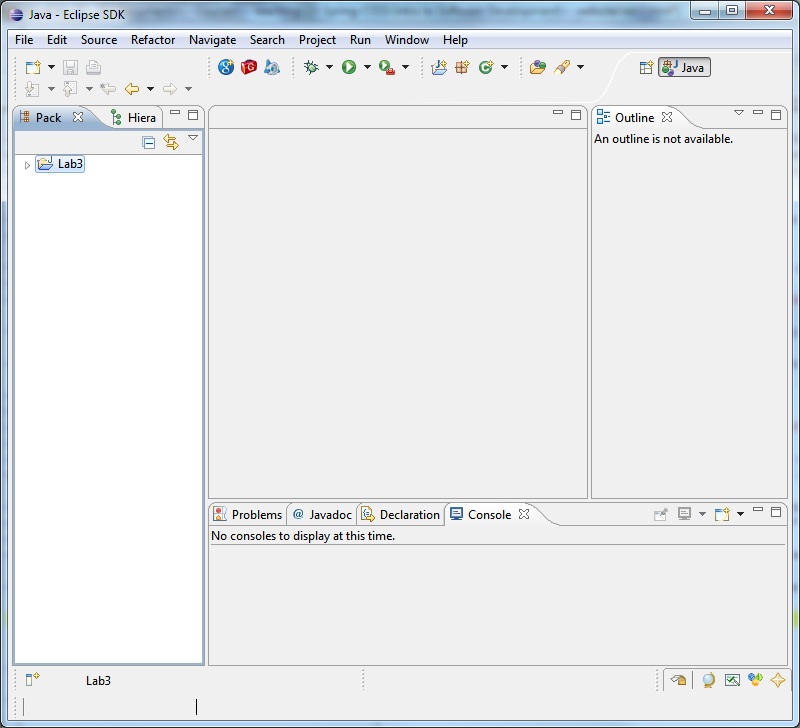
Then click "Finish" and you will see that the project lab3 has shown up in your workspace in the left window.
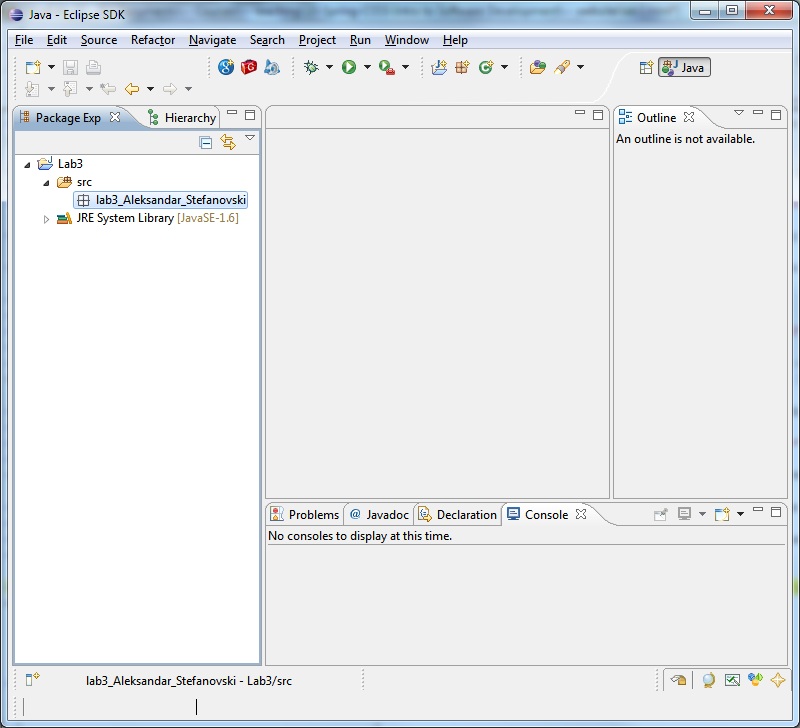
Now with the project lab3 still highlighted, go to the "File" menu again and select "New" -> "Package". Call it lab3_YourFirstName_YourLastName and you will see something like:
One more time, go to the "File" menu and this time make a new class (click on "New" -> "Class"). Yes, that is right, you are going to learn how to define and create your own classes! You can do it in Alice as well, but so far in Alice we have worked with existing classes and have been modifying them.
You will need to provide some information here. For example, in the "Name" field, type in "MyFirstJavaProgram". This will be the name of -- you guessed it -- your first Java program!!!
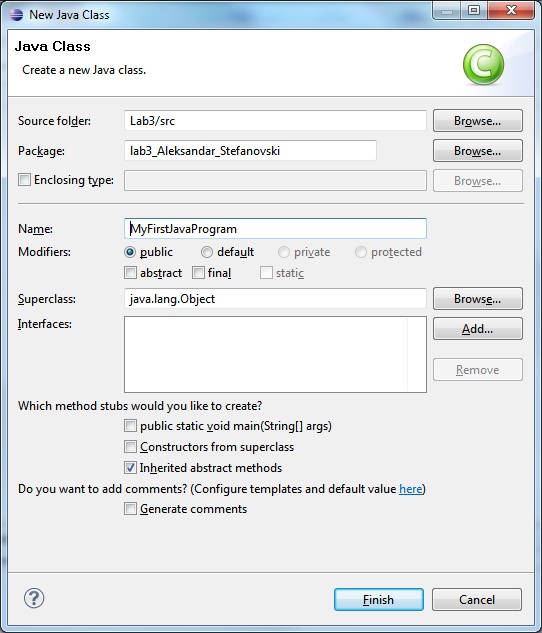
I also want you to change the entry in the "Superclass" box. It needs to read javax.swing.JFrame. A convenient way to make this entry is to start typing "JFra"... and then click the "Browse" button to let Eclipse finish it off for you.
Next, make sure you select " " under the "Which method stubs would you like to create?"

Now when you click the finish button, your workspace will become something like:
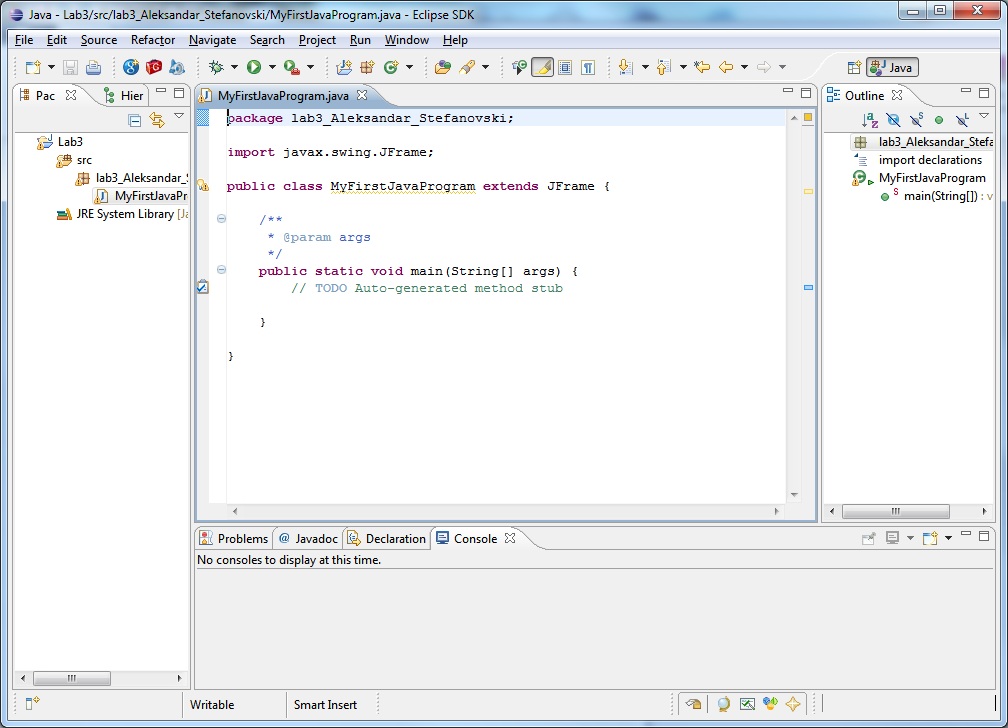
The big pane in that window is where you edit your program. Currently all you have is:
package lab3_Aleksandar_Stefanovski;

import javax.swing.JFrame;

public class MyFirstJavaProgram extends JFrame {

	/**
	 * @param args
	 */
	public static void main(String[] args) {
		// TODO Auto-generated method stub

	}

}
which Eclipse wrote for you.
Now let's get ready for your first Java exercise... Ready? Get set? GO!
By typing in that main window, add Java code so that the code in the window becomes:
package lab3_Aleksandar_Stefanovski;

import javax.swing.JFrame;

/**
 * File:	MyFirstJavaProgram.java
 * 		A simple class for getting used to Java and Eclipse.
 * Date:	January 25, 2010
 * @author  	Aleksandar Stefanovski
 * @version 	1.0
 */
public class MyFirstJavaProgram extends JFrame {

	/**
	 * Method:	main
	 * Purpose: 	Lets the Operating System and Java know where
	 * 		to start the program.
	 * @param	args
	 * @return 	none
	 */
	public static void main(String[] args) {
		// TODO Auto-generated method stub

	}
}
We have started to write our first comments in Java. Comments are very useful and we are going to use them throughout the entire term. Make sure that you document your program completely. In the above code it would be helpful to the graders if you actually changed the name from Aleksandar Stefanovski to your name.
Java allows us to write comments in two ways:
- Multiple line block comments starting with /** and ending with */
- Single line comments using // as we have used so far in Alice.
So far, so good. First, let's create global variables and place them right above the main method:
Next let's create a constructor method and put it between the variables and the main method:
	/**
	 * Method:	Constructor method.
	 * Purpose: 	Creates a new object (instance) of this class.
	 *
	 * @param	none
	 * @return 	none
	 */
	public MyFirstJavaProgram() {
		// set the title bar to read "My First Java Program"
		super("My First Java Program");
		this.setVisible(true);                // make it visible
		this.setSize(width,height);
		// make sure that when the X box is pressed
		// the program will exit
		this.setDefaultCloseOperation(EXIT_ON_CLOSE);
	}
We are almost done. We have defined what our program should look like and what to do. We have literally created our world, similarly to the world in Alice. But there is one last piece missing: We need to instanciate our program and turn it into an object.
We do this by adding the following line in the main method:
Try running the program by pressing on the green "play" button on the screen, or alternatively click on the "Run" menu, and select "Run" again.
If you followed the directions step-by-step, you should have in your window code that is exactly like this:
package lab3_Aleksandar_Stefanovski;

import javax.swing.JFrame;

/**
 * File:	MyFirstJavaProgram.java - a simple class for getting
 * 		used to Java and Eclipse.
 * Date:	January 25, 2010
 * @author  	Aleksandar Stefanovski
 * @version 	1.0
 */
public class MyFirstJavaProgram extends JFrame {

	// Private world (global) variables
	private int width = 640;
	private int height = 400;

	/**
	 * Method:	Constructor method.
	 * Purpose: 	Creates a new object (instance) of this class.
	 *
	 * @param	none
	 * @return 	none
	 */
	public MyFirstJavaProgram() {
		// set the title bar to read "My First Java Program"
		super("My First Java Program");

		this.setVisible(true);                // make it visible

		this.setSize(width,height);

		// make sure that when the X box is pressed the program will exit
		this.setDefaultCloseOperation(EXIT_ON_CLOSE);
	}


	/**
	 * Method:	main
	 * Purpose: 	Lets the Operating System and Java know where
	 * 		to start the program.
	 * @param	args
	 * @return 	none
	 */
	public static void main(String[] args) {

		// So far we have defined how the our program should
		// look like, but now we need to create an object of
		// our program and lets store it in a variable called
		// myWorld, similarly to our Alice world.

		MyFirstJavaProgram myWorld = new MyFirstJavaProgram();
	}
}
We wrote all this code for just one window to come to life. In comparison to Alice, Java the greater control of what we want to do in our programs. Alice had hid all of these details from us so that we can focus on the story and the visualization of our problems.
The Java programs you produce in this lab may appear very insubstantial compared to the magnificent stories you put together in Alice. Nevertheless, you should be able to have some fun putting together a tableau of text, shapes, colors and characters.
Excercise 1
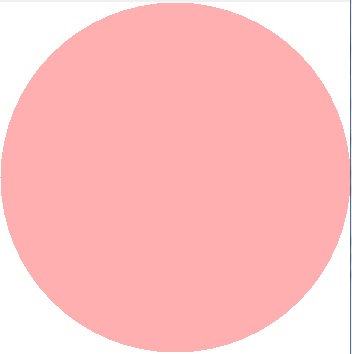
Create a Java program that draws an pink oval like this:
First things first, let's make a copy of your first Java program and save it as .
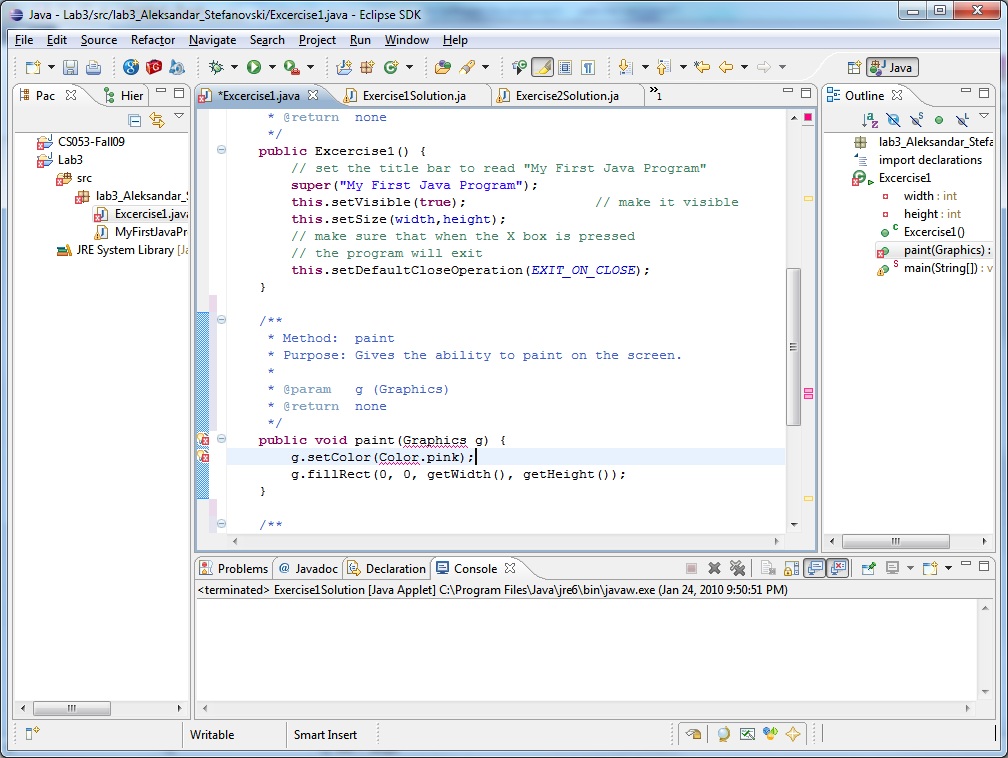
Create a paint method that will let you draw things in your program. Study the documentation and you will see that paint requires a parameter of type Graphics. Again look at the documentation and you will see that a Graphics object has methods to draw rectangles, draw ovals, fill rectangles, draw strings, draw images! The paint method is called by the runtime system which will pass a Graphics object for your actual device to the method. Your method can then tell the Graphics object (whose name, as a parameter, is g) what to do. In my code below, I set the painting color to pink by commanding g.setColor(Color.pink), and then I tell the Graphics object to fill the entire rectangular applet with this color via g.fillRect(0,0,getWidth(),getHeight()).
The paint method I am using is:
 	/**
	 * Method:	paint
	 * Purpose: 	Gives the ability to paint on the screen.
	 *
	 * @param	g (Graphics)
	 * @return 	none
	 */
    	public void paint(Graphics g) {
    	    g.setColor(Color.pink);
   	    g.fillRect(0, 0, getWidth(), getHeight());
   	}
If you just copy and paste the method above into your Exercise1 code, Eclipse will underline few words with a red line and put red boxes with and X mark in front of the lines as well, signaling you that you have errors in your program:
This indicates an error that Eclipse has detected. Click on each such error flag, and Eclipse will help you fix it. (The error flag in the picture above is because I need to import java.awt.Color, and by double-clicking Eclipse's first suggestion the error gets fixed.) After fixing all the errors, I end up with:

If you copy the code that I give you here, you will get a program that produces a solid pink square. For Exercise 1 you will need to modify my code to give you a solid pink Oval within a rectangular applet.
Here is my code, some of which was generated by Eclipse. You will need to make some small changes for Exercise 1.
package lab3_Aleksandar_Stefanovski;

import java.awt.Color;
import java.awt.Graphics;

import javax.swing.JFrame;

/**
 * File:	Exercise1.java - a simple class for getting
 * 		used to Java and Eclipse.
 * Date:	January 25, 2010
 * @author  	Aleksandar Stefanovski
 * @version 	1.0
 */
public class Exercise1 extends JFrame {

	// Private world (global) variables
	private int width = 640;
	private int height = 400;

	/**
	 * Method:	Constructor method.
	 * Purpose: 	Creates a new object (instance) of this class.
	 *
	 * @param	none
	 * @return 	none
	 */
	public Exercise1() {
		// set the title bar to read "My First Java Program"
		super("My First Java Program");
		this.setVisible(true);                // make it visible
		this.setSize(width,height);
		// make sure that when the X box is pressed
		// the program will exit
		this.setDefaultCloseOperation(EXIT_ON_CLOSE);
	}

	/**
	 * Method:	paint
	 * Purpose: 	Gives the ability to paint on the screen.
	 *
	 * @param	g (Graphics)
	 * @return 	none
	 */
    	public void paint(Graphics g) {
      	  	g.setColor(Color.pink);
    	    	g.fillRect(0, 0, getWidth(), getHeight());
    	}

   	 /**
	 * Method:	main
	 * Purpose: 	Lets the Operating System and Java know where
	 * 		to start the program.
	 * @param	args
	 * @return 	none
	 */
	public static void main(String[] args) {
		// So far we have defined how the our program should
		// look like, but now we need to create an object of
		// our program and lets store it in a variable called
		// world, similarly to our Alice world.
		Exercise1 world = new Exercise1();
	}
}
Painting in Java
The key to drawing in Java is the paint(Graphics g) method. Inside of that method you have access to the actual graphics device which will be passed to your variable g by the runtime system. It doesn't matter if the graphics device is a Windows monitor, a laptop screen, a Macintosh laptop screen, a printer or even an overhead projector. All the individual messy details of real graphics devices are abstracted away, and all you need to know is how to tell the abstract Graphics object to draw, setColor, fill, and otherwise do cool stuff.
This kind of abstraction is one of the most important concepts you will learn about the science of computing. Abstraction is one of the key elements in giving us the power to work with very complex systems.
Now I want you find out more about the Graphics abstraction. Look at the documentation, look at tutorials, use Google to help you, ask your classmates, ask your lab instructor.
When you know some more, take a shot at
Excercise 2
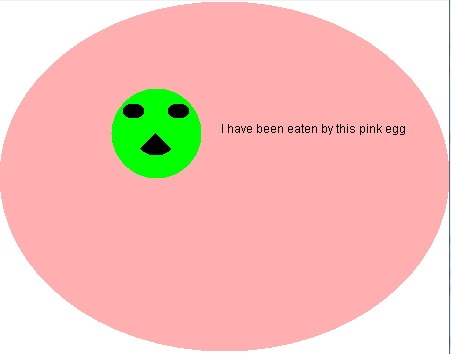
Add some text and some other shapes and use some more colors to "enhance" your program in Ex1 and save it as Excercise2. I'm sure you can do better than:
Images in Java
I know that by now you are eager to load some real images: photos of yourself, your friend, your favorite Rugby player, your favorite ...
There are some key classes that you will need to read about in the documentation. Take a look at the classes:
- Image
- BufferedImage
- ImageIO
I'm sure you'll suffer from information overload, so to keep it simple for you, here is a recipe that should get you started.
Get the pictures you want, use whatever image processing software you like to cut them down in size and save them in a standard format. I am going to suggest jpg as the format of choice.
You will need to declare variables to hold each of your images. I have two, one is called bugsImage, the other is called woodyImage. My declaration, placed after the class header but before any methods can be seen in:
public class Exercise3 extends JFrame {

        private Image bugsImage, woodyImage;  // variables for the images
        public Excercise3() {
           ...
Find the folder named "Lab3" in the project folder in your Eclipse workspace. Inside of that I want you to create a new folder named "images". Inside that folder is where I want you to store your very own .jpg images. That is where I stored two images called bugs.jpg and woody.jpg.
To load the images into your program you may add this world method:
	/**
	 * Method:	loadImage
	 * Purpose: 	Reads an image from file and stores it into an object.
	 *
	 * @param	imgFileName
	 * @return 	img object
	 */
 	private Image loadImage(String imgFileName) {
		Image img = null;
		try {
			Toolkit tk = Toolkit.getDefaultToolkit();
			img = tk.getImage(imgFileName);
		} catch (Exception e) {
			System.err.println("Image not found: "+ imgFileName);
		}

		return img;
	}
It is a function that will return a value of type Image.
- Accept my apologies for not explaining the "try" and "catch" and "Toolkit tk" nonsense. We'll get to it in class, but for now please accept that this is code that will load your images for you.
I like to load my images in a method called start. Here is my start method in which I am loading two images from my images folder. One is called "bugs.jpg", the other is called "woody.jpg":
        public void start() {
                bugsImage = loadImage("images/bugs.jpg");
                woodyImage = loadImage("images/woody.jpg");
        }
Note that you will have to call the method start in your code.
Finally, here is how I display the images. Just two lines within the paint method:
        g.drawImage(woodyImage,250,100,this);
        g.drawImage(bugsImage,350,100,this);
(250,100) are the coordinates of the top left corner of Woody Woodpecker, and (350,100) are the coordinates of the top left corner of Bugs Bunny. If you look at the documentation for the drawImage method you will see that it requires an ImageObserver. In our case, the ImageObserver is the world itself, which we can reference by the keyword this.
The code snippets I gave you above contribute to my class for this exercise:
Try to reproduce something close to it before you embark on your final exercise.
Exercise 3
Create a Java program that displays a neat scene involving rectangles, arcs, ovals, and at least one .jpg image. Use your imagination and creativity to entertain me and the graders!
How to submit your homework
Create a folder on your computer and name it 'CS053-Spring10' (if you do not have it already). Create another folder and name it 'Lab2'. In the newly created 'Lab3' folder copy your solutions to the exercises: Exercise1.java, Exercise2.java, and Exercise3.java.
Next, go back up to your folder 'CS053-Spring10', right click on your folder 'Lab3' and compress it either in a or file.
Your newly compressed file should be named:
- FirstName_LastName_Lab_3.zip or
- FirstName_LastName_Lab_3.rar
After you have compressed your homework, then proceed to submit it via Blackboard.
Got problems? If you have any problems make sure you clear them with your lab instructor because if you do not follow these requirements for submission your lab homework submissions will not be accepted and you will get zero points.
