
|
Selections fromM.B. Feldman and E.B. Koffman, Ada 95 Problem Solving and Program Design, 3rd edition.
Copyright 1999, Addison-Wesley Publishing Company
|
A.1 AdaGraph: A Basic High-Resolution Graphics Package
A.2 Using AdaGraph Operations
Drawing a High-Resolution Sine Curve
A.3 A High-Resolution Color Spider Package
The Spider Goes "Hi-Res"
A.4 Using the High-Resolution Spider Package
Drawing High-Resolution Spirals
Drawing Regular Polygons
Drawing Polystars
The Drunken Spider Returns
Many beginning students of Ada ask whether it is possible to do computer graphics with Ada. The answer is very simple: Of course it is! In fact, in this book we have actually done some: Our Screen package is a very simple computer graphics package, and its operations ClearScreen and MoveCursor are very similar to operations that are found in all graphics packages.
PACKAGE Adagraph IS
----------------------------------------------------------------------
--| Basic 16-color High-Resolution Graphics Package
--| Selected Types and Operations
--| Author: Jerry van Dijk, Leiden, Netherlands
--| Adapted by M. B. Feldman, The George Washington University
--| Last Modified: November 1998
----------------------------------------------------------------------

  -- Output Types

  -- 16-Color Palette; more colors could be used if we were sure
  --   that the display supported them
  TYPE Color_Type IS (Black, Blue, Green, Cyan, Red, Magenta, Brown,
    Light_Gray, Dark_Gray, Light_Blue, Light_Green,
    Light_Cyan, Light_Red, Light_Magenta, Yellow, White);

  -- Indicates whether a graphic shape will be drawn as an outline
  --   or as a filled area
  TYPE Fill_Type IS (Fill, No_Fill);

  -- Graphic Window Management Operations

  PROCEDURE Get_Max_Size (X_Size, Y_Size : OUT Integer);
  -- Pre:  None
  -- Post: X_Size and Y_Size contain the maximum X (horizontal) and Y
  --       (vertical) coordinates, respectively, of graphics windows on
  --       the display. The coordinates are in the range 0..X_Size and
  --       0..Y_Size

  PROCEDURE Create_Graph_Window (X_Max,  Y_Max  : OUT Integer;
                                 X_Char, Y_Char : OUT Integer);
  -- Pre:    None
  -- Post:   Opens a graphic window on the display, of the maximum size.
  --         The OUT parameters X_Max and Y_Max contain the maximum
  --         horizontal and vertical cordinates, respectively; X_Char
  --         and Y_Char contain the width and height, respectively,
  --         in pixels, of characters to be displayed
  -- Raises: Window_Already_Open if the graphic window is already open

  PROCEDURE Ext_Create_Graph_Window (X_Max,  Y_Max  : OUT Integer;
                                     X_Char, Y_Char : OUT Integer);
  -- Pre:  None
  -- Post: Like Create_Graph_Window, but guarantees that the display
  --       area of the window is of the maximum size possible

  PROCEDURE Create_Sized_Graph_Window (X_Size, Y_Size : IN Integer;
                                 X_Max,  Y_Max  :    OUT Integer;
                                 X_Char, Y_Char :    OUT Integer);
  -- Pre:  X_Size and Y_Size are defined
  -- Post: Like the previous two operations, but also sets the display
  --       area of the window to the size given by X_Size and Y_Size

  PROCEDURE Destroy_Graph_Window;
  -- Pre:  None
  -- Post: Closes the graphic window
  -- Raises: Window_Already_Closed if the window is already closed


  FUNCTION Is_Open RETURN Boolean;
  -- Pre:  None
  -- Post: Returns True if the graphic window is active, False otherwise

  PROCEDURE Set_Window_Title (Title : IN String);
  -- Pre:  Title is defined
  -- Post: Sets the title to be displayed at the top of the window

  -- Graphic Operations

  PROCEDURE Clear_Window (Hue : IN Color_Type := Black);
  -- Pre:  Hue is defined
  -- Post: Erases the contents of the graphic window and clears it to
  --       the given color, Black by default

  FUNCTION Get_Pixel (X, Y : IN Integer) RETURN Color_Type;
  -- Pre:  X and Y are defined
  -- Post: Returns the color of the pixel at the <X, Y> coordinates

  PROCEDURE Put_Pixel (X, Y : IN Integer; Hue : IN Color_Type := White);
  -- Pre:  X, Y, and Hue are defined
  -- Post: Colors a single pixel at the <X, Y> coordinates

  PROCEDURE Draw_Line (X1, Y1, X2, Y2 : IN Integer;
                       Hue : IN Color_Type := White);
  -- Pre:  X1, Y1, X2, Y2, and Hue are defined
  -- Post: Draws a line 1 pixel wide, in the given color,
  --       from <X1, Y1> to <X2, Y2>

  PROCEDURE Draw_Box (X1, Y1, X2, Y2 : IN Integer;
                      Hue   : IN Color_Type := White;
                      Filled : IN Fill_Type  := No_Fill);
  -- Pre:  X1, Y1, X2, Y2, Filled, and Hue are defined
  -- Post: Draws a rectangle, in the given color,
  --       from <X1, Y1> to <X2, Y2>. If Fill_Type is No_Fill,
  --       draws an outline in the given color; if Fill_Type is
  --       Fill, draws a filled box.

  PROCEDURE Draw_Circle (X, Y, Radius : IN Integer;
                         Hue : IN Color_Type := White;
                         Filled   : IN Fill_Type  := No_Fill);
  -- Pre:  X, Y, Hue, and Filled are defined
  -- Post: Draws a circle centered at <X, Y> with radius Radius

  PROCEDURE Draw_Ellipse (X1, Y1, X2, Y2 : IN Integer;
                          Hue   : IN Color_Type := White;
                          Filled : IN Fill_Type  := No_Fill);
  -- Pre:  X1, Y1, X2, Y2, Filled, and Hue are defined
  -- Post: Draws an ellipse whose bounding rectangle is given by
  --       <X1, Y2> and <X2, Y2>

  PROCEDURE Flood_Fill (X, Y : IN Integer;
                        Hue : IN Color_Type := White);
  -- Pre:  X, Y, and Hue are defined
  -- Post: Reads the color at <X, Y> and then replaces this color
  --       by Hue in all directions until another color is encountered

  PROCEDURE Display_Text (X, Y : IN Integer;
                          Text : IN String;
                          Hue  : IN Color_Type := White);
  -- Pre:  X, Y, Text, and Hue are defined
  -- Post: Displays the given text string in the graphics window.
  --       The character size is the default one in the system; it
  --       is returned by the window-creating operations

  -- Polydraw Support

  FUNCTION Where_X RETURN Integer;
  FUNCTION Where_Y RETURN Integer;
  -- Pre:  None
  -- Post: Return the horizontal and vertical positions, respectively,
  --       of the current drawing point

  PROCEDURE Goto_Xy (X, Y : IN Integer);
  -- Pre:  X and Y are defined
  -- Post: Moves the current drawing point to <X, Y>

  PROCEDURE Draw_To (X, Y : IN Integer; Hue : IN Color_Type := White);
  -- Pre:  X, Y, and Hue are defined
  -- Post: Draws a line 1 pixel wide, in the given color,
  --       from the current drawing point to <X, Y>, and moves
  --       the current drawing point to <X, Y>

  -- Input Types

  TYPE Event_Type IS
    (None, Moved, Left_Up, Left_Down, Right_Up, Right_Down);

  TYPE Mouse_Type IS RECORD
    Event : Event_Type;  -- indicates which mouse event occurred;
    X_Pos : Integer;     -- gives the location of the cursor when
    Y_Pos : Integer;     -- the mouse event occurred
  END RECORD;

  -- Input Operations

  FUNCTION Key_Hit RETURN Boolean;
  -- Pre:  None
  -- Post: Returns True if a character is available (i.e., if a
  --       key has been pressed)

  FUNCTION Get_Key RETURN Character;
  -- Pre:  None
  -- Post: Waits until a character is available and returns it

  FUNCTION Mouse_Event RETURN Boolean;
  -- Pre:  None
  -- Post: Returns True if a mouse event in the graphic window has
  --       become available

  FUNCTION Get_Mouse RETURN Mouse_Type;
  -- Pre:  None
  -- Post: Waits for a mouse event in the graphical window to occur,
  --       and returns a record containing the event type and the
  --       coordinates of the mouse pointer

   . . .

PRIVATE

  . . .

END Adagraph;
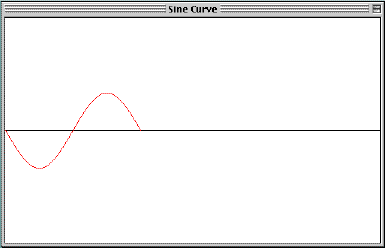
Program A.1 is an adaptation of Program 8.4, in which AdaGraph
operations are used to plot the sine wave.
WITH AdaGraph;
USE AdaGraph;
WITH Ada.Numerics;
WITH Ada.Numerics.Elementary_Functions;
USE  Ada.Numerics;
USE  Ada.Numerics.Elementary_Functions;
PROCEDURE Sine_Wave IS

----------------------------------------------------------------------
--| Plots a sine curve, using high-resolution graphics.
--| Author: M. B. Feldman, The George Washington University
--| Last Modified: November 1998
----------------------------------------------------------------------

  XMax    : Integer;                    -- width of graphic window
  YMax    : Integer;                    -- height of graphic window
  XChar   : Integer;                    -- width of character font
  YChar   : Integer;                    -- height of character font
  Mouse: AdaGraph.Mouse_Type;           -- click to quit program

  RadiansPerDegree : CONSTANT Float := Pi / 180.0;
                                        -- radians per degree
                                        -- Pi in Ada.Numerics

  MinAngle :  CONSTANT Integer := 0;    -- smallest angle
  MaxAngle :  CONSTANT Integer := 360;  -- largest angle

  MaxAmplitude : Float;                 -- max plot height
  Sine          : Float;                -- current sine value
  Height        : Integer;              -- height of plot pixel

BEGIN

  AdaGraph.Create_Graph_Window(X_Max => XMax, Y_Max => YMax,
                               X_Char => XChar, Y_Char => YChar);
  MaxAmplitude := Float(YMax / 6);
  AdaGraph.Set_Window_Title(Title => "Sine Wave");
  AdaGraph.Clear_Window(Hue => AdaGraph.White);
  AdaGraph.Draw_Line(X1 => 1,        X2 => XMax,
                     Y1 => YMax / 2, Y2 => YMax / 2,
                     Hue => AdaGraph.Black);
  AdaGraph.Goto_XY(X => 0, Y => YMax / 2);

  FOR Degrees IN MinAngle .. MaxAngle LOOP
    IF Degrees REM 2 = 0 THEN
      Sine := Sin(Float(Degrees) * RadiansPerDegree);
      Height := YMax / 2 + Integer(MaxAmplitude * Sine);
      AdaGraph.Draw_To(X   => Degrees / 2,
                       Y   => Height,
                       Hue => AdaGraph.Blue);
      DELAY 0.01;
    END IF;
  END LOOP;

  LOOP
    IF AdaGraph.Mouse_Event THEN
      Mouse := AdaGraph.Get_Mouse;
      EXIT WHEN
      Mouse.Event = AdaGraph.Left_Down OR
      Mouse.Event = AdaGraph.Right_Down;
    END IF;
  END LOOP;

  AdaGraph.Destroy_Graph_Window;

END Sine_Wave;
AdaGraph.Create_Graph_Window(X_Max => XMax, Y_Max => YMax,
                             X_Char => XChar, Y_Char => YChar);
MaxAmplitude := Float(YMax / 6);
AdaGraph.Clear_Window(Hue => AdaGraph.White);
AdaGraph.Draw_Line(X1 => 1, X2 => XMax,
                   Y1 => YMax / 2, Y2 => YMax / 2,
                   Hue => AdaGraph.Black);
AdaGraph.Goto_XY(X => 0, Y => YMax / 2);
PACKAGE Spider_Hires IS
----------------------------------------------------------------
--| This package provides procedures to emulate "Spider"
--| commands. The spider can move around
--| the screen drawing simple patterns.
--| This is a high-resolution color version of the package.
--| Author: John Dalbey, Cal Poly San Luis Obispo, 1992
--| Adapted by M. B. Feldman, The George Washington University
--| Last Modified: November 1998
----------------------------------------------------------------
  -- These are the spider's simple parameterless methods

  PROCEDURE Start;
  -- Pre:  None
  -- Post: Spider's room appears on the screen
  --   with spider in the center.

  PROCEDURE Quit;
  -- Pre:  None
  -- Post: End the drawing

  -- now some types, and methods that use the types

  TYPE Directions IS (North, East, South, West);
  TYPE Colors     IS (Red, Green, Blue, Black, None);
  SUBTYPE Steps IS Integer RANGE 1..300;
  SUBTYPE Degrees IS Float RANGE 0.0..360.0;

  PROCEDURE Step(HowMany: Steps := 1);
  -- Pre:  None
  -- Post: Spider takes HowMany steps forward in the direction
  --       it is facing; default is 1.
  -- Raises: Hit_the_Wall if spider tries to step into a wall.

  FUNCTION RandomStep RETURN Steps;
  -- Pre:  None
  -- Post: Returns a random step in the range 1..200

  PROCEDURE TurnRight(HowFar: Degrees := 90.0);
  -- Pre:  None
  -- Post: Spider turns HowMany degrees to the right;
  --       default is 90.

  FUNCTION RandomTurn RETURN Degrees;
  -- Pre:  None
  -- Post: Returns a random angle of turn

  PROCEDURE Face (WhichWay: IN Directions);
  -- Pre:  WhichWay has been assigned a value
  -- Post: Spider turns to face the given direction.

  FUNCTION IsFacing RETURN Directions;
  -- Pre:  None
  -- Post: Returns the nearest direction the spider is facing.
  --       (Rounds the spider's heading to the nearest direction)

  FUNCTION RandomDirection RETURN Directions;
  -- Pre:  None
  -- Post: Returns a random direction

  PROCEDURE ChangeColor (NewColor: Colors);
  -- Pre:  NewColor has been assigned a value
  -- Post: Spider leaves its tracks in the new color

  FUNCTION IsPainting RETURN Colors;
  -- Pre:  None
  -- Post: Returns the color in which the spider is painting

  FUNCTION RandomColor RETURN Colors;
  -- Pre:  None
  -- Post: Returns a random color

  FUNCTION AtWall RETURN Boolean;
  -- Pre:  None
  -- Post: Returns True if the spider is standing next to a wall

  Hit_The_Wall: EXCEPTION;

  TYPE Switch IS (On, Off);

  PROCEDURE Debug (Setting: IN Switch);
  -- Pre:  None
  -- Post: Turns on or off single stepping through the program.

  FUNCTION  Debugging RETURN Switch;
  -- Pre:  None
  -- Post: Returns on or Off depending on Debug setting

  TYPE Speeds IS (Slow, Medium, Fast);

  PROCEDURE SetSpeed (Speed: IN Speeds);
  -- Pre:  Speed is defined
  -- Post: Execution speed is set as desired

  PROCEDURE Wait;
  -- Pre:  None
  -- Post: Causes the program to wait for a mouse click
  --       before proceeding

END Spider_Hires;
PROCEDURE Step(HowMany: Steps := 1);
PROCEDURE TurnRight(HowFar: Degrees := 90);
Spider_Hires.Step;
Spider_Hires.TurnRight;
TYPE Speeds IS (Slow, Medium, Fast);
PROCEDURE SetSpeed (Speed: IN Speeds);
Spider_Hires.SetSpeed (Speed => Spider_Hires.Medium);
PROCEDURE Wait;
Spider_Hires.Wait;
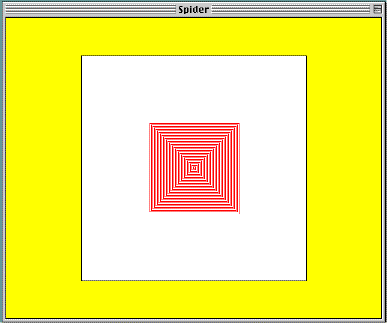
WITH Spider_Hires;
PROCEDURE Spiral IS
----------------------------------------------------------------
--| Draw spiral pattern with spider - use nested loops
--| High-resolution version
--| Author: M. B. Feldman, The George Washington University
--| Last Modified: November 1998
----------------------------------------------------------------
BEGIN -- Spiral
  Spider_Hires.Start;
  Spider_Hires.Face(WhichWay => Spider_Hires.RandomDirection);
  -- draw 120 lines, starting in a random direction
  FOR Line IN 1..120 LOOP
    -- inner loop takes its bound from outer count
    FOR Count IN 1..Line LOOP
      Spider_Hires.Step;
    END LOOP;

    Spider_Hires.TurnRight;
END LOOP;
Spider_Hires.Quit;
END Spiral;This is identical to Program 2.9 except for the number of lines drawn and the references to Spider_Hires instead of to Spider.
FOR Side IN 1..N LOOP
  Draw a line of length L
  Turn 360/N degrees
END LOOP
TurnRight(HowFar => 360.0/Float(Sides));
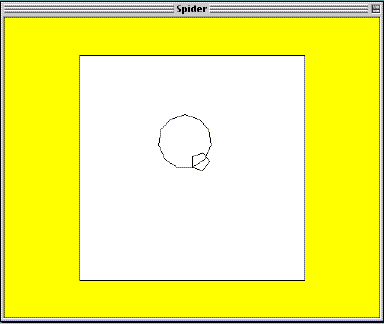
WITH Spider_Hires;
USE  Spider_Hires;
PROCEDURE Polygons IS
----------------------------------------------------------------
--| Draw regular polygon pattern with spider
--| High-resolution version
--| Author: M. B. Feldman, The George Washington University
--| Last Modified: November 1998
----------------------------------------------------------------
  PROCEDURE Polygon(Length: IN Steps; Sides: Positive) IS
  BEGIN
FOR Side IN 1..Sides LOOP
      Step(HowMany => Length);
      TurnRight(HowFar => 360.0/Float(Sides));
END LOOP;
END Polygon;
BEGIN
  Start;
  Polygon(Length => 15, Sides => 5);
  Wait;
  Face(WhichWay => West);
  Polygon(Length => 25, Sides => 11);
  Quit;
EXCEPTION
  WHEN OTHERS =>
    Quit;
END Polygons;
FOR Side IN 1..N LOOP
  Draw a line of length L
  Turn 180 - 180/N degrees
END LOOP
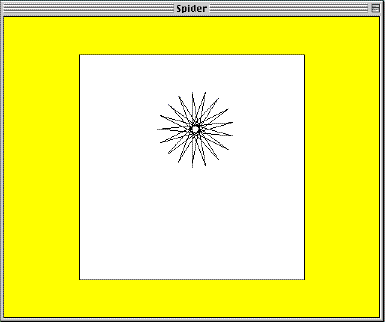
WITH Spider_Hires;
USE  Spider_Hires;
PROCEDURE Polystars IS
----------------------------------------------------------------
--| Draw polystar pattern with spider
--| High-resolution version
--| Author: M. B. Feldman, The George Washington University
--| Last Modified: November 1998
----------------------------------------------------------------
  PROCEDURE Polystar(Length: IN Steps; Sides: IN Positive) IS
  -- Pre:  Length and sides are defined
  -- Post: Draws a polystar pattern with the spider
  BEGIN
FOR Side IN 1..Sides LOOP
      Step(HowMany => Length);
      TurnRight(HowFar => 180.0 - 180.0/Float(Sides));
END LOOP;
END Polystar;
BEGIN -- Polystars
  Start;
  Polystar(Length => 80, Sides => 17);
  Quit;
END Polystars;

Program A.6 shows the spider program.
WITH Spider_Hires;
USE Spider_Hires;
PROCEDURE Drunken_Spider IS
----------------------------------------------------------------
--| Spider tries to tour its room but has drunk too much, so
--| takes a random number of steps and may hit the wall. If the
--| spider hits the wall, it turns around and keeps going.
--| This version is for high-resolution graphics.
--| Author: M. B. Feldman, The George Washington University
--| Last Modified: November 1999
----------------------------------------------------------------

BEGIN -- Drunken_Spider

  Start;
  SetSpeed(Speed => Medium);

  LOOP                     -- keep going forever

    LOOP  -- make sure we are always painting a color

      ChangeColor (NewColor => RandomColor);
      EXIT WHEN IsPainting /= None;

    END LOOP;

    BEGIN   -- to handle exception

      Step(RandomStep);

    EXCEPTION

      WHEN Hit_The_Wall =>
        TurnRight(HowFar => RandomTurn);

    END;

    TurnRight(HowFar => RandomTurn);

  END LOOP;

END Drunken_Spider;
This version differs from the one in Chapter 2 in an important way. Instead of using an IF statement to test whether the spider is at the wall, we use an exception handler. The lines
BEGIN   -- to handle exception
  Step(RandomStep);
EXCEPTION
  WHEN Hit_The_Wall =>
    TurnRight(HowFar => RandomTurn);
END;

TurnRight(HowFar => RandomTurn);
cause the spider to take a random number of steps forward. If it is able to do so before hitting the wall, control passes to the last line and the spider turns right a random number of degrees. If the spider hits the wall, control passes to the exception handler and the spider turns, then (below the END) turns again.
This gives a somewhat more realistic simulation of an inebriated creature,
which would probably bump into the wall rather than turn before reaching
it.