CS 1111
Introduction to Software Development
GWU Computer Science
Introduction to Software Development
GWU Computer Science
From your this past week, you should remember:
Rule 1: Verify that your file has the same name as the class it contains.
Activity 1: Follow along in a Text Editor, compile using javac, and run it using java on your Terminal.
Step 1: Type the following program fragment in the Editor window and compile it.
public class MyHello {

}
Note 1: Even though this does not compile, this is the proper way to start a class.
Note 2: We have some keywords here to tell Java details about the class (more on this later).
Note 3: We open the bracket and then immediately close it!! This creates the class block!
In Java, the idea is to package all the features and behaviors that a program can do. We do this so we can eventually use them without having to think of the details. This is using the program as a black box.
Step 2: Now add the following section (inside the grayed-out code), and compile it:
public class MyHello {
    public static void main(String[] args) {

    }
}
Note 1: The class now compiles even though it actually does nothing.
Note 2: We open the bracket and then immediately close it. This creates the method block.
The idea is to package sequences of instructions that ultimately perform one behavior or task.
Step 3: Now add the following section:
public class MyHello {
    public static void main(String[] args) {
      System.out.println("Hello, Myself!");
    }
}
The single instruction or statement is like a single action.
Rule 2: If you want to run (execute) the class, make sure that the program contains a class block with a method called main inside. We'll talk about this later (when we discuss the "Path of execution").
Activity 2: Follow along using a Text Editor and the Terminal.
You can have as many instructions as you like inside the main method. Here, we have two print statements:
public class Hello2 {

    public static void main(String[] args) {
        // generate some simple output
        System.out.println("Hello, World!");
        System.out.println("How are you?");
    }
}
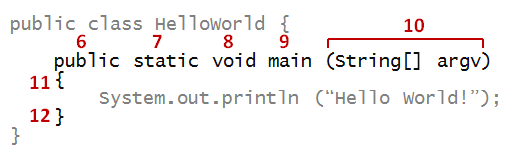
Reserved Words:
We'll Highlight in red some words in HelloWorld which we call reserved words
public class MyHello {

    public static void main(String[] args) {
        // generate some simple output
        System.out.println("Hello, Myself!");
    }
}
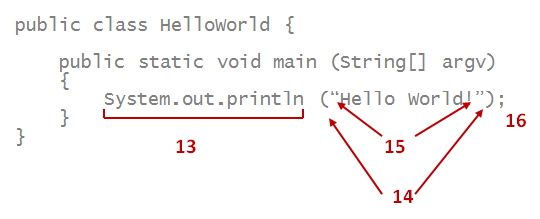
Identifiers:
We'll Highlight in green some words in HelloWorld which we call identifiers
These words are names that we pick to refer to named elements of the code, like classes, variables, or methods. Some are named by us, some have been named by others and are now standard in Java.
public class MyHello {

    public static void main(String[] args) {
        // generate some simple output
        System.out.println("Hello, Myself!");
    }
}
Backpack.Phone.calculatorApp(355/113)
Braces:
We'll Highlight in blue the different types of braces used in Java.
public class FutureExample {

    public static void main(String[] args) {
        ArrayList<Integer> mylist = new ArrayList<Integer> ();
        System.out.println("Hello, Past!");
    }
}
Cake<Chocolate>We'll cover why we have these at the very end of the semester; you can ignore them for now.
Martha said “Something I don't want to tell you”
Without the quotation marks, that would be very confusing!
Some code formatting elements are optional but recommended. The code shown below compiles but is very hard to read and understand.
public
  class Hello2 {public static void main(String
    args [] ) {// generate some simple output
        System.out.
    println("Hello, World!");
System.out.println("How are you?");
    }}
That is why, in this class, we will follow a strict set of programming style guidelines. One of those will be to indent your code at a new level each time you open a set of curly braces:
|-- indent Level 1
    |-- indent Level 2
        |-- indent Level 3
public class Hello2 {

    public static void main(String[] args) {
        // generate some simple output
        System.out.println("Hello, World!");
        System.out.println("How are you?");
    }
}
We will download and use the Java CheckStyle command line tool throughout this semester to perform automated style checking. Although there are many common and slightly different opinions on what is good coding style, we're going to pick just one of these during the semester, for the sake of learning to conform to a coding standard and being able to use this tool. More details in lab this week!
Your homework assignments will grade your solutions based on how many test cases they pass (which you will have access to), and then will provide you with instructions how to call the command line style checker on your code to earn those points.
In Java, we use strings to represent text that is human-readable, rather than code. For example, "Hello, World!" is a string. We use double quotes to indicate what the start and end of a string should be to Java, as we saw above.
Some things inside a String denote literal text and others try to indicate formatting. Since Strings are surrounded by double quotes like in: "How are you?" , it would be hard to try to write double quotes as part of a text. like in " She said "How are you?", and smiled ". In that example, the compiler doesn't know you mean for the two internal quotes to be taken literally.
That's why, we use a special symbol: \ to tell the compiler that there starts an escape sequence, which is a sequence of characters that the compiler needs to interpret in a different way.
In Java, these are the most common escape sequences:
Activity 3 [3 minutes]: Work individually to modify the code below in your Text Editor, compile it, and run it.
The objective is to correct the internal quotes in this message:
public class Escape {

    public static void main(String[] args) {
        // generate some simple output
        System.out.println("She said "Hello!" to me. ");
    }
}
Then make it print:
  She said
  "Hello!"
  to me.
When you have finished, submit this code on Blackboard under the "Class participation 02_1" link on Blackboard.
We can't emphasize this enough: reading programs is an all-important skill.
Start with the class:
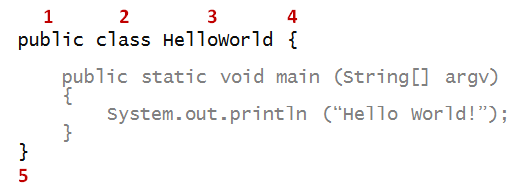
Next, go to main:
Next, read the one statement inside:
As we proceed, we will point out good reading habits.
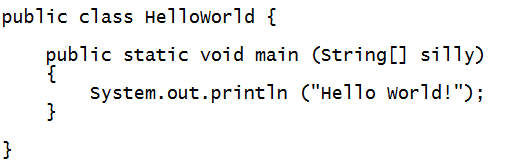
Activity 4: The following programs might have Syntax errors that will cause the compiler to complain. Try to identify them by eye:
Program 1:

Program 2:

Program 3:

Program 4:

Program 5:
That was tough! Especially before we learned about all of the parts of the code! Fortunately, the compiler will help us to know when we have these syntax errors. Unfortunately, the error messages the compiler gives can often be a little cryptic, especially for the novice!
Let's go through these examples together, using a "healthy" HelloWorld example, and add in these compilation errors. Then, let's try to run the code and see if we can make sense of the error message. If nothing else note that the compiler gives us a line number of where it thinks the error is. This line number might not always be perfect, but it's a good place to start looking.
For all the windows people, in order to use some (most) of the command line tools we'll be showing you in lab this week, you need to install the Windows Subsystem for Linux (wsl), which you can do by following the instructions below (we'll go over it quickly in the lab too, so don't worry if you get stuck!).
Note: you only need to follow the instructions under the "Install" section right at the top.
https://docs.microsoft.com/en-us/windows/wsl/install
Couple of helpful hints:
1) To open a terminal in administrator mode, open the windows start menu and type "cmd" as you would to open a normal terminal, then right click on the command prompt icon and select "Run as Administrator" (it may also appear on the right hand column next to the icon).
2) After you install WSL, you need to restart your computer to notice the changes.
3) After restarting, you can run the command "bash" to access a more typical linux terminal (however the commands should work on windows power shell or command prompt as well)