Department of Electrical Engineering and Computer Science
The George Washington University
Washington, D. C. 20052
An earlier version of this paper appeared in Proc. 10th Annual Ada Software Engineering Education and Training (ASEET) Symposium, Prescott, AZ, June 1996 (p. 41-49).
With the introduction of the AppletMagic(tm) compiler from Intermetrics, it is now possible to write Ada 95 programs which can run on the Java Virtual Machine and easily use the Java windowing toolkit. This paper talks about experiences in integrating these tools into two course, a Data Structures (CS2) course, and a course on the Principles of Graphical User Interfaces.
One of the biggest trends in computer science is increasing access to information from all over the world by using hypertext links to provide connections and context for information which is stored on computers connected to the Internet. This large interconnection of information and computers has been named the "World Wide Web" (or simply WWW). The WWW is extremely powerful because it makes a great deal of information available to anyone who can gain access to the Internet. However, the information which is available on the WWW is mostly static in that pages of information (Web Pages) are generated, and then downloaded to be processed on the local user's computer. Interactive content (the ability to run programs from Web pages) was difficult to achieve since one of the main tenets of the WWW was that the information was simply stored on the server, and it was the responsibility of the local client to figure out how to process and display it. Since that local client could be any one of a large number of computers, it was impossible to make an executable program which would run seamlessly on all of them.
To make the information on the Web more dynamic, Java has emerged. Java is a language which compiles to an intermediate byte code, Java Byte Code (JBC). JBC is a low level interpreted instruction set which runs on a Java Virtual Machine, a JBC interpreter. It is possible to simply port this interpreter to each computer which runs a WWW viewer, and then write programs which can be sent as information on the WWW.
Java also includes an Application Programming Interface (API). By using the API it is possible to develop applications which will behave the same regardless of which computer or viewer is being used by the local user. Given that Java and the Java API are available, it is now possible to develop applications which can be run anywhere on the WWW. This allows the building of interactive content into Web Pages. The types of tools which are available in the Java API include tools to develop graphical applications and graphic user interfaces (GUI), tools for network connectivity, and general purpose programming utilities.
There is nothing special about JBC or the Java API which precludes languages other than Java from producing compatible JBC or using the Java API. In fact, there are at least two languages, Ada and Smalltalk, for which JBC compilers are being produced. The Ada to JBC compiler is Applet Magic from Intermeterics. George Washington University received an advance copy of this compiler, which we used to integrate Java into several Ada courses. This paper describes our experiences using Ada and Java in these courses.
This paper reviews our experiences with Ada and Java specifically in two courses. The first is the CS2 (Data Structures) course. Here we are using Java's ability to easily generate and run animations to develop an Ada package which will allow students to generate their own animations of algorithms which they are learning in class. The second course, Design of User Interface Software, teaches students the principals of how graphical user interfaces work, and how to use those principals to develop GUIs. Here the inter-language ability provided by AppletMagic(tm) is used. This allows the students to write their programs in Ada and use the same Java API as is used when programming in Java.
For the past several years the CS2 (Data Structures) course at The George Washington University has included an extra credit assignment which allows students to develop a graphical animation of some topic which was covered in the class. Students have used specially produced Ada libraries to produce programs which illustrate sorting, and recursion using fractal curves. The animations were done by developing bindings to the POLKA algorithm animation package. These bindings were then encapsulated in Ada packages which created objects in the algorithm problem domain. The students could then implement an animation of an algorithm simply by implementing the algorithm using the operations defined in the Ada package. For example, to implement a sorting algorithm, sortable objects were created, and a special swap operation was defined on these objects. When the swap operation was called, the two objects were swapped in the underlying array, and an animation of the swap was displayed on the student's terminal. In this manner, the students could implement an animation of any sorting operation which involved using a swap operation.
Algorithm animations of assignments are relatively easy to implement where stereotypic objects and operations can be found which allow the algorithm to be implemented and which map directly to something which can be animated. Swapping operations for sorts and turtle graphics for fractal curves represent two easily implementable animations. Dynamic structures, such as linked lists and trees represent a much more difficult problem because of the need of pointers to the heap, and the difficulty of representing student errors in the animation.
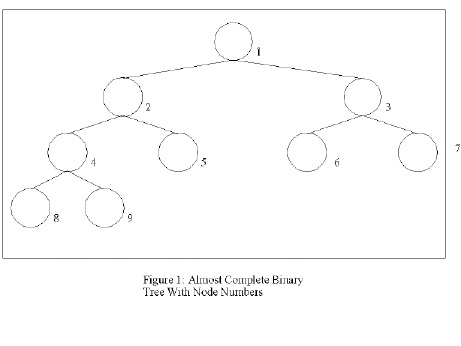
However one type of tree, an Almost Complete Binary Tree (ACBT), is fairly easy to implement with an animation. The reason an ACBT can be easily implemented is that an array can be used as an underlying data structure. In order to see this, we need to look at some definitions [Feldman96]:
We can now view an ACBT as an array by numbering the vertices in the tree starting at one for the root, two and three for the root's left and right children, and so on [Figure 1]. We then use the numbers for the vertices as indices of an array. Each vertex's parent can be found by using integer division, dividing its node number by 2. Children of the current node can be found as (current*2) and ((current*2) + 1)). This makes it easy to implement the tree efficiently in an array. Since the students generally tend to have problems understanding the mapping of the ACBT to the underlying array, it seems natural to implement this type of tree in an animation.
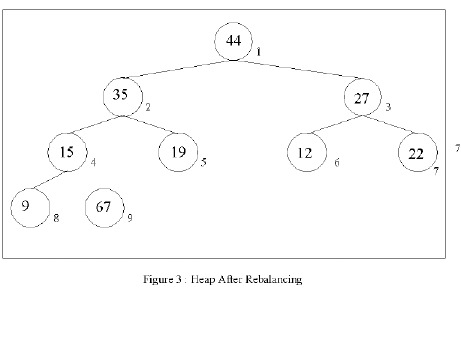
The specific assignment chosen was to implement a heap sort. A
heap is an ACBT in which the value stored at every node is greater
than or equal to the value stored in its children. A heap sort is
implemented by building the heap using the data to be sorted, and
then taking the value of the root (the largest value in the heap),
swapping it with the vertex at the end of the tree, removing the last
vertex from the tree, and converting the resulting almost-heap to a
heap [Figures 2 and 3].

The students were given an extra credit assignment to implement an animation of the heap sort. A library (described in section 2.1) was provided which allowed them to animate the heap sort in terms of a few operations such as compare (compares 2 or 3 nodes) and swap (swaps 2 nodes). When the algorithm was implemented with these operations, an animation would also be generated which would allow the students to see the results of calling these operations.
At the writing of this paper, the current semester is not yet over, so no results can be given as to the experiences of the students in implementing these sorts. One student, however, decided to use a similar strategy and implemented an AVL tree animation using AppletMagic(tm).
In the past, animations for the Data Structures Course were developed using POLKA. [Stasko 93]. However, since AppletMagic(tm) was available this semester, it was chosen to develop the animations. Although POLKA has a number of useful features built into it specifically for doing algorithm animations, there are a number of advantages in using Java.
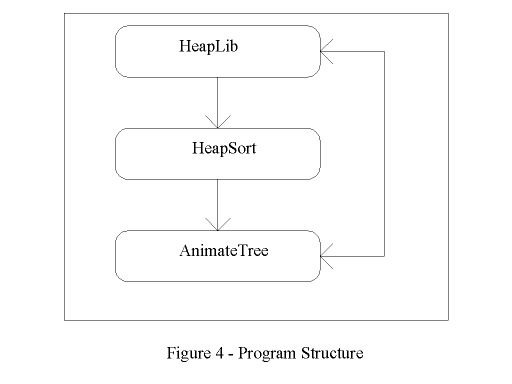
An Ada package representing a tree, animateTree, was created which the student could access to implement the algorithm and animation. The students were to implement the heap sort in a package named heapSort using this tree package. There was another program, heapLib, which implemented the applet and provided the interface to the viewer, and finally the animation was run from an html file.
The flow of the system is a little strange. In a Java applet, the program begins and is controlled in the applet object (in this case, heapLib). However, since we wanted to hide the Java control functions from the students, the decision was made to not allow the student to modify the applet directly. The applet therefore called the student's package, heapSort. Further since normal flow in a program is from main programs to subprograms, the animateTree was implemented so that it appeared to the students program to be a subprogram. animateTree, however, needs to be able to work with the applet to process events such as repainting the screen. The heapLib object therefore first initializes the animateTree object so that it can communicate with the heapLib object. The overall flow of the system is shown in [Figure 4].
An example screen from a run of the heap sort is give in figure 5. A student in the course was interested in animation and the avl tree. This student put together an animation for an AVL tree. A screen from this animation is shown in figure 6.
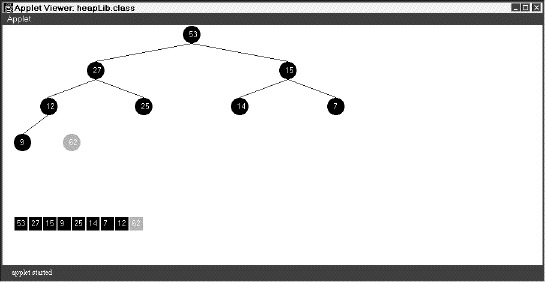
Figure 5: Heap Sort Example

Figure 6. AVL Tree Example
As was mentioned earlier, at the writing of this paper, the course is still in progress, and so there are no results from students to report.
The user interface course is an upper level undergraduate course. The purpose of this course is to teach students about the use and design of toolkits for developing graphical user interfaces. Concepts such as how to implement event trees, call backs, and graphical user interface widgets such as Buttons, Menus and Menu Bars, Scroll Bars, etc, are covered. Also students are taught principles on how to use these tools properly within an interface.
In the first part of the course, the students develop a graphical user interface using a toolkit. This semester, the students developed a system to process income tax forms. The forms allowed the students to input data using a number of widgets, and to keep the form updated through event bindings. Because the AppletMagic(tm) compiler was not available when the course was started, the decision was made to use Tcl/TK to implement the interface.
The second part of the course involved the students creating their own GUI server. This server was to handle multiple windows and event queues. The state and position of the mouse were determined by polling the mouse. A small server was written in AppletMagic(tm) which would store the state of the mouse, and allow the users to retrieve the mouse state. This server applet is in. It is important to note that Java's multi-threaded capability is used in this server, since the Java run time is reporting the mouse events to the server, and the students' programs are querying for those events.
One interesting feature of the server is that it is designed to be used from either Ada or Java, thereby showing the ability to mix languages within Java.
In the course of our using AppletMagic(tm) and Java, we have learned a number of lessons about how to use Java in a course. Here we will try to summarize those lessons.
First, Java applets are very different from traditional main procedures. In an applet, control comes from the browser, and the applet can be thought of as a subprogram. This leads to some problems in structuring programs so that they match the traditional view that the programmer creates a main, and that main then calls functions and procedures. Often the student programs needed to make use of resources in the applet, which really inverted the traditional program hierarchy. Further, the browser was running in a separate thread, and this lead to problems with synchronization as a basically hidden process was executing functions (such as MouseMove) in our applet. This problem is similar to the difference in the flow of control when using Event-Driven programming, and forces the programmer to develop a new model of how a program works. Of course, developing this new model in the students' minds is one of the goals of the user interface course.
Second, the students seemed to get very confused about how to use packages when they are working with Ada in a Java environment. This is probably to be expected, because the concepts of objects, types, and packages do not really correspond that well between Ada and Java. Part of this can be attributed to using the same terms for different concepts (ie, a package). But a lot of it seems to be due to a difficulty of understanding what an object is in Ada. It is not quite a type, and it is not quite a package. While the Ada system is consistent when viewed in isolation, this problem of defining an object becomes a problem when the language is mapped into a system which has a very well defined concept of an object, as in the Java Virtual Machine.
The use of the Java VM and the WWW opens a number of news ways to present course material in computer science. These new environments allow educators the ability to easily interface with a windowing tool kit and to do animations easily. Since Ada now has AppletMagic(tm) which allows it to develop Java applications, Ada can participate in this revolution.
The authors gratefully acknowledge Intermetrics for providing a copy of the AppletMagic(tm) compiler for use in these courses.
This work has been supported by DISA grant DCA100-95-1-1-0011 and ADJPO grant #F29601-93-K-0215.
WITH java.awt.Graphics; USE java.awt.Graphics;
WITH java.awt.Container; USE java.awt.Container;
WITH java.awt.Component; USE java.awt.Component;
WITH java.awt.Color; USE java.awt.Color;
WITH java.lang.Math; USE java.lang.Math;
WITH java.awt.Image; USE java.awt.Image;
WITH conversion; USE conversion;

PACKAGE Animate_Tree IS

  --
  -- These are two sub types. For this animation, all values in the nodes
  -- have to be integers between 0..99. This is so they fit in the circles.
  -- Also, there is a maximum of 32 nodes (5 levels) which can be displayed.
  --
  SUBTYPE Node_Value IS Integer Range 0..99;
  SUBTYPE Node_Pointer IS Integer Range 0..32;

  PROCEDURE Add_Node( Value : Node_Value );
  -- Add_Node adds a node to the tree, where the Node_Value is the integer
  -- value you pass in. You build a tree by successively calling Add_Node.
  -- Pre- Conditions: Value is defined and between 0..99.
  -- Post- Conditions: A new node is created in the tree, with a Node_Value
  -- set to the input Value.
  -- Side- effects: The screen is updated and redrawn.

  FUNCTION Get_Node( Node : Node_Pointer ) RETURN Node_Value;
  -- Get_Node gets the Node_Value in the Node.
  -- Pre_Conditions : The node is in the tree.
  -- Post- Conditions: The value at that node position is returned.

  PROCEDURE Set_Node( Node : Node_Pointer; Value : Node_Value );
  -- Set_Node changes the value in a node. You probably won't need this.
  -- Pre- Conditions: The Node is in the tree, and Value is 0..99.
  -- Post- Conditions: The value in the node is changed.

  FUNCTION Last_Node RETURN Node_Pointer;
  -- Last_Node returns the last node in the current tree. Note that pruned
  -- nodes are still displayed, but are not in the current tree.
  -- Pre- Conditions: None
  -- Post_Conditions: Last node in tree is returned.

  FUNCTION Compare_Node( Node1 : Node_Pointer;
    Node2 : Node_Pointer;
    Node3 : Node_Pointer := 0) RETURN Node_Pointer;
  -- Compare_Node returns the Node_Pointer to the node being compared. Note
  -- that you must supply 2 nodes, but the third node is optional.
  -- Pre- Conditions: The 3 nodes you wish to compare are in the current tree.
  -- Post- Conditions: The pointer to the largest of the 3 nodes compared is
  -- is returned.
  -- Side- Effects: This will cause nodes being compared to flash yellow.

  PROCEDURE Swap_Node( Node1, Node2 : Node_Pointer );
  -- Swap_Node swaps two nodes in the tree.
  -- Pre- Conditions: Both nodes exist in the current tree.
  -- Post- Conditions: The nodes are swapped in the tree.
  -- Side- Effects: This will create an animation where the nodes will
  -- swap on the tree on the screen.

  PROCEDURE Prune;
  -- Prune removes a node from the tree. However, the node is painted red
  -- and left on the screen.
  -- Pre- Conditions: There is at least one node left on the tree.
  -- Post- Conditions: The last node in the tree is "pruned". It is no
  -- longer on the screen, but still appears on the screen
  -- painted red.

  -- You should not need to call the routines below.

  PROCEDURE Display;
  PROCEDURE Initialize(L : Container_Ptr; Image_Map : Image_Ptr);

  Tree_Full : Exception;
  Not_In_Tree : Exception;

PRIVATE
  TYPE Tree_Rec IS RECORD
    Value : Node_Value := 1;
    X_Pos : Integer := 0;
    Y_Pos : Integer := 0;
    Offset_X : Integer := 0;
    Offset_Y : Integer := 0;
  END RECORD;

  -- Note : access to unconstrained array not supported, so I have to work
  -- around this by using a fixed size array and storing the size;
  TYPE Tree_Array IS array(Integer Range <>) of Tree_Rec;
  TYPE Tree_Type IS RECORD
    Size : Node_Pointer := 0;
    Pruned_Nodes : Node_Pointer := 0;
    Max_Size : Node_Pointer := 0;
    Depth : Node_Pointer := 0;
    Data : Tree_Array(1..Node_Pointer'Last);
  END RECORD;
  Tree : Tree_Type;
  Offscreen : Image_Ptr;
  Parent_Obj : Container_Ptr;
  Background : constant Color_Ptr := black;
  SleepTime : Constant Long_Integer := 250;
END Animate_Tree;

WITH java.io.PrintStream; USE java.io.PrintStream;
WITH java.lang.System; USE java.lang.System;
WITH java.lang.String; USE java.lang.String;
WITH java.lang.Thread; USE java.lang.Thread;
WITH Interfaces.Java;
PACKAGE BODY Animate_Tree IS

  FUNCTION "+"(s : String) RETURN Interfaces.Java.Java_String
  RENAMES Interfaces.Java."+";

  FUNCTION Last_Node RETURN Node_Pointer IS
  BEGIN
    RETURN Tree.Size;
  END Last_Node;

  PROCEDURE Add_Node( Value : Node_Value ) IS
  BEGIN
    IF Tree.Size >= Tree.Max_Size THEN
      RAISE Tree_Full;
    END IF;

    Tree.Size := Tree.Size + 1;
    Tree.Data(Tree.Size).Value := Value;
    Display;
    sleep(SleepTime);
  END Add_Node;

  PROCEDURE Erase_Node(g : Graphics_Ptr; Color : Color_Ptr;
                       Node : Node_Pointer) IS
  BEGIN
    SetColor(g, Color);
    fillOval(g, Tree.Data(Node).X_Pos + Tree.Data(Node).Offset_X,
    Tree.Data(Node).Y_Pos + Tree.Data(Node).Offset_Y, 30, 30);
    drawOval(g, Tree.Data(Node).X_Pos + Tree.Data(Node).Offset_X,
    Tree.Data(Node).Y_Pos + Tree.Data(Node).Offset_Y, 30, 30);
  END Erase_Node;

  PROCEDURE Display_Node(g : Graphics_Ptr; Color : Color_Ptr;
    Node : Node_Pointer) IS
  BEGIN
    -- Draw the node on the screen.
    SetColor(g, Color);
    fillOval(g, Tree.Data(Node).X_Pos + Tree.Data(Node).Offset_X,
      Tree.Data(Node).Y_Pos + Tree.Data(Node).Offset_Y, 30, 30);
    SetColor(g, black);
    drawOval(g, Tree.Data(Node).X_Pos + Tree.Data(Node).Offset_X,
      Tree.Data(Node).Y_Pos + Tree.Data(Node).Offset_Y, 30, 30);
    drawString(g, + itoa(Tree.Data(Node).Value),
      Tree.Data(Node).X_Pos + Tree.Data(Node).Offset_X +8,
      Tree.Data(Node).Y_Pos + Tree.Data(Node).Offset_Y +20);

    -- Draw value in array which is displayed at the bottom of the screen
    SetColor(g, Color);
    fillRect(g, 20+((Node- 1)*24), 320, 22, 22);
    SetColor(g, black);
    drawString(g, + itoa(Tree.Data(Node).Value), 20+((Node- 1)*24)+1, 335);
  END Display_Node;

  PROCEDURE Set_Size( Max_Size : Node_Pointer ) IS
    Position_X, Position_Y : Integer;
    Start_Node : Integer;
    Distance_Between_Nodes : Constant Integer := 40;
    Distance_Between_Levels : Constant Integer := 60;
  BEGIN
    -- println(stdout,"In Size");
    Tree.Max_Size := Max_Size;
    -- log works on Base e, so this is a kludge, but it is acutally faster.
    IF (Max_Size <= 1) THEN
      Tree.Depth := 0;
    ELSIF (Max_Size <= 3) THEN
      Tree.Depth := 1;
    ELSIF (Max_Size <= 7) THEN
      Tree.Depth := 2;
    ELSIF (Max_Size <= 15) THEN
      Tree.Depth := 3;
    ELSIF (Max_Size <= 31) THEN
      Tree.Depth := 4;
    ELSE
      Tree.Depth := 5;
    END IF;

    -- Fill in the node positions for the bottom of the tree.
    Position_Y := Distance_Between_Levels * Tree.Depth;
    Start_Node := Integer(pow(Long_Float(2),Long_Float(Tree.Depth)));
    FOR j IN 0..Start_Node LOOP
      Tree.Data(j+Start_Node).X_Pos := j * Distance_Between_Nodes;
      Tree.Data(j+Start_Node).Y_Pos := Position_Y;
    END LOOP;

    FOR i IN REVERSE 0..Tree.Depth- 1 LOOP

    -- Here we set up for the positions of each of the nodes `
    -- above the bottom level. The nodes at the level above
    -- the bottom are the average of the placement of
    -- the two child nodes X positions. Y positions are simply the
    -- number of levels down times a constant. This allows us to
    -- handle trees with 1..TreeSize nodes. Note that we fill in
    -- the positions of the entire last level, even if they aren't
    -- displayed. This allows our algorithm to work on parents.

    Position_Y := 60 * i;
    Start_Node := Integer(pow(Long_Float(2),Long_Float(i)));
      FOR j IN 0..Start_Node- 1 LOOP
        Tree.Data(j+Start_Node).X_Pos :=
          ( Tree.Data((j+Start_Node)*2).X_Pos +
            Tree.Data(((j+Start_Node)*2) + 1).X_Pos ) / 2;
        Tree.Data(j+Start_Node).Y_Pos := Position_Y;
      END LOOP;
    END LOOP;

  END Set_Size;

  PROCEDURE Initialize(L : Container_Ptr; Image_Map : Image_Ptr) IS
  BEGIN
    Parent_Obj := L;
    Offscreen := Image_Map;
    Set_Size(31);
  END Initialize;

  PROCEDURE Display IS
    End_Node, To_Node : Integer;
    BufferG : Graphics_Ptr;
  BEGIN
    BufferG := getGraphics(Offscreen);

    -- Erase anythign already in the buffer.

    SetColor(BufferG, Background);
    fillRect(BufferG, 0, 0, 900,400);

    -- Draw Nodes in the current tree.
    FOR i IN 1..Tree.Size LOOP
      Display_Node(BufferG, white, i);
    END LOOP;

    -- Draw Pruned nodes.
    FOR i IN Tree.Size+1..Tree.Size + Tree.Pruned_Nodes LOOP
      Display_Node(BufferG, red, i);
    END LOOP;

    -- Draw the lines between the nodes.
    IF (Tree.Depth = 0) THEN
      End_Node := 0;
    ELSE
      End_Node := Integer(pow(Long_Float(2), Long_Float(Tree.Depth ))) - 1;
    END IF;

    SetColor(BufferG, White);
    FOR i IN 1..End_Node LOOP
      To_Node := I * 2;
      IF (To_Node <= Tree.Size) THEN
        drawLine(BufferG, Tree.Data(i).X_Pos+15, Tree.Data(i).Y_Pos+30,
          Tree.data(To_Node).X_Pos+15, Tree.Data(To_Node).Y_Pos);
      END IF;
      To_Node := (I * 2) + 1;
      IF To_Node <= Tree.Size THEN
        drawLine(BufferG, Tree.Data(i).X_Pos+15, Tree.Data(i).Y_Pos+30,
          Tree.data(To_Node).X_Pos+15, Tree.Data(To_Node).Y_Pos);
      END IF;
    END LOOP;
    -- Draw the image we created on the screen.
    repaint(Parent_Obj);
    sleep(10);
  END Display;

  FUNCTION Get_Node( Node : Node_Pointer ) RETURN node_value IS
  BEGIN
    IF Node > Tree.Size THEN
      RAISE Not_In_Tree;
    END IF;

    RETURN Tree.Data(Node).Value;
  END Get_Node;

  PROCEDURE Set_Node( Node : Node_Pointer; Value : Node_Value ) IS
  BEGIN
    IF Node > Tree.Size THEN
      RAISE Not_In_Tree;
    END IF;

    Tree.Data(Node).Value := Value;
  END Set_Node;

  PROCEDURE Swap_Node( Node1, Node2 : Node_Pointer ) IS
    BufferG : Graphics_Ptr;
    Temp_Value : Node_Value;
    Delta_X, Delta_Y : Float;
  BEGIN
    BufferG := getGraphics(Offscreen);

    -- Calculate the step size for moving the nodes.
    Delta_X := Float(Tree.Data(Node2).X_Pos - Tree.Data(Node1).X_Pos);
    Delta_Y := Float(Tree.Data(Node2).Y_Pos - Tree.Data(Node1).Y_Pos);

    -- Move the nodes in 6 steps.
    FOR i IN 1..6 LOOP
      Tree.Data(Node1).Offset_X := I * Integer(Delta_X / 6.0);
      Tree.Data(Node1).Offset_Y := I * Integer(Delta_Y / 6.0);
      Tree.Data(Node2).Offset_X := - (I * Integer(Delta_X / 6.0));
      Tree.Data(Node2).Offset_Y := - (I * Integer(Delta_Y / 6.0));
      Display;
      sleep(SleepTime);
    END LOOP;
    -- Values are moved, so swap the nodes.
    Temp_Value := Tree.Data(Node1).Value;
    Tree.Data(Node1).Value := Tree.Data(Node2).Value;
    Tree.Data(Node2).Value := Temp_Value;
    Tree.Data(Node1).Offset_X := 0;
    Tree.Data(Node1).Offset_Y := 0;
    Tree.Data(Node2).Offset_X := 0;
    Tree.Data(Node2).Offset_Y := 0;
    Display;

  END Swap_Node;

  FUNCTION Compare_Node( Node1 : Node_Pointer;
    Node2 : Node_Pointer;
    Node3 : Node_Pointer := 0) RETURN Node_Pointer IS
    BufferG : Graphics_Ptr;
    Max_Node : Node_Value;
    Ret_Node : Node_Pointer;
  BEGIN
    BufferG := getGraphics(Offscreen);

    -- Flash the nodes to be swapped.
    FOR i IN 1..3 LOOP
      Display_Node(BufferG, yellow, Node1);
      Display_Node(BufferG, yellow, Node2);
      IF Node3 /= 0 THEN
        Display_Node(BufferG, yellow, Node3);
      END IF;
      repaint(Parent_Obj);
      sleep(SleepTime);
      Display_Node(BufferG, white, Node1);
      Display_Node(BufferG, white, Node2);
      IF Node3 /= 0 THEN
        Display_Node(BufferG, white, Node3);
      END IF;
      repaint(Parent_Obj);
      sleep(SleepTime);
    END LOOP;

    -- Figure out the biggest node, and return it.
    Max_Node := Tree.Data(Node1).Value;
    Ret_Node := Node1;
    IF Max_Node < Tree.Data(Node2).Value THEN
      Max_Node := Tree.Data(Node2).Value;
      Ret_Node := Node2;
    END IF;
    IF Node3 /= 0
    AND THEN Max_Node < Tree.Data(Node3).Value THEN
      Ret_Node := Node3;
    END IF;
    RETURN Ret_Node;
  END Compare_Node;

  PROCEDURE Prune IS
    BufferG : Graphics_Ptr;
  BEGIN
    BufferG := getGraphics(Offscreen);
    Display_Node(BufferG, red, Tree.Size);
    -- Do I need anything but these two lines?
    Tree.Size := Tree.Size - 1;
    Tree.Pruned_Nodes := Tree.Pruned_Nodes + 1;
    IF Tree.Size > 1 THEN
      SetColor(BufferG, Black);
      drawLine(BufferG, Tree.Data(Tree.Size- 1).X_Pos+15,
      Tree.Data(Tree.Size- 1).Y_Pos+30,
      Tree.data(Tree.Size).X_Pos+15,
      Tree.Data(Tree.Size).Y_Pos);
    END IF;
  -- And these two lines?
  Display;
  sleep(SleepTime);
  END Prune;

END Animate_Tree;
PRAGMA Suppress(All_Checks);
WITH Animate_Tree; USE Animate_Tree;
PACKAGE heapSort IS
  PROCEDURE start;
  PROCEDURE Sort_Heap;
  PROCEDURE Almost_Heap_To_Heap;
  PROCEDURE Extend_Heap(New_Value : Integer);
PRIVATE
END heapSort;

PACKAGE BODY heapSort Is

  PROCEDURE Extend_Heap(New_Value : Integer) IS
    Child : Integer;
    Parent : Integer;
  BEGIN
    Add_Node(New_Value);
    Child := Last_Node;
    IF Child = 1 THEN
      RETURN;
    END IF;

    Parent := Child / 2;
    WHILE Parent >= 1 LOOP
      IF Compare_Node(Parent, Child) = Parent THEN
        EXIT;
      END IF;
      Swap_Node(Parent, Child);
      Child := Parent;
      Parent := Parent / 2;
    END LOOP;
  END Extend_Heap;

  PROCEDURE Almost_Heap_To_Heap IS
    Child : Integer;
    Parent : Integer;
    Largest_Node : Integer;
  BEGIN
    IF Last_Node = 1 THEN
      RETURN;
    END IF;
    Parent := 1;
    Child := 2;

    WHILE (Child <= Last_Node) LOOP
      IF (Child+1) <= Last_Node THEN
        Largest_Node := Compare_Node(Parent, Child, (Child+1));
      ELSE
        Largest_Node := Compare_Node(Parent, Child);
      END IF;

      IF Largest_Node = Parent THEN
        EXIT;
      END IF;

      Swap_Node(Parent, Largest_Node);
      Parent := Largest_Node;
      Child := Parent * 2;
    END LOOP;
  END Almost_Heap_To_Heap;

  PROCEDURE Sort_Heap is
  BEGIN
    WHILE Last_Node > 1 LOOP
      Swap_Node(1, Last_Node);
      Prune;
      Almost_Heap_To_Heap;
    END LOOP;
    Prune;
  END Sort_Heap;

  PROCEDURE start IS
    Biggest_Node : Node_Pointer;
  BEGIN
    Extend_Heap(12);
    Extend_Heap(15);
    Extend_Heap(25);
    Extend_Heap(27);
    Extend_Heap(53);
    Extend_Heap(14);
    Extend_Heap(7);
    Extend_Heap(62);
    Extend_Heap(9);
    Sort_Heap;
  END start;

END heapSort;
PRAGMA Suppress(All_Checks);

WITH java.applet.Applet; USE java.applet.Applet;
WITH java.awt.Graphics; USE java.awt.Graphics;
WITH java.awt.Image; USE java.awt.Image;
WITH java.lang.Runnable; USE java.lang.Runnable;
WITH java.lang.Thread; USE java.lang.Thread;
WITH heapSort; USE heapSort;

PACKAGE heapLib IS
  TYPE heapLib_Obj IS new Applet_Obj WITH PRIVATE;
  TYPE heapLib_Ptr IS access heapLib_Obj;

  PROCEDURE start(L : access heapLib_Obj);
  PROCEDURE init(L : access heapLib_Obj);
  PROCEDURE run(L : access heapLib_Obj);
  PROCEDURE paint(L : access heapLib_Obj;
    g : Graphics_Ptr);
  PROCEDURE update(L : access HeapLib_Obj; G : Graphics_Ptr);

PRIVATE
  Offscreen : Image_Ptr;
  TYPE heapLib_Obj IS new Applet_Obj WITH RECORD
    kicker : Thread_Ptr := NULL;
  END RECORD;

PRAGMA Convention(Java, run);   -- So matches Runnable.run
END heapLib;

WITH Interfaces.Java;
WITH java.lang.System; USE java.lang.System;
WITH java.io.PrintStream; USE java.io.PrintStream;
WITH java.awt.Container; USE java.awt.Container;
WITH java.awt.Component; USE java.awt.Component;
WITH java.lang.String; USE java.lang.String;
WITH Animate_Tree; USE Animate_Tree;

PACKAGE BODY heapLib IS

  function "+"(s : String) return Interfaces.Java.Java_String
    renames Interfaces.Java."+";

    -- Update without erasing the background.
  PROCEDURE update(L : access HeapLib_Obj; G : Graphics_Ptr) IS
  BEGIN
    paint(L, g);
  END update;

  PROCEDURE run(L : access heapLib_Obj) IS
  BEGIN
    setPriority(currentThread, MIN_PRIORITY);
    Animate_Tree.Initialize(Container_Ptr(L), Offscreen);
    heapSort.start;
  END run;

  PROCEDURE paint(L : access heapLib_Obj;
    g : Graphics_Ptr) IS
    Image_Done : Boolean;
  BEGIN
    Image_Done := drawImage(g, Offscreen, 0, 0, NULL);
    show(L);
  END paint;

  PROCEDURE init(L : access heapLib_Obj) IS
    Temp : Component_Ptr;
    Prompt : String_Ptr;
  BEGIN

    IF Offscreen = NULL THEN
      Offscreen := createImage(L, 900, 400);
    END IF;

      -- println (stdout, "in heap init");
  END init;

    -- Start the applet by forking an animation thread.
  PROCEDURE start(L : access heapLib_Obj) IS
  USE java.lang;
  BEGIN

      -- Create the thread
    IF L.kicker = NULL then
      L.kicker := new_Thread(Runnable_Obj(Object'Class(L.all))'Access,
                           +"Life thread");
      start(L.kicker);
    END IF;
  END start;
END heapLib;
<title>Heap Sort Demonstration</title>
<hr>
<applet code=heapLib.class width=900 height=400>
</applet>
<hr>
PRAGMA Suppress(All_Checks);

WITH java.applet.Applet;
WITH java.awt.Graphics;
WITH java.lang.Thread;
WITH java.lang.String;
WITH java.awt.Event;
WITH java.awt.Color;

PACKAGE CS187 IS
  TYPE CS187_Obj IS NEW java.applet.Applet.Applet_Obj WITH PRIVATE;
  TYPE CS187_Ptr IS ACCESS CS187_Obj;

  TYPE Mouse_Button IS (Up, Down);
  TYPE Mouse_Event IS RECORD
    X,Y : Integer := 0;
    Button_Status : Mouse_Button := UP;
  END RECORD;

  FUNCTION Initialize_Mouse RETURN Mouse_Event;
    -- Initialize_Mouse allows the mouse to be set into a consistant
    -- state.
    -- Pre Conditions : None.
    -- Post Conditions : Ret_Event has the position of the mouse on the
    -- canvas. Mouse is initialized.

  PROCEDURE Initialize_Mouse( Ret_Event : in out Mouse_Event );
    -- Initialize_Mouse allows the mouse to be set into a consistant
    -- state.
    -- Pre Conditions : None.
    -- Post Conditions : Ret_Event has the position of the mouse on the
    -- canvas. Mouse is initialized.

  FUNCTION Get_Mouse RETURN Mouse_Event;
    -- Get_Mouse gets the current state of the mouse
    -- Pre Conditions : None
    -- Post Conditions : Ret_Event has the position of the mouse on the
    -- canvas, and the button status.

  PROCEDURE Get_Mouse( Ret_Event : in out Mouse_Event );
    -- Get_Mouse gets the current state of the mouse
    -- Pre Conditions : None
    -- Post Conditions : Ret_Event has the position of the mouse on the
    -- canvas, and the button status.

  PROCEDURE Draw_Box( X, Y, Width, Height : Integer;
    This_Color : java.awt.Color.color_Ptr := java.awt.Color.black);
    -- Draw_Box draws a box at the specified coordinates on the canvas.
    -- Pre Conditions : The X, Y coordinates and width and height are
    -- specified.
    -- Post Conditions : A box is drawn on the canvas.

  PROCEDURE Post_Event( ID : String; Event_Type : String;
    Screen_X, Screen_Y : Integer;
    Window_X, Window_Y : Integer);
    -- Post_Event draws the Event window on the canvas with the appropriate
    -- information about the event.
    -- Pre Conditions : ID - The ID of the widget posting this Event.
    -- Event_Type - A string identifying the Event.
    -- Screen_X and Screen_Y - The Screen coordinates
    -- Window_X and Window_Y - The Window coordinates
    -- Post Conditions : Event is posted to the screen.

  PROCEDURE Post_Event_Java( ID : java.lang.String.String_Ptr;
    Event_Type : java.lang.String.String_Ptr;
    Screen_X, Screen_Y : Integer;
    Window_X, Window_Y : Integer);
    -- Post_Event draws the Event window on the canvas with the appropriate
    -- information about the event.
    -- Pre Conditions : ID - The ID of the widget posting this Event.
    -- Event_Type - A string identifying the Event.
    -- Screen_X and Screen_Y - The Screen coordinates
    -- Window_X and Window_Y - The Window coordinates
    -- Post Conditions : Event is posted to the screen.

    --
    -- The following procedures are needed to simply start the applet. You
    -- do not need to use them in your projects.
    --
  PROCEDURE start(L : ACCESS CS187_Obj);
  PROCEDURE init(L : ACCESS CS187_Obj);
  PROCEDURE run(L : ACCESS CS187_Obj);
  FUNCTION mouseMove(L : ACCESS CS187_Obj;
    evt : java.awt.Event.Event_Ptr;
    x : Integer; y : Integer) RETURN Boolean;
  FUNCTION mouseDown(L : ACCESS CS187_Obj;
    evt : java.awt.Event.Event_Ptr;
    x : Integer; y : Integer) RETURN Boolean;
  FUNCTION mouseUp(L : ACCESS CS187_Obj;
    evt : java.awt.Event.Event_Ptr;
    x : Integer; y : Integer) RETURN Boolean;
  PROCEDURE update(L : ACCESS CS187_Obj;
    g : java.awt.Graphics.Graphics_Ptr);
  PROCEDURE paint(L : ACCESS CS187_Obj;
    g : java.awt.Graphics.Graphics_Ptr);

PRIVATE
  TYPE CS187_Obj IS NEW java.applet.Applet.Applet_Obj WITH RECORD
    kicker : java.lang.Thread.Thread_Ptr := null;
  END RECORD;

PRAGMA Convention(Java, run);
END CS187;
WITH java.lang;
WITH java.lang.Thread;
WITH java.lang.String;
WITH java.lang.Runnable;
WITH Interfaces.Java;
WITH CS187;

PACKAGE Student IS
  TYPE Student_Obj IS NEW java.lang.Object WITH NULL RECORD;
  type Student_Ptr is access all Student_Obj'Class;

  -- start your program.
  PROCEDURE start(Parent : ACCESS CS187.CS187_Obj);

PRIVATE
  Student_Process : Student_Ptr;
END Student;

WITH java.lang.System;
WITH java.io.PrintStream;
WITH java.lang.Runnable;
WITH CS187;
PACKAGE BODY Student IS

  --
  -- Your program starts here.
  --
  PROCEDURE run(L : ACCESS Student_Obj) IS
  BEGIN
    CS187.Post_Event("5", "Any", 100,100, 300, 400);
  END run;

END Student;
import java.lang.*;
import java.awt.*;
import CS187;

public class
Student
{
static cs187.Mouse_Event My_Event;

public static void start(CS187 Parent, int dummy)
{
My_Event = CS187.Initialize_Mouse();
CS187.Draw_Box(100, 100, 50, 50, java.awt.Color.red);
CS187.Post_Event_Java("aa", "bb", My_Event.X,My_Event.Y,
                       My_Event.X,My_Event.Y);
}
}