Overview This page is designed to teach you, the programmer, how to make your programs be distributable by making those neat "setup" programs which install your application onto a Windows computer. You will learn how to create a basic script which will be able to copy files to a folder and set up start menu shortcuts, etc. Also, you will learn how to make your programs uninstallable. What is NSIS (Nullsoft Scriptable Install System A.K.A. Nullsoft Super-Pimp Installation System) ?
If you have installed WinAmp, then you have used an NSIS program to install
your software. Why? Because the same people that make WinAMP, Nullsoft
Inc., are the ones that have made this great tool for packaging and
making your program accessible. Their reason for developing it was
mainly to make WinAMP easily distributable, but they then decided
to release their installation software to everyone for free. NSIS,
as their owners call it, is "the scriptable win32 installer/uninstaller
system that doesn't suck and isn't huge." How does NSIS work? Once your program is ready to be "deployed" to the world, you need a way to let other people install/uninstall your software. You might not even be a programmer, but need some way of easily letting someone have some files. NSIS packs & compresses all your files into a creates a single .exe file for installing your software. So, the final product is one "setup.exe" file which is easily downloadable and runnable by others. To make a setup executable, you have to write a script of what needs to happen. That is, in that script you will write the following:
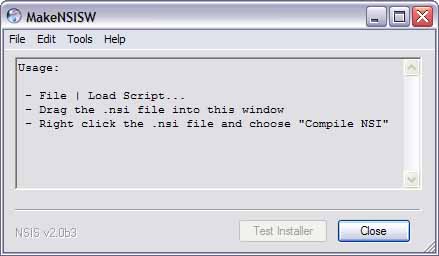
This is easier than you might think it is. A NSIS script has the extension .nsi, and can be written in any text editor. In that way it's like writing HTML for doing webpages: you could write it in Notepad, or you could write it in Macromedia Dreamweaver. Similarly, there are programs available that let you edit the scripts and provide some useful functions So instead of having to create your own GUI for installing your program and then somehow figuring out how to package everything so that a novice user can download it, you just write in the script what you want to happen, and NSIS will take care of the GUI for you. Setting up your the NSIS system on your computer Once you have written the script it has to be read-in by a "compiler" which will read through your instructions and create the single .exe file you wanted. To get the compiler you have to download NSIS from Nullsoft. You can get it here or by going down to the links section. Once you install this, you are able to compile your .nsi files using the program "MakeNSISW." Just open the program, and then drag and .nsi file into the GUI and it will compile the script into your executable, or it will tell if you made any mistakes in the script and offer some debugging. Below is what the MakeNSISW program looks like:
A Basic .nsi Script The scripting language used by NSIS lets you do a lot of things, so your installation can be as complex as setting up WinAMP, or as simple as just copying a couple of files to a directory. The best source for describing all the functions and capabilities of NSIS is in Nullsoft's NSIS User Manual. It lists all of the features available, so if you have any specific requirements for installing your program, be sure to check it out.
Let's look at the script more closely: Installer Attributes The first few instructions all define installer attributes. They are used to present the installer to the user. Things that are commonly set here are the order of windows to show, and the text that is shown on each window
Sections Every installation script has at least one "section." Since a typical program has different components that can be optionally installed, the code to copy files associate with certain components is included in sections. For example, some programs install themselves and then offer to install other, supplemental software or plug-ins. If you think about the program you installed most recently, chances are it gaves you some options of what you wanted installed. If the user checks a component to be installed, then that components files much be copied. These components are then installed in "sections." If your program doesn't have any extras or optional components, then all you need is one section. Think of it as your application has only one component and that component is ALWAYS installed. Sections are usually named and their is displayed to the user as the name of the component. Since we have only one section, the name isn't important, as it won't even be displayed.
Typically
sections have a start and an end. All lines inbetween are instructions
for what to install for that component. In the basic example, all
that the installer does is set the output path to be the installation
directory, and then copies one file, "MyProg.exe," to that
path. The following is just a small description of how to go about doing some more advanced things. Please refer to the NSIS User's Manual for complete information.
Making your application uninstallable We would all love if programmers remembered to uninstall everything that they installed into your system. So, here's your chance to do your part! To make your application uninstallable, you must create a section and name it "Uninstall." In there, you put commands to delete all the files and directories, and change whatever settings you set when you installed the application onto the computer. Finally, you put the command WriteUninstaller $INSTDIR\Uninstall.exe into the section where you do the actual installation. And that's it! When compiling your script, NSIS will look for a section called "Uninstall" and if so, will create an .exe file (based on the name you provided in "WriteUninstaller $INSTDIR\_____"). Here is an example of an uninstall section (the parts that are need to make your application uninstallable are colored:
Creating Start Menu Items For those of you who don't know, the start menu / Programs is actually a folder which sits in your computer (inside C:\Windows under 9x/ME, and under "C:\Documents and Settings\Username\Start Menu\Programs" for XP), and as a bunch of links. To create start menu items, you just need to use the functions CreateDirectory and CreateShortCut to add links to the start menu. The following is a small example on creating shortcuts. Please read the User's Manual and go to the Forums for information on creating different kinds of shortcuts In a section which is installing files:
The above statements will create a program group in your start menu called "Rizwan Inc." and in there it will create a shortcut called "Run Rizwan's Program", which in turn points to the actual program, in this case called "Rizwan.exe." For sake of example, another shortcut is created called "Open Notepad" which opens the Windows Notepad program. Notice that the term $SMPROGRAMS is built-in to make it very easy for you to install it to the start menu. You don't have to worry about where exactly the start menu is and for which user you are installing it for ($SMPROGRAMS points to the start menu of the current user) If you have created shortcuts, then you should also remove them when you are uninstalling. This is done in the same way as deleting any other file or folder For example, under the Uninstall section:
NSIS and Java Let's make an installer for a Java application. Java applications are started with a "java MyApplication" kind of call. That is, it is a call to the Java Virtual Machine (java.exe) to load the .class file "MyApplication.class." For that reason (and some others), java application installers must be differ from regular application installers in the following ways:
Java applications are not much different from regular Windows applications, except for that they are not .exe files, but are .class files which javaw.exe must start. Javaw.exe is the version of java.exe which suppresses the System.out stream, which also removes the need for a DOS prompt which typically shows up every time you run a java program. Checking for a Java Runtime Environment If a JRE is installed, the windows\system32 directory will have both java.exe and javaw.exe, so we can check for the existence of those files to tell if a JRE exists. The NSIS Archive actually has a example of how to check the JDK version, so that is worth taking a look at. If the system doesn't have a JRE installed, then it won't be able to launch java applications. You could either notify the user and direct him/her where to download a JRE, or provide one from within our installation package. The JRE from Sun Microsystems is freely available to download and can be freely distributed as well, so that is another strategy for ensuring that java is installed. We could just download the JRE installer from Sun Microsystems, and then provide that as part of the installation. How do you run a program from the installer? If you use the Exec command from NSIS, we can "execute" the JRE installer that we packaged as part of our installer. However, Exec runs the command and continues immediately; it is a non-blocking call. What we would like is for the JRE to install and then continue on with the rest of the installation. For that reason, use ExecWait. Just make sure that the JRE installer is first extracted with the File command to either a temp directory or the install directory first and then execute that. Environment Variables To set environment variables, the NSIS Archive has a great example / tutorial on how to set environment variables. How does a java application find all the classes that it uses? (Setting the working directory) In almost all operating systems, a call can be made to an executable file from anywhere. Suppose you have MyApplication.exe placed in C:\TestExe\. To run MyApplication.exe, you typically would go to the TestExe directory and then call: C:\TextExe\> MyApplication However, we could be in a folder like C:\Another_Folder\Inside_yet_another_folder\ and still be able to execute MyApplication.exe. How? Like this: C:\Another_Folder\Inside_yet_another_folder\> C:\TestExe\MyApplication This kind of example works in Unix as well (of course, the directories wouldn't be starting with "C:". What is different about these two program calls. The working directory of each application is different. In the first example, the working directory is C:\TestExe because that is where we launched the application from. In the second example the working directory is C:\Another_Folder\Inside_yet_another_folder . The working directory is the directory from which the application is launched. As you have seen, it doesn't necessarily have to be the directory where the program is installed. Go to your start menu, and under programs, find a shortcut. Right-click on this shortcut and now in the new window, look at the text box labelled "Start In:". That is the working directory of that application. How do we make sure that the working directory in our shortcuts are where we want them to be? There is no parameter to set for that in the CreateShortcut function in NSIS. Look back to the first example where we created start menu shortcuts. Notice that we have set an Outpath for copying files. This Outpath is ALSO set as the working directory for every shortcut that is created after that SetOutPath command. If you would like to change the working directory of a shortcut, then simply change the OutPath to what you would like, create the shortcut, and then, if you want, change the OutPath back. Creating Start Menu shortcuts for running java .classes Typically, the target of a shortcut in the start menu is a simple .exe file or a .bat file of some sort. If you look at any shortcut's properties in your start menu, you may notice that the "Target" field is in quotations. For simple targets, Windows likes to put quotes around the entire call. What happens when you have a target that takes in some kind of command line parameter? For example, you have a .exe file but it takes a number after it. The call to the function would have to be something like: C:\Path_of_exe_file\MyApplication.exe 5 When you have some target such as this, Windows doesn't like to put quotes around the program call. Why does this matter to a java application? Since to run a java program, one has to type "javaw MyApplication," it can be seen as a call to an .exe file ("javaw.exe") which takes in a parameter (the class name, or "MyApplication). Thus, we cannot have quotes around the target in our shortcut. The following then, will not work: CreateShortCut "$SMPROGRAMS\Rizwan Inc.\Run Rizwan's Java Program.lnk" "$SYSDIR\javaw.exe MyApplication" What we need to do is create a shortcut for executing 'javaw.exe' but pass the classname, jar file, or other stuff as a parameter. This is done by simply adding another "quotation" part after the executable part, like this: CreateShortCut "$DESKTOP\Run My Java Program.lnk" "$SYSDIR\javaw.exe" "MyJavaClass" To run a java class from a jar file, you can type something like this: CreateShortCut "$DESKTOP\Run My Java Program.lnk" "$SYSDIR\javaw.exe" "-jar MyGreatJarFile.jar" The extra "quotation" section with our classname is all you need to run your java application. If you like, you can attach an icon to your java application, by adding ANOTHER quotation section like so: CreateShortCut "$DESKTOP\Run My Java Program.lnk" "$SYSDIR\javaw.exe" "MyJavaClass" "$INSTDIR\MyIcon.ico" Of course, you'll need your icon file to be installed to your installed directory, so don't forget to do that. A Java Example Here is the .nsi script for a program which installs a Java application which uses one .class file, NSISExampleApplication1.class. More specifically, it does the following:
Look at the script below for doing the above tasks. It may look a little intimidating, but there is a lot of whitespace and comments to make it easier to understand:
If you have NSIS installed, then compile the script and files and see what happens. Download and extract: NSISExampleApplication.zip (4K) If you would like to just get the installer .exe, download: Setup_NSISExampleApp1.exe (39K) Resources This is by no means a complete guide to creating an installer. Please look at the following links for more information.
|
|||||||||||||||||||||||||||||||||||||||||||||||||||||||||||||||